BMS - Banquet Management System User Guide
1. Overview
This BQS Operation guide explains how to use the BQS (Banquet Quotation System) for Sales / Event / Operations teams to manage banquet events end-to-end. It covers the full process from creating an Event, preparing a Quotation, generating operational documents such as the BEO / Function Sheet, recording and tracking Deposits, to Confirming the event and handing over relevant information to the operations team or other connected systems.
2. Contract Profile Center
This function allows users to manage contracts, including corporate, direct, and complimentary agreements with companies or partners. It supports creating and maintaining contract records, linking rates, managing contract contacts, and updating contract status and related documents to ensure accurate and consistent contract management.
To perform the task:
-
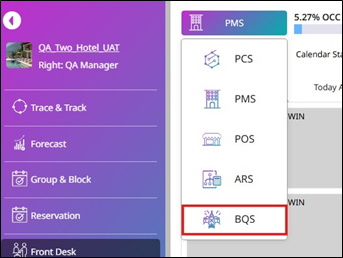
Press on the Business Unit.
-
Press BQS.
-
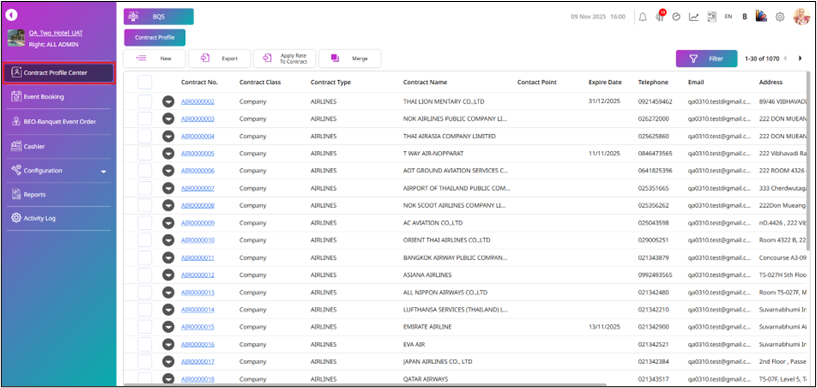
Press Contract Profile Center.
-
Press New to create the contract.
-
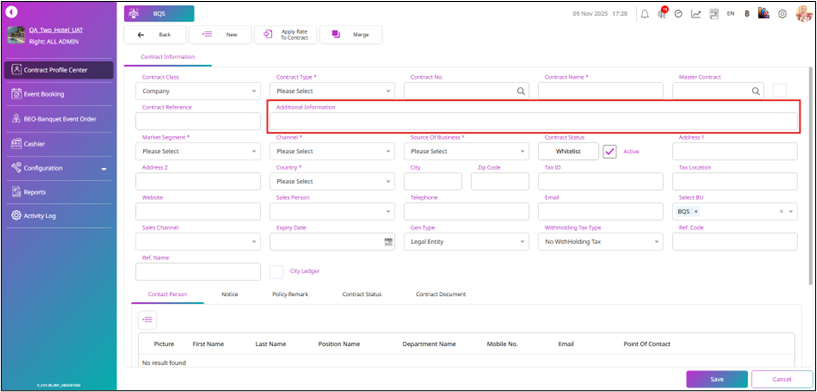
Fill in the required information (Contract Type, Contract Name, Market Segment, Country, etc.).
-
If BQS is selected in Select BU, the system will display the Additional Information section.
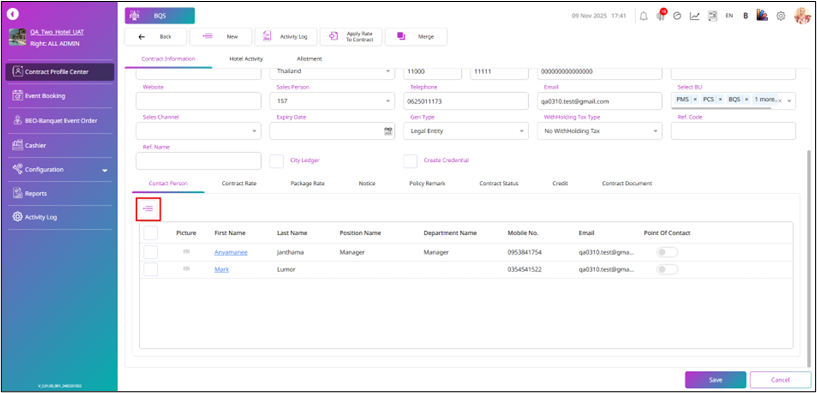
- To add a contact person, press New. The Contact Person pop-up window will be displayed.
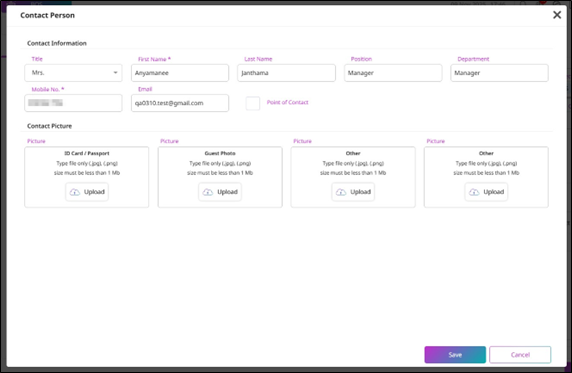
- Fill in the required contact information and press Save.
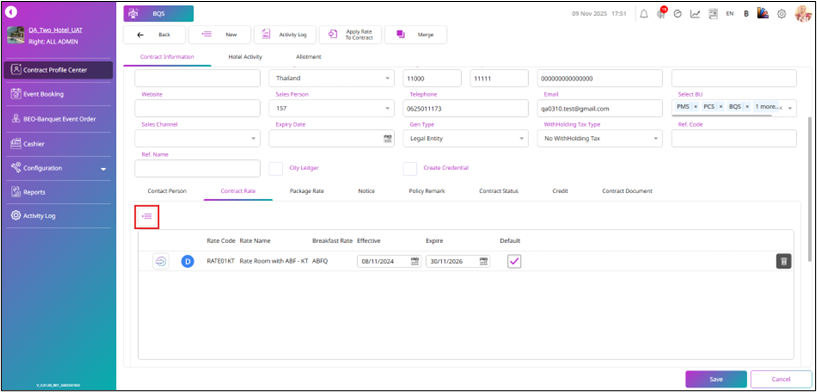
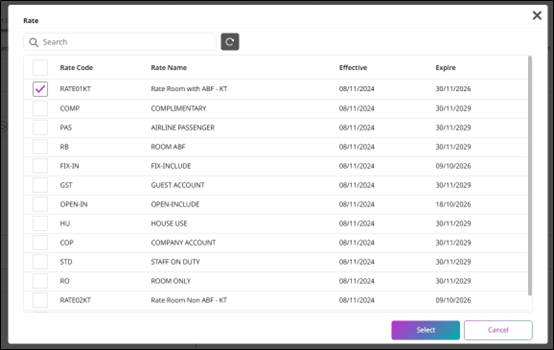
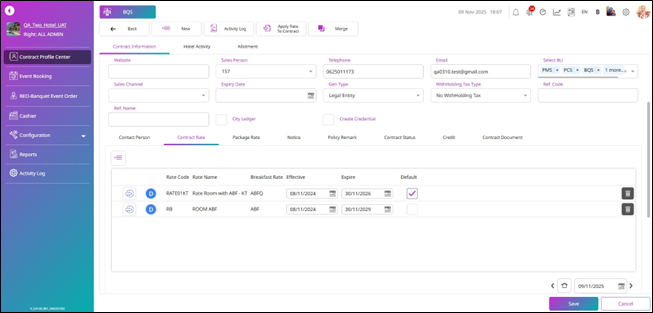
- To add a contract rate, press New. The Rate pop-up window will be displayed.
- Select the rate and press Select.
- To use the contract with the BQS system, you must select the Default Rate.
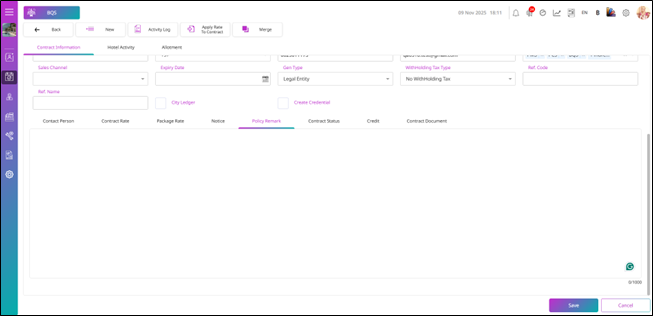
- Select Notice & Policy Remark to add remarks and enter the information.
-
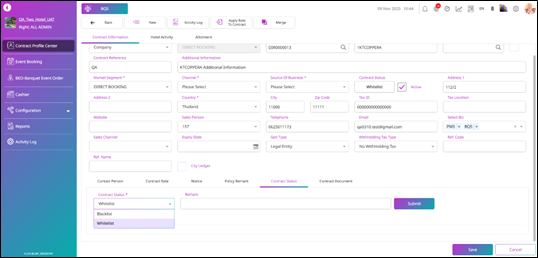
Select Contract Status to update the contract status and choose the appropriate status.
- Whitelist means the contract partner is approved to do business with the hotel under normal conditions.
- Blacklist means the contract partner is restricted or blocked from hotel transactions.
-
Press Submit to confirm.
-
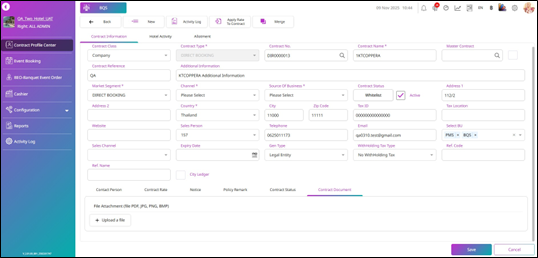
To add a contract document, press Upload a file. Only PDF, JPG, PNG, and BMP files are allowed, and only one file can be uploaded.
-
Press Save to confirm and save the information.
-
Press Cancel to cancel the action.
3. Event Booking
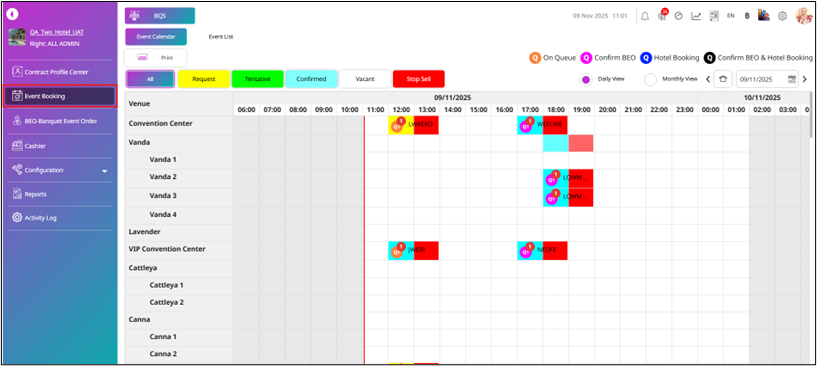
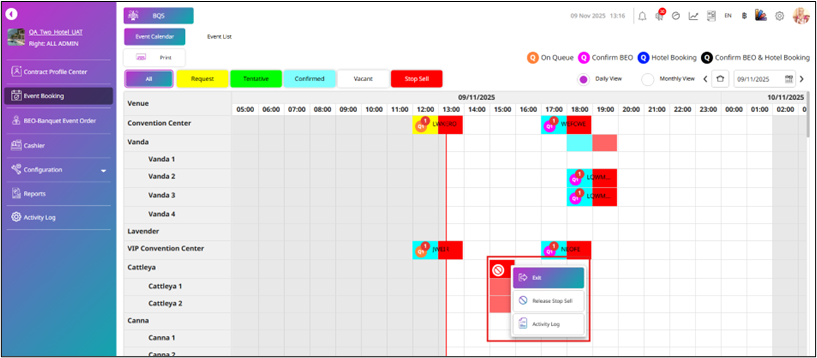
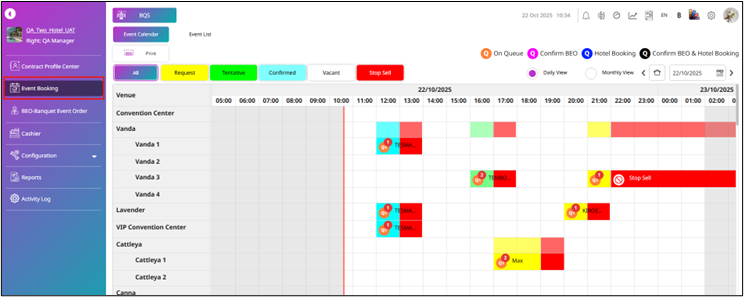
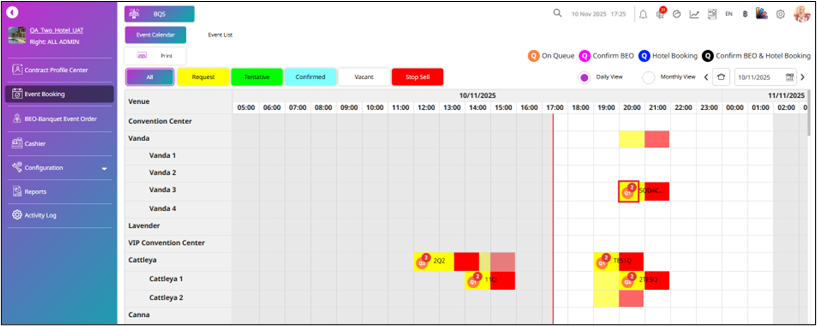
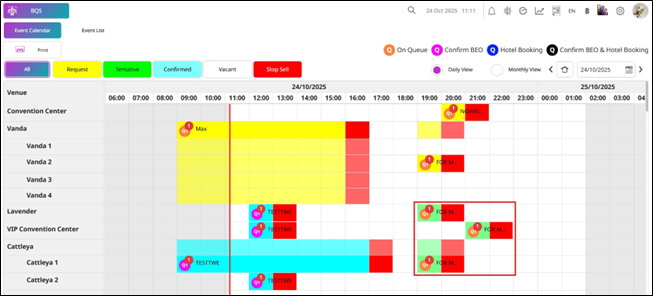
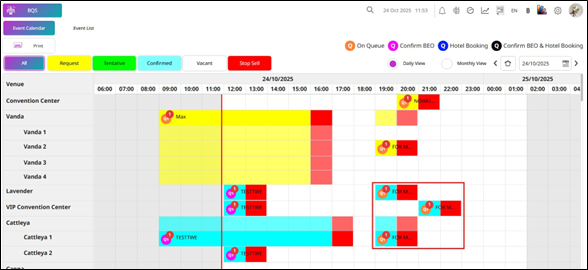
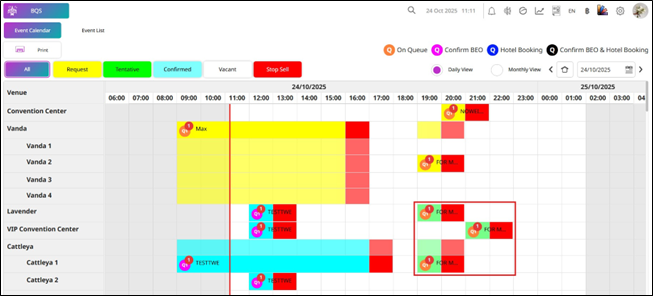
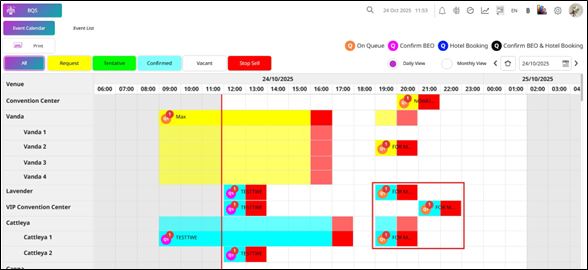
Available under BQS > Banquet Event > Calendar Event, this function provides a calendar view of all banquet events, allowing users to easily view, track, and manage event schedules by date. Users can also manage banquet bookings directly from this screen. The calendar uses color indicators to display booking statuses: Yellow indicates Request status, Light Blue indicates Confirmed Booking, Green indicates Tentative status, and Red indicates Stop Sell status. Queue information is also displayed on the calendar. The label Q1 indicates that the booking is Queue 1, while the number shown above represents the total number of queues for that room during the selected period. Queue colors provide additional details: Orange indicates a booking in queue, Pink indicates a booking with a Confirmed BEO, Blue indicates a booking that has been booked in the hotel, and Black indicates a booking that has both a Confirmed BEO and is booked in the hotel. Users can switch between Daily View and Monthly View to manage and review banquet schedules more effectively.
3.1 Event Calendar
This function allows users to perform the same actions as the Event Booking screen, including Make Booking, Copy Booking, Edit Booking, Tentative Booking, Confirm Booking, Undo Confirm, Print Booking, Print BEO, Manage Function, Move Room, Send Mail, Post to Cashier, Stop Sell, and Release Stop Sell. All actions are controlled by user permissions, ensuring that only authorized users can access and perform each function according to the hotel’s policy.
To perform the task:
-
Press Event Booking.
-
The system will show you the display of the Event Calendar by default.
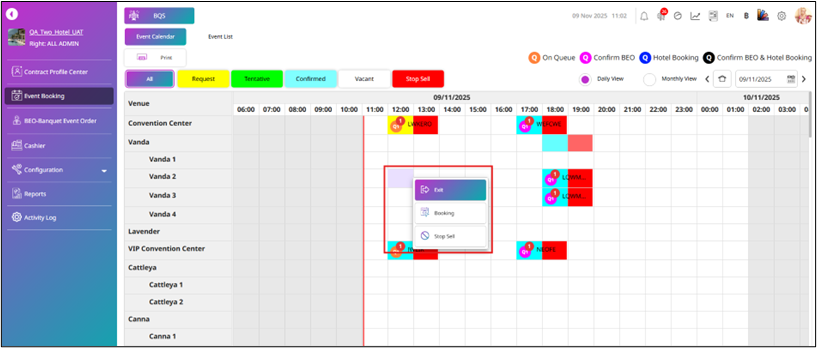
- If you press on a vacant period, the system will show the Booking and Stop Sell buttons.
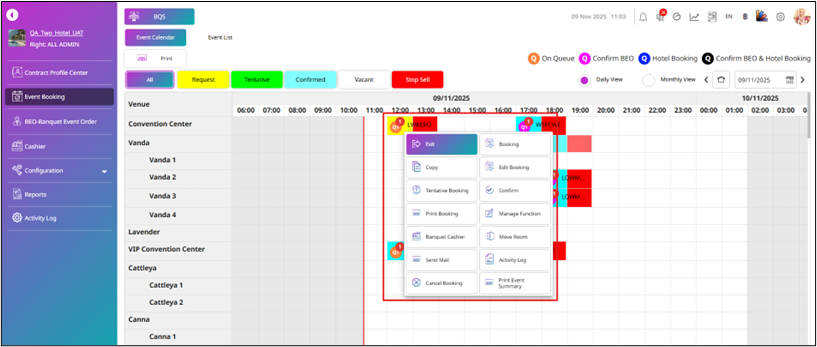
- If you press on a booking with Request or Tentative status, the system will display the Booking, Copy Booking, Edit Booking, Tentative Booking, Confirm Booking, Confirm, Print Booking, Manage Function, Move Room, and Send Mail buttons.
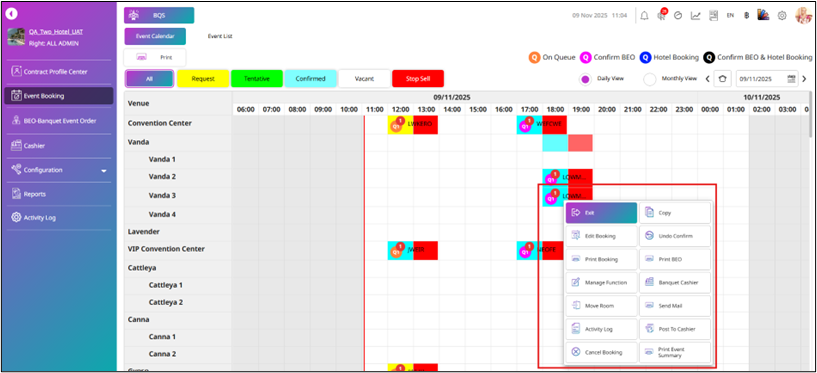
- If you press on a booking with Confirmed status, the system will display the Booking, Copy Booking, Edit Booking, Tentative Booking, Confirm Booking, Undo Confirm, Print Booking, Print BEO, Manage Function, Move Room, and Send Mail buttons.
-
If you press on a Stop Sell, the system will display the Release Stop Sell button.
-
All buttons are displayed based on the user’s permissions, and you can perform the same functions as those available from the Event Calendar in Event Booking.
3.2 Event List
This function allows users to perform Print and Send Mail actions for banquet events. The information is organized into Request, Tentative, Confirmation, Stop Sell, and History tabs. For each event, the system displays details such as Quotation status, Deposit status, Function Date, Function Time, Event Booking No., Function No., Organization, Organizer, Event Name, Venue, Event Type, Function Style, Expected Pax, Guaranteed Pax, Price per Pax, Total Charge, Discount, Net Total Charge, Contact Person, and Create BQ Sale. All actions and access are subject to user permissions and hotel policy.
To perform the task:
-
Press Event Booking.
-
Press Event List.
-
The system will default to the Request tab. This list will display booking events with details including Quotation Status, Deposit Status, Function Date, Function Time, Event Booking No., Function No., Organization, Organizer, Event Name, Venue, Event Type, Function Style, Expected Pax, Guaranteed Pax, Price per Pax, Total Charge, Discount, Net Total Charge, Contact Person, and Create BQ Sale.
-
If you have not created a quotation, the Quotation Status will be shown as no status (no color). If a quotation has been created, the system will display status colors as follows: Prepare status (default theme color), Request Approve status (blue), Approved status (green), and Rejected status (red).
-
If there is no deposit for the booking event, the Deposit Status will be shown as No Deposit (no color). If a deposit has been created, the system will display the status colors as follows: Request status (default theme color) and Paid status (green).
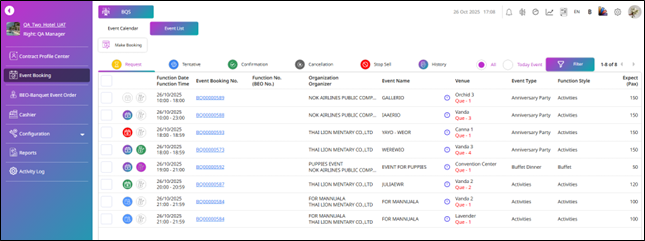
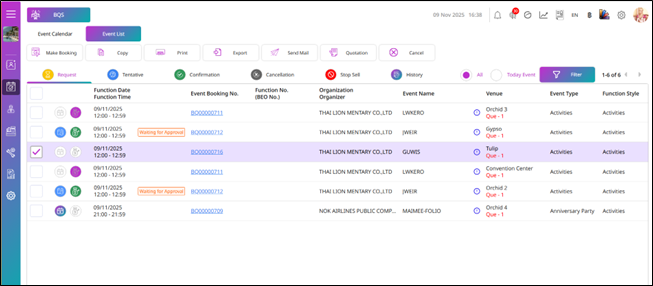
- If you select a booking event, you will see the Copy, Print, Export, Send Mail, Quotation, and Cancel buttons. Some buttons will be displayed based on your user permissions.
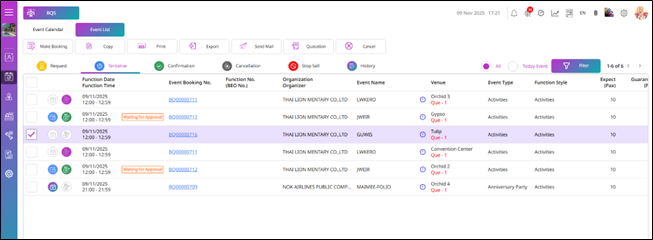
- The Tentative tab functions similarly to the Request tab. It displays only bookings with Tentative status and allows users to review, track, and manage tentative bookings before confirmation.
- The Confirmation tab functions similarly to the Request and Tentative tabs. It allows users to perform actions such as Copy, Print, Export, Send Mail, Undo Confirm, and Cancel, subject to user permissions and hotel policy.
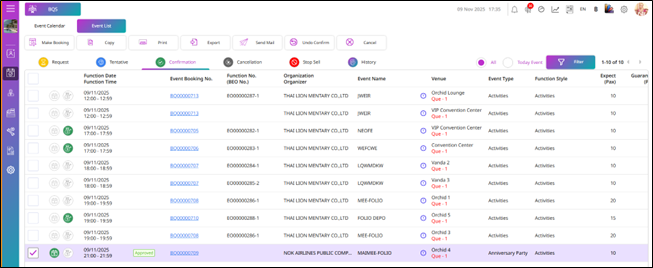
- The Cancellation tab functions similarly to the Request and Tentative tabs and allows users to perform actions such as Print, Export, Send Mail, and Recovery, subject to user permissions and hotel policy.
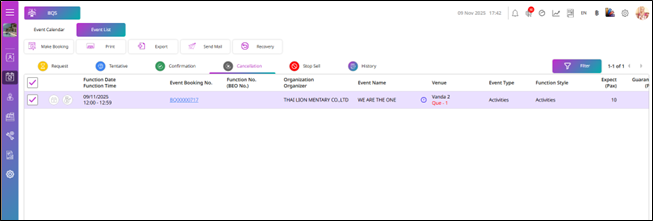
- The Stop Sell tab displays a list of Stop Sell entries. It shows details including Venue, Effective Date/Time, End Date/Time, Remark, and Created By information. By default, the system displays Stop Sell records based on the current system date.
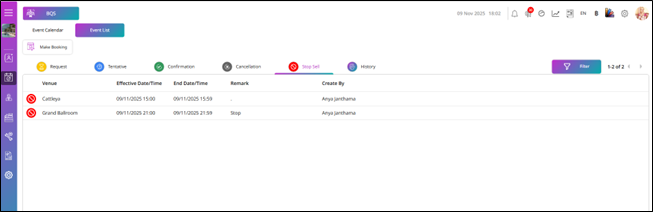
- The History tab functions similarly to the Request and Tentative tabs. It allows users to perform actions such as Print, Export, Send Mail, and Cashier, subject to user permissions and hotel policy.
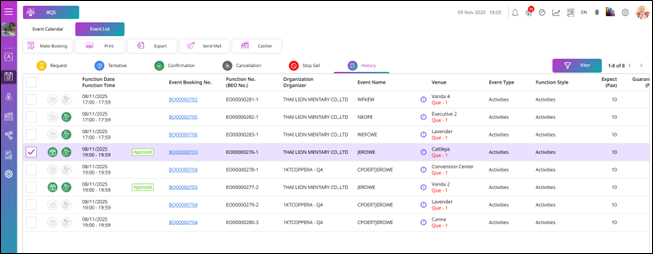
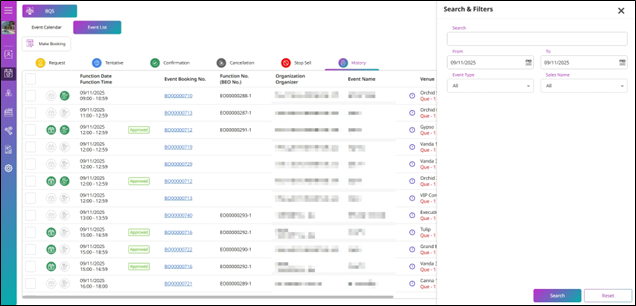
- For the Search & Filter function in the Event List, press the Filter button. The system will then display the Search & Filter panel on the right side.
-
You can search by entering a keyword in the Search field or filter by parameters such as Date (From – To), Event Type, and Sales Name, then press Search.
-
The system will display the results based on the entered keyword and selected filter criteria.
-
Press Reset to reset the data in the Search & Filter panel to the default settings.
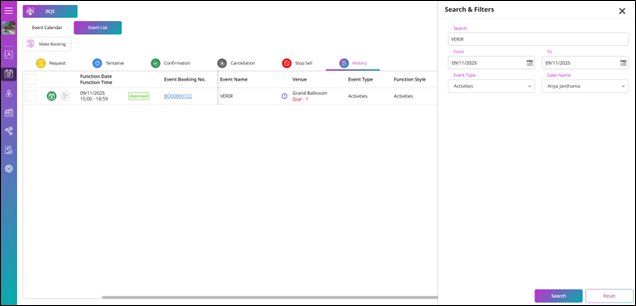
Note: All tabs in the Event List page have the same fields and parameters for searching.
3.3 Create Booking
This function allows users to make banquet bookings directly from the Calendar screen. Users can select an available time slot on the calendar, enter event details such as the event name, room, and guest count, and choose the appropriate booking status. Once saved, the booking is displayed on the calendar with the corresponding color code and status, allowing users to easily manage and track their banquet events.
To perform the task:
- Press Event Booking, and the system will show you the display of the Event Calendar by default.
-
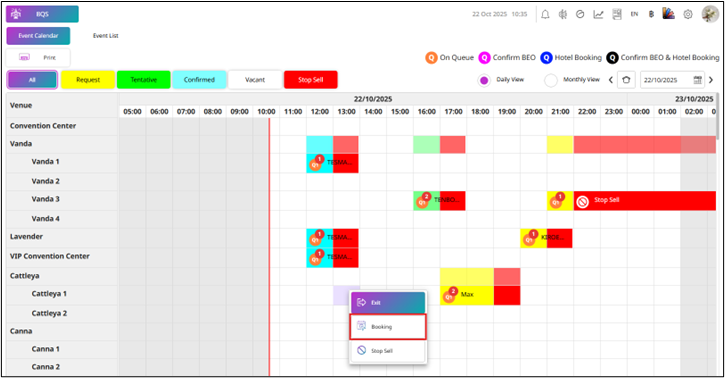
Press on the vacant period.
-
The system will show the command on the right.
-
Press Booking to make a new banquet booking.
-
The system will bring you to the New Request Page (Reservation).
-
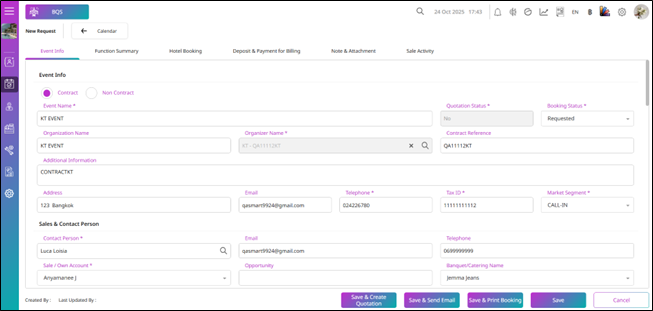
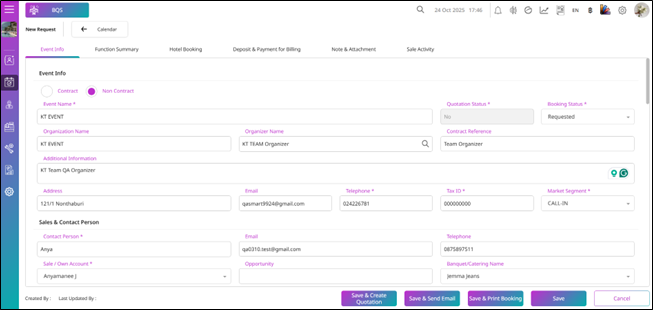
Fill in the Event Info:
- Select Contract or Non-Contract: If you select Contract, it will require you to fill in the Organizer Name, and the Organizer Name will allow you to select from the contract; you cannot enter it manually in this field.
- Enter the Event Name.
- The Quotation Status will default to No, and it is not allowed to change the status while creating the new booking.
- Booking Status: It will default to Requested, but you can change it to either Tentative or Requested Status only.
- Enter the Organization Name.
- Organizer Name: If you select booking by Contract, you must press the Search icon, which will show the Search Contract Profile List. You can select only one contract by pressing the Select & Go icon. If you select booking by Non-Contract, it will allow you to enter the Organization Name manually.
- The Contract Reference, Additional Information, Address, Email, Telephone, Tax ID, and Market Segment will auto-fill after you select the Organizer Name. You can edit or enter additional information as needed.
- The Sale / Own Account will default to the user who is creating the booking, but you can change it to another user.
- Enter the Opportunity.
- Select the Banquet/Catering Name.
-
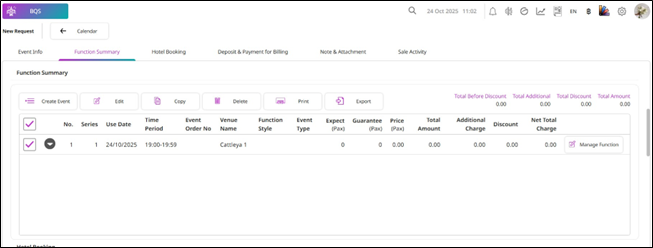
Function Summary will show all the events for this booking.
-
For a new booking, the system will default to 1 record and default the series as Series 1.
-
The Use Day will default to the hotel system date.
-
The Time period and Venue Name will default to the venue and period you selected from the calendar.
-
Press the Event checkbox, then press Edit.
-
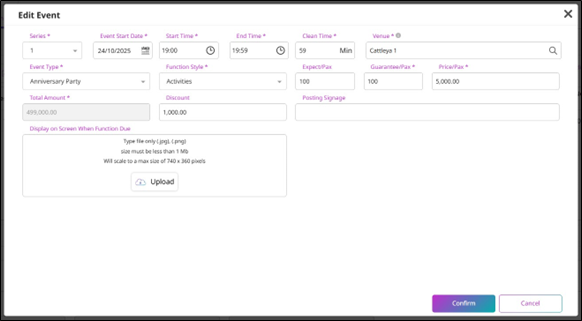
The Edit Event pop-up will be displayed. The Series, Event Start Date, Start Time, End Time, Clean Time (default is 59 minutes), and Venue will be set by default. You can change this information if needed.
-
Select the Event Type and Function Style.
-
Enter the Expect/Pax, Guarantee/Pax, Price/Pax, and Discount. The Total Amount will be calculated automatically using the formula (Guarantee/Pax × Price/Pax − Discount).
-
Enter the Posting Signage.
-
Press Upload to upload the picture for display on the screen when the function is due.
-
Press Confirm.
-
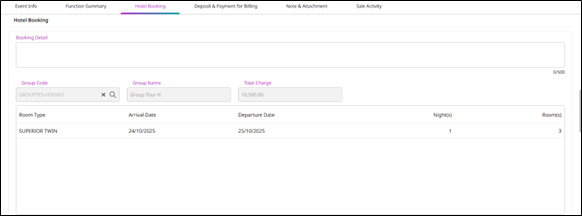
Enter the Booking Detail.
-
To select the Hotel Booking, press the Search icon in the Group Code field.
-
The Select Group pop-up will be displayed. You can select a group booking from this pop-up by pressing the Select & Go icon.
-
The information from the hotel group booking will be displayed and shown in the corresponding information fields.
-
If you do not want to book with a group booking, you can press the X icon on the Group Code field to remove it.
-
The system will then delete the hotel booking information for both BQS and PMS.
-
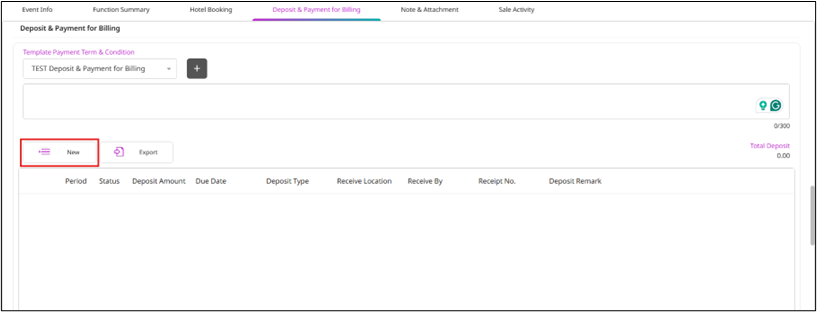
Select the Template Payment Term & Condition.
-
To make a deposit for the booking, press New.
-
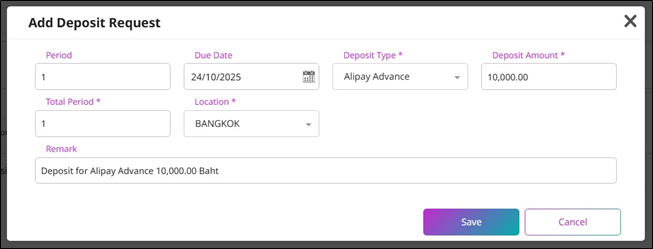
The system will show the Add Deposit Request pop-up.
-
Select the Due Date for the deposit (only dates within the event booking period can be selected).
-
Enter the Deposit Amount.
-
Select the Location.
-
Enter the Remark.
-
Press Save to add the deposit request.
-
Press Cancel to cancel the progress.
-
Enter the Notice.
-
Press Upload File if you want to upload a file as an attachment.

-
For Sale Activity, you can press New to add an activity.
-
Select the Post Date.
-
Enter the Sale Activity and Percent.
-
Press Search to select a sale.
-
If you want to delete a sale activity, press the Delete icon to remove this activity.
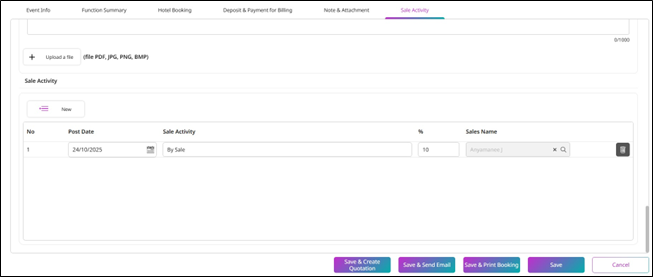
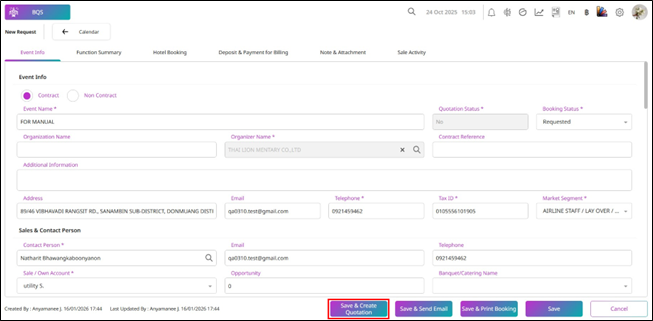
- If you press Save & Create Quotation, the system will pop up the Create Quotation window before saving the information.
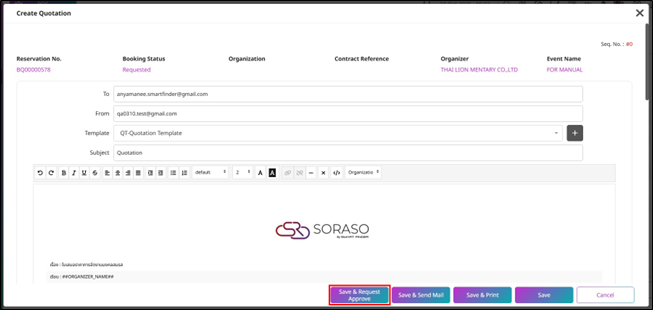
-
Enter the To and From email addresses.
-
Select the Template for the quotation template.
-
Enter the Subject.
-
Press Save & Request Approve to continue, and this booking will have the Request Approve status, or press Cancel to close the Create Quotation pop-up.
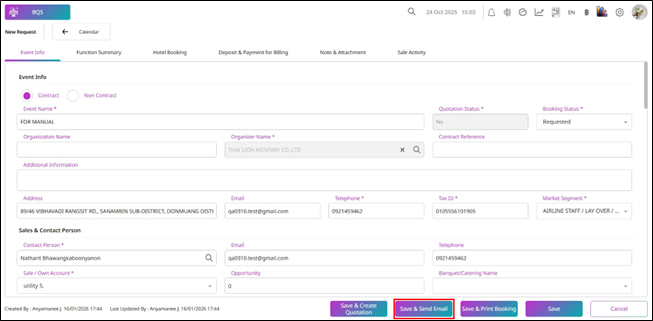
- But if you press Save & Send Mail, the system will send the email with the quotation information and it will save the booking event.
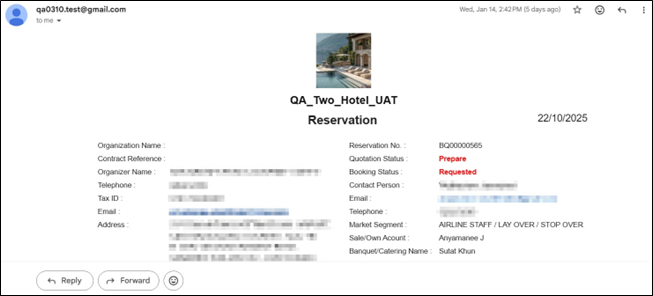
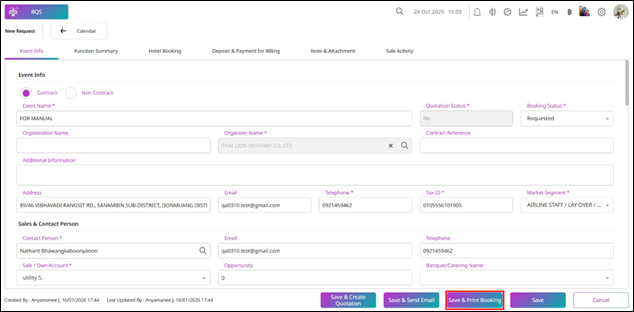
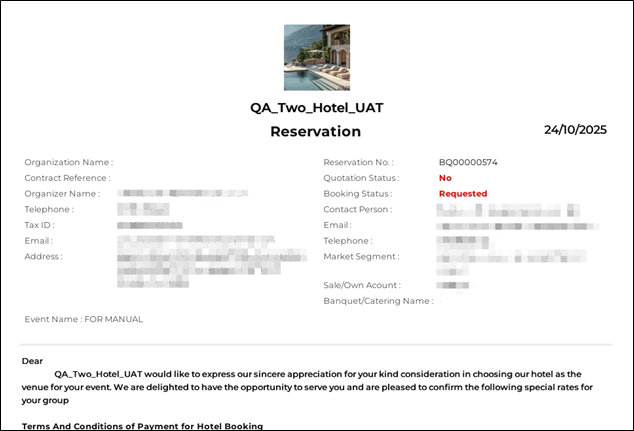
- But if you press Save & Print Booking, the system will save the information and display the print booking.
-
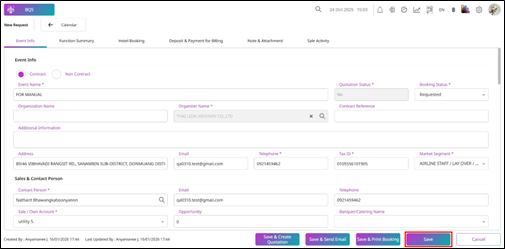
If you press Save, the system will save the booking information.
-
Press Cancel to discard the progress.
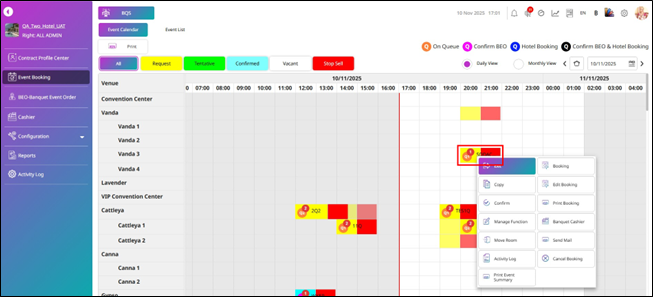
- If you create a booking during a period that already has another booking, the system will assign a queue number such as Que-2, Que-3, and so on.
-
The calendar will display the Que-1 booking, and the queue number will increase by 1 each time a new booking is created for the same period and venue.
-
You can press the On Queue icon to view the bookings that are on queue for the same venue and period.
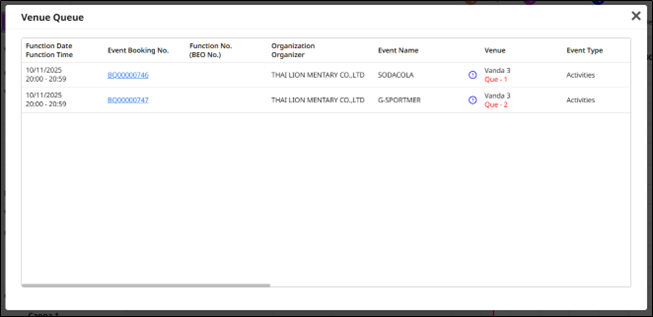
- The Venue Queue pop-up will display the following information: Function Date/Time, Event Booking No., Function No., Organization / Organizer, Event Name, Venue, Event Type, Function Style, Expect (Pax), Guarantee (Pax), Price (Pax), Total Charge, Discount, Net Total Charge, Contact Person, and Create BQ Sale information.
3.4 Edit Booking
This function allows users to edit an existing booking on the calendar. However, the system restricts editing permissions based on user roles. Users with the appropriate rights can make changes, while those without editing privileges will not be able to modify the booking. The only exception is when the booking was created by the user, who is considered the "owner" of the booking, allowing them to edit it regardless of their role.
To perform the task:
-
Press Event Booking, and the system will show you the display of the Event Calendar by default.
-
Press on a Booking Event that exists on the Calendar to close the event.
-
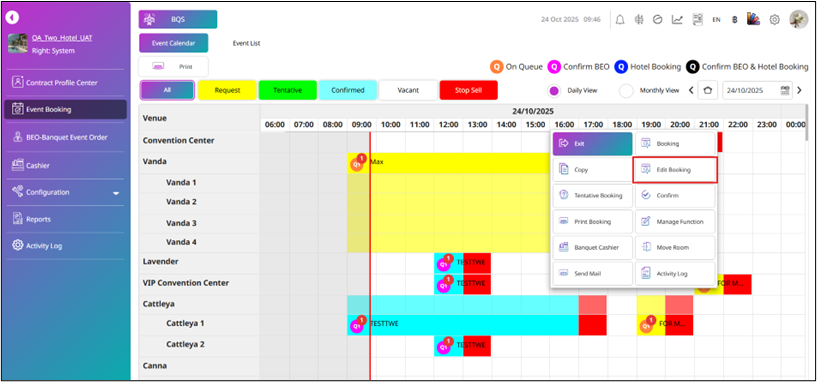
The system will show the command menu on the right for the user you are using.
-
Press on Edit Booking.
-
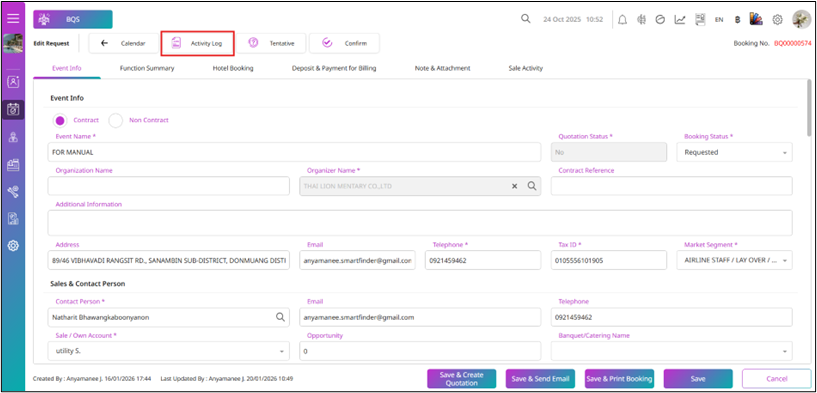
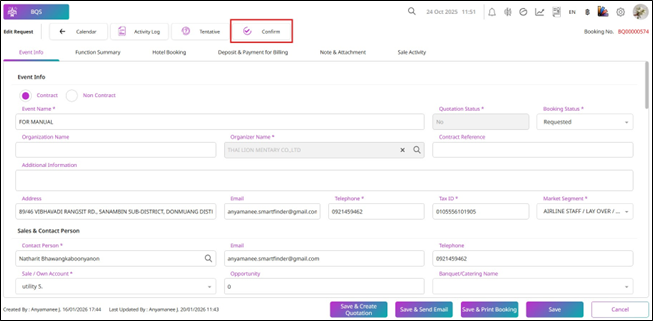
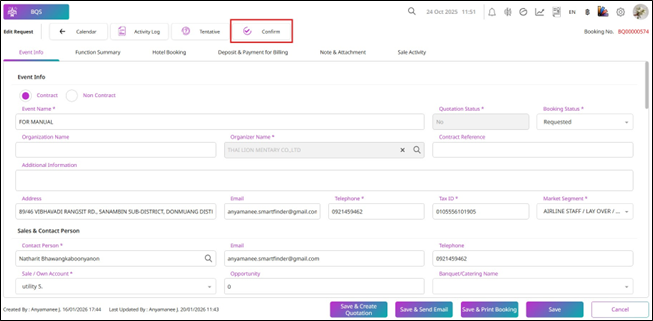
The system will show you the Edit Request, where you will see all the detailed information for the booking.
-
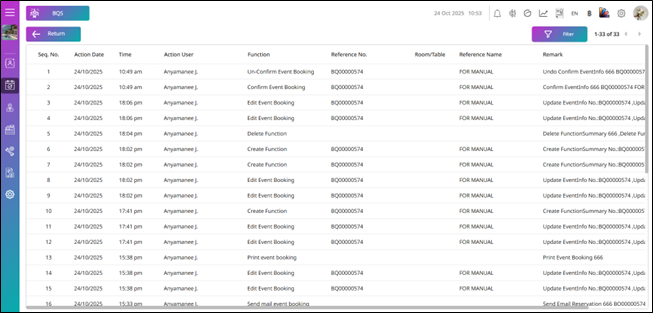
The system will show the Activity Log button. If you press the button, the system will show you the activity log of this booking.
- It will include entries such as Create Event Booking, Edit Event Booking, Create Function, etc., showing the activities and changes made to the booking.
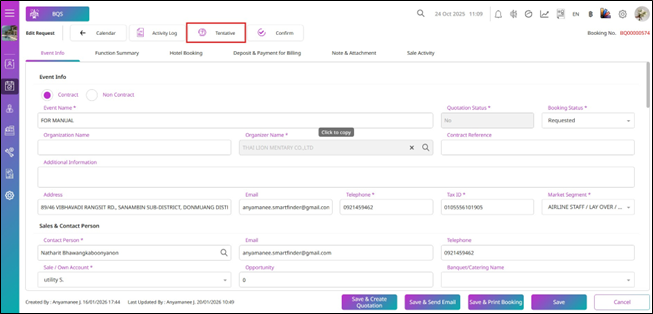
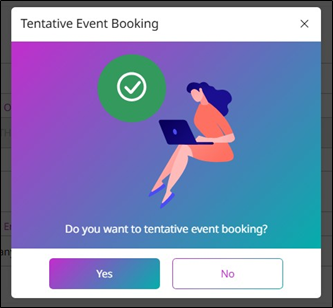
- If you press the Tentative button, the system will show the Tentative Event Booking pop-up.
-
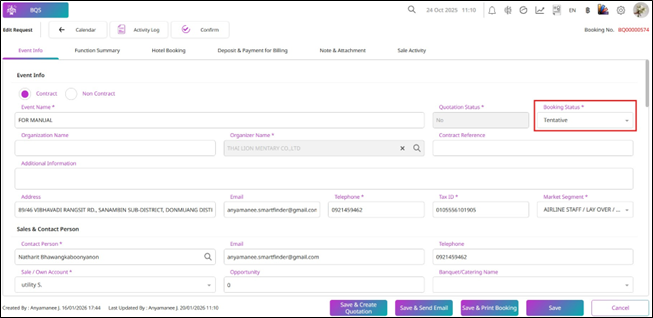
If you press Yes on the pop-up, the system will change the booking status to Tentative.
-
If you press No, the system will close the pop-up and discard the progress.
-
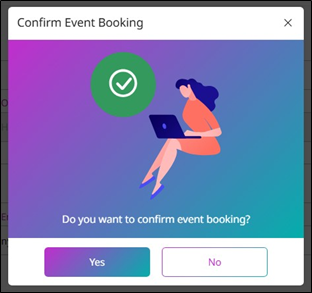
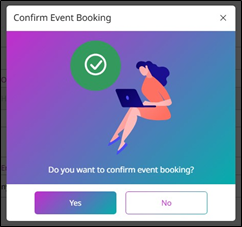
And if you press the Confirm button, the system will show the Confirm Event Booking pop-up.
-
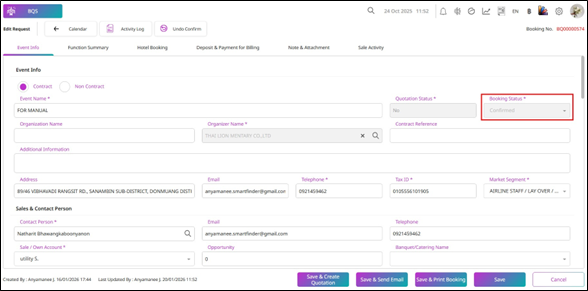
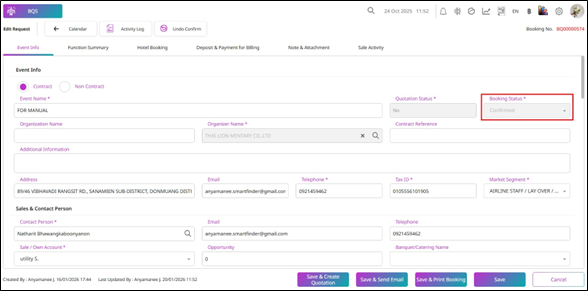
The status of the booking will change to Confirmed.
-
And you can edit the information for this booking.
-
After editing, press Save, and the system will stamp the user and date/time for the Last Update.
-
Press Cancel to discard the changes or press Back to Calendar to return to the calendar without saving the changes.
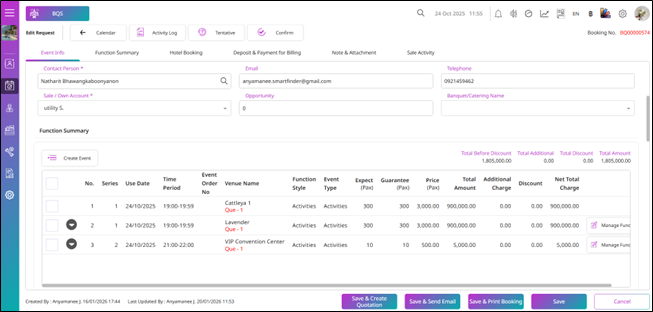
Note: Only users with the appropriate permissions can edit bookings. Users can edit their own bookings, but others cannot unless they are the booking owner. Ensure permissions are properly set for access control.
3.5 Manage Function & Create Event
This function allows users to manage banquet event details directly from the Calendar or by editing a booking to manage additional functions and event details. Users can create multiple functions within a single booking and manage them by series, enabling efficient organization and control of all functions under one event.
To perform the task:
-
Press Event Booking. The system will display the Event Calendar by default.
-
Select a booking event on the calendar.
-
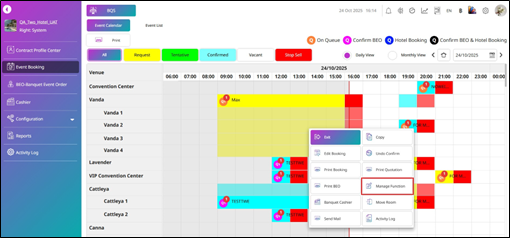
The system will display the command menu on the right side, based on the user role you are currently using.
-
Press Manage Function.
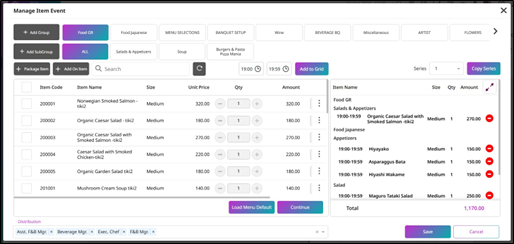
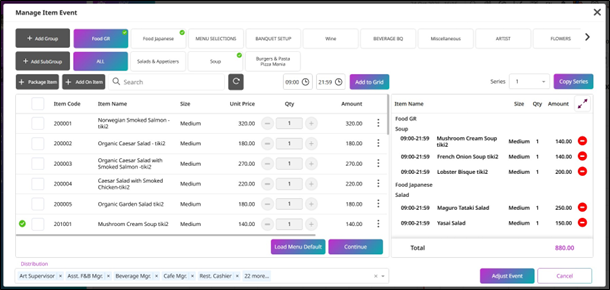
- The system will show the Manage Item Event. If the booking event hasn't made the Confirm BEO yet, this pop-up will show Save and Cancel buttons.
-
If the booking event has made the Confirm BEO, this pop-up will show Adjust and Cancel buttons.
-
You can manage the item you want.
-
Press Adjust or Save to save the progress.
-
Press Cancel to close this pop-up and discard the changes.
- If you want to manage all functions within the booking, press Edit Booking from the command menu.
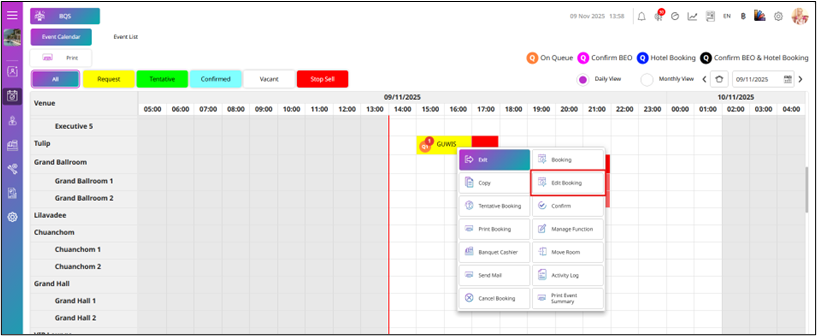
-
The system will display the Edit Booking page.
-
To manage functions, press Manage Function for the selected event series.
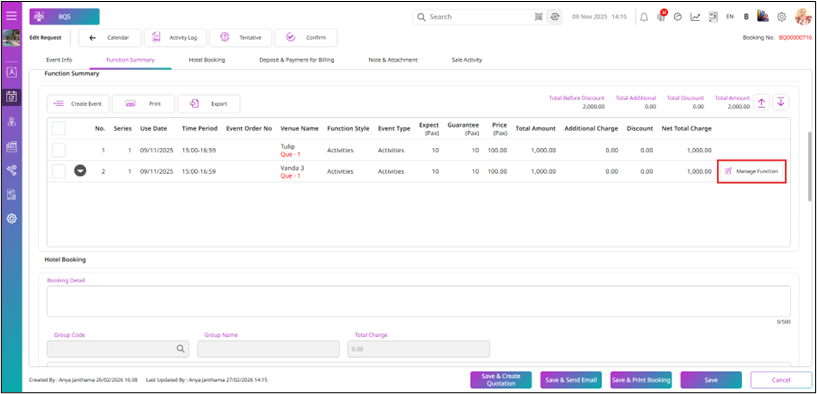
- If the booking event has not yet been confirmed as a BEO, the pop-up will display Save and Cancel buttons. However, if the booking event has already been confirmed as a BEO, the pop-up will display Adjust and Cancel buttons.
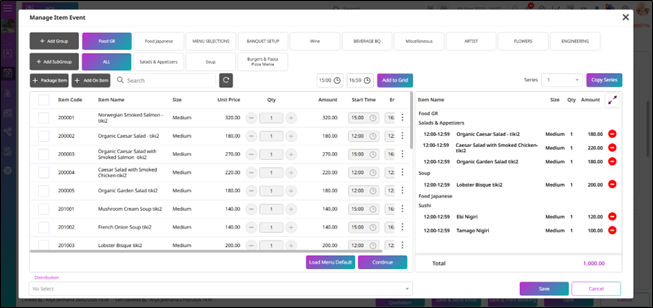
-
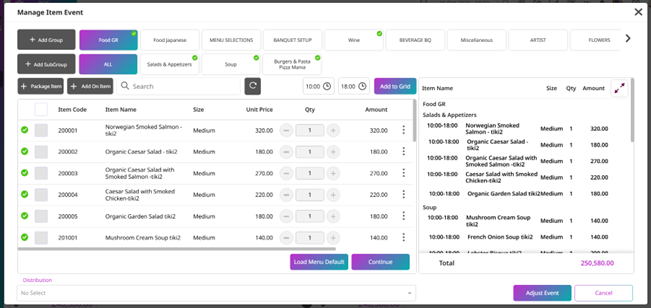
The system will show the Menu Group and Subgroup based on the item menu that is applied to the Banquet Outlet.
-
The Subgroup will be displayed based on the Group you select.
-
The Items will be displayed based on the Subgroup you select.
-
If you want to add a new group for use with this function, press + Add Group, and the system will show the New Group pop-up.
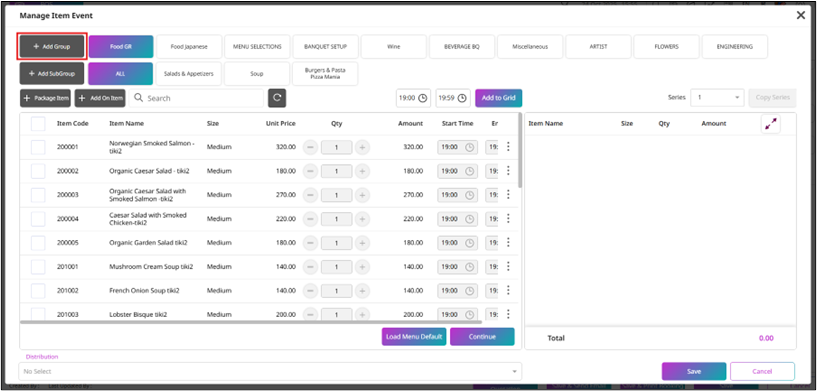
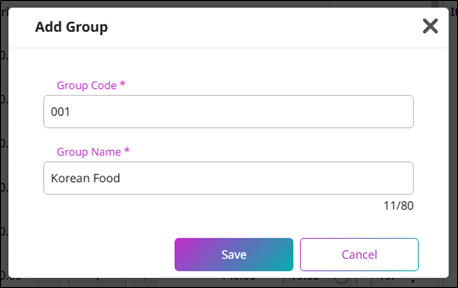
- Enter the Group Code and Group Name, then press Save. The system will add a new group and automatically add a default Subgroup when the group is created.
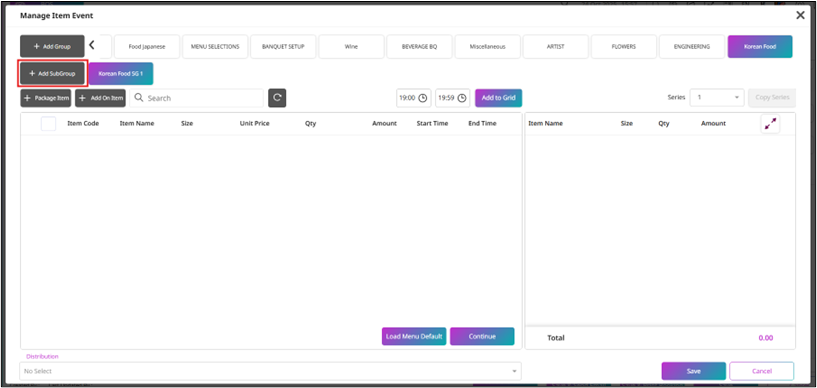
- If you want to add a new subgroup, press + Add SubGroup.
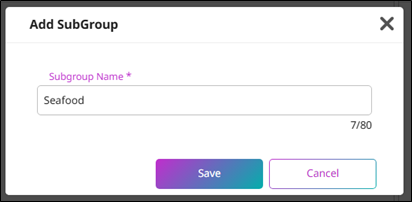
- Enter the Subgroup Name in the Add SubGroup pop-up and press Save to create a new subgroup.
-
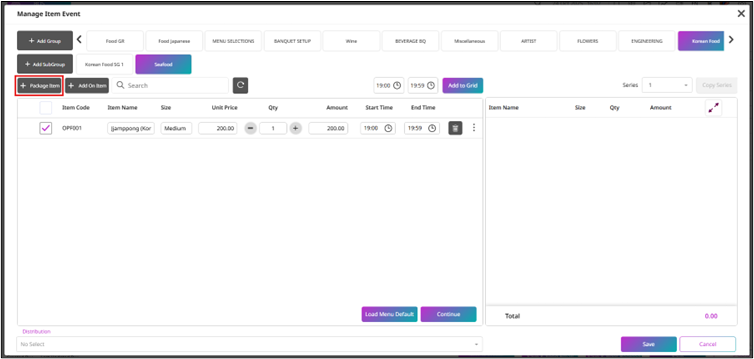
To add a new item, you can choose + Package Item (no additional charge).
-
The system will add a new item record (shown in black). The Item Code and Size will be defaulted based on the setup. You must enter the Unit Price and QTY, and the Amount will be automatically calculated from the Unit Price × QTY. The Start Time and End Time will default to the event time. If you want to remove this open item, press the Delete icon to delete the item.
-
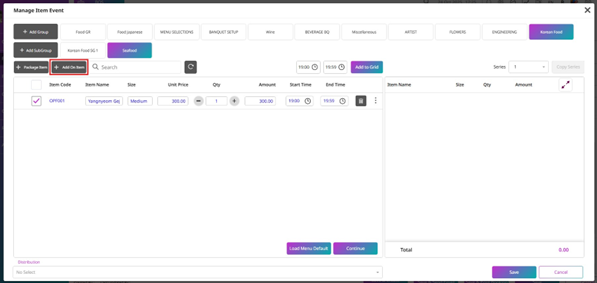
Or press + Add On Item (additional charge).
-
The system will add a new item record similar to adding a package item, but the item will be shown in blue. The Item Code and Size will be defaulted based on the setup. You must enter the Unit Price and QTY, and the Amount will be automatically calculated from Unit Price × QTY. The Start Time and End Time will default to the event time. If you want to remove this open item, press the Delete icon to delete the item.
-
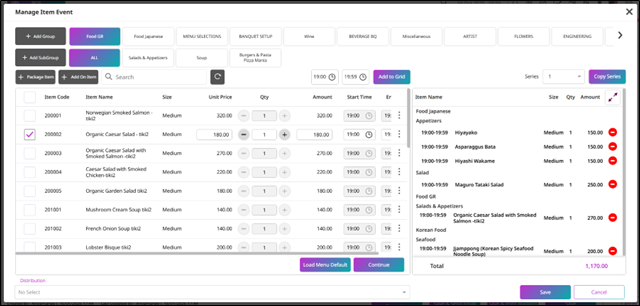
Select the checkbox and press Continue to add the items to the function (right screen).
-
If you want to delete an item, press the Delete icon.
-
The Confirm Delete pop-up will be displayed. Press Delete to remove the item, or press Cancel to close the pop-up.
-
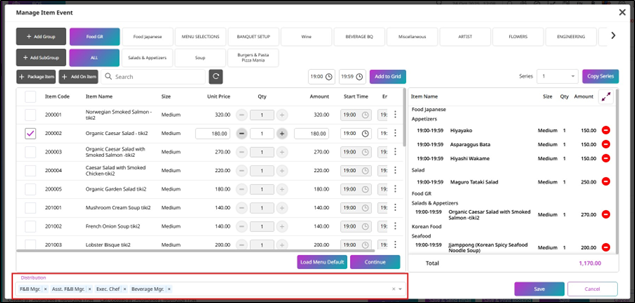
To select the Distribution, press the dropdown of Distribution.
-
Select the Distribution you want for this function.
-
Press Save on the Manage Item Event pop-up to save the changes.
-
Press Cancel to discard the progress.
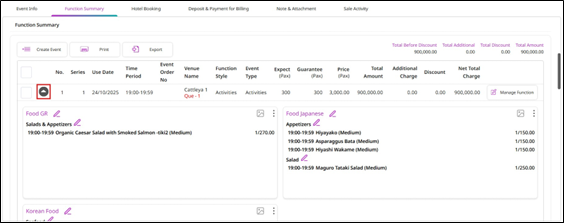
- After you save the function, you can press the More Detail icon to view the item details grouped by Group.
- Press Create to add a new event.
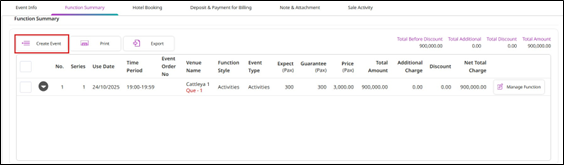
-
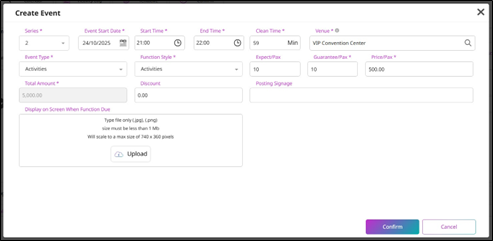
And the system will show the Create Event pop-up.
-
Select the Series and input the information.
-
And to manage the function, you can also copy from Function Series 1 to Series 2.
-
Press Save to save the booking and stay on this booking.
-
Then press Manage Function.
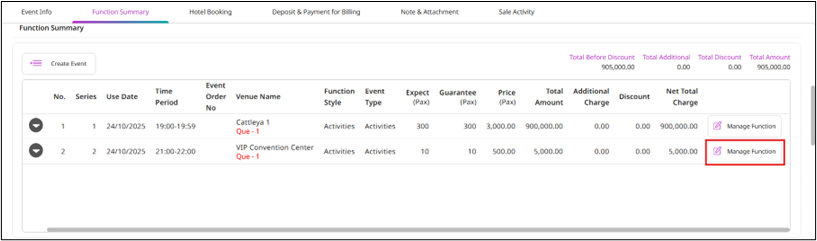
-
Select the number of series to be 1.
-
Press Copy Series.
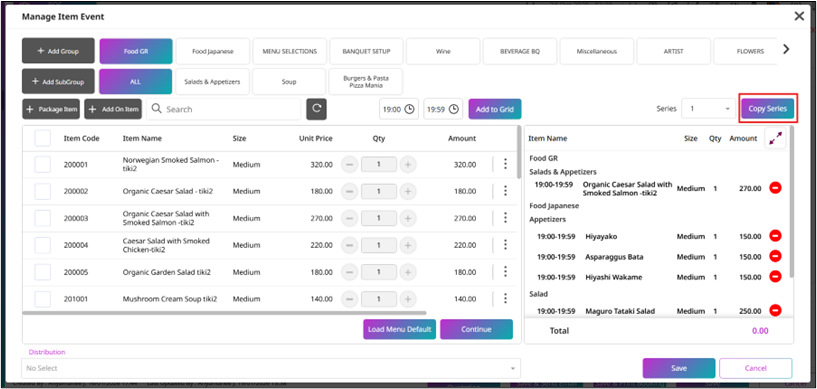
-
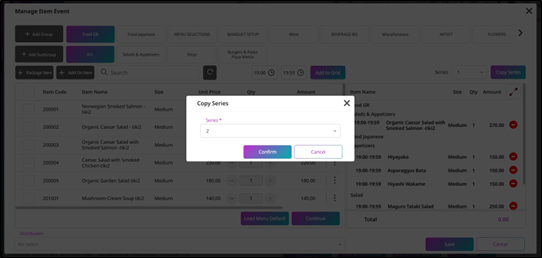
Select Series 2, and it will copy from Series 1 to Series 2.
-
Press Confirm to continue the progress.
-
Press Cancel to discard the copy process.
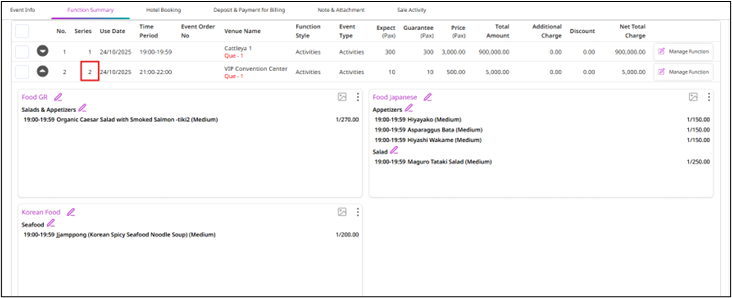
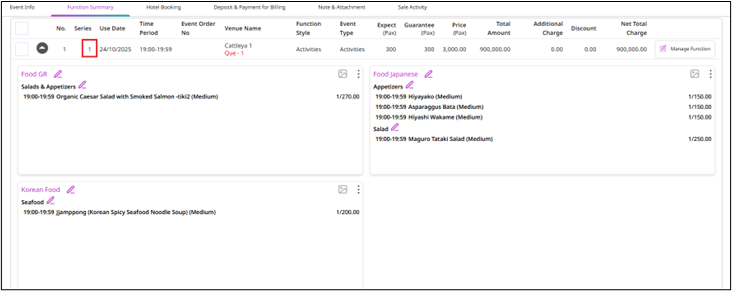
- If you view more details for the function series, you will see that Series 2 will have the same items as Series 1.
- If you want to copy the event for the same booking event, select the event you want to copy and then press Copy.
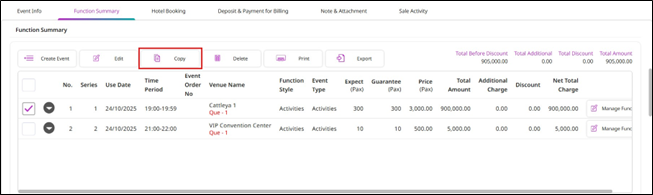
-
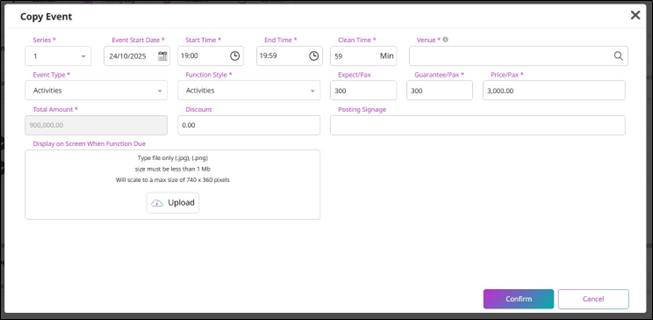
The system will show the Copy Event pop-up.
-
And it will show the information of the event, the same as the event you selected to copy.
-
Select a Venue and then press Save to continue the process, or press Cancel to discard.
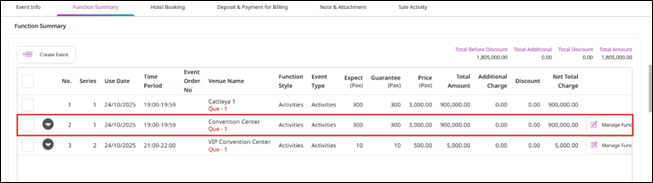
- After you save the copied event, the system will show the copied event record.
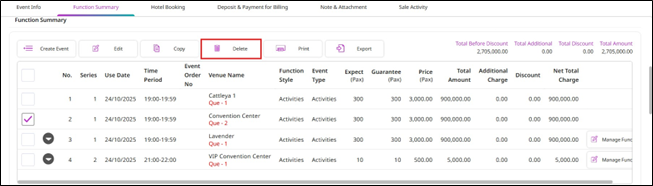
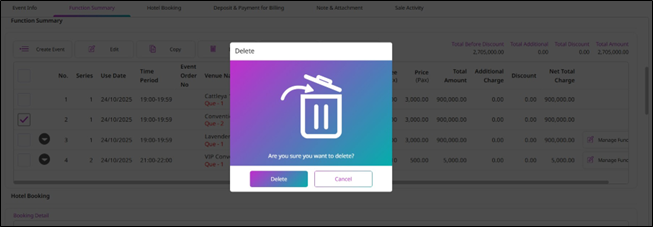
- And if you want to delete the event, you can select the event and press Delete.
-
The system will show the Confirm Delete pop-up.
-
Press Delete to delete this event.
-
Press Cancel to discard.
3.6 Print Booking
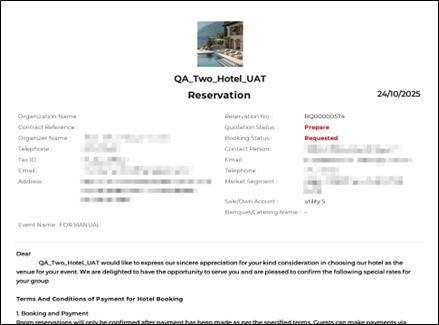
This function allows users to print the details of a booking event, regardless of its status (e.g., Request, Tentative, or Confirmed). The printed booking will include the relevant information, along with the Terms and Conditions of the hotel for the booking, ensuring that users have all necessary details for the event in a printed format.
To perform the task:
-
Press Event Booking, and the system will show you the display of the Event Calendar by default.
-
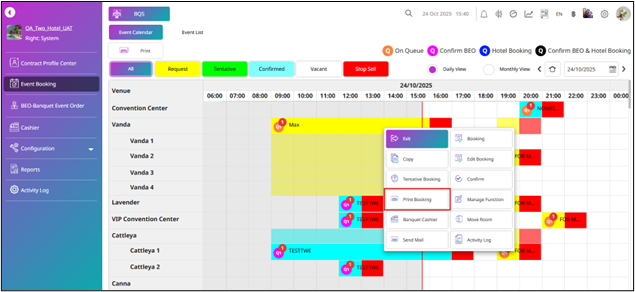
Press on a Booking Event that exists on the Calendar to close the event.
-
Press on Print Booking, and the system will show the booking, including the relevant information, along with the Terms and Conditions of the hotel for the booking.
3.7 Make Quotation & Print Quotation
This function allows users to create and print a Banquet Quotation. The Make Quotation option is available for bookings in Request or Tentative status, while the Print option becomes available only after a quotation has been created. The system generates the quotation according to the selected template, ensuring a consistent, professional, and accurate document format.
To perform the task:
-
Press Event Booking, and the system will show you the display of the Event Calendar by default.
-
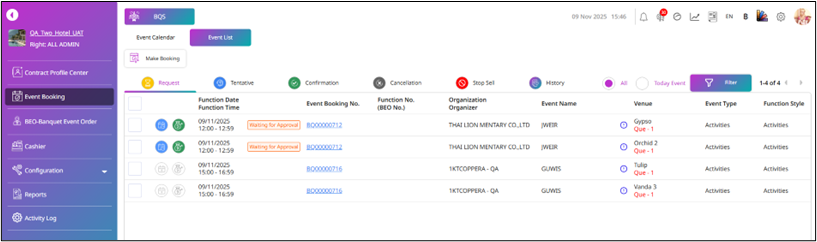
Press Event List.
-
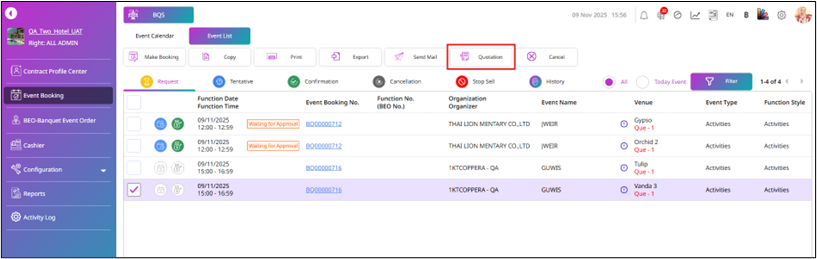
Select a booking. The system will display the available action buttons.
-
Press Quotation.
-
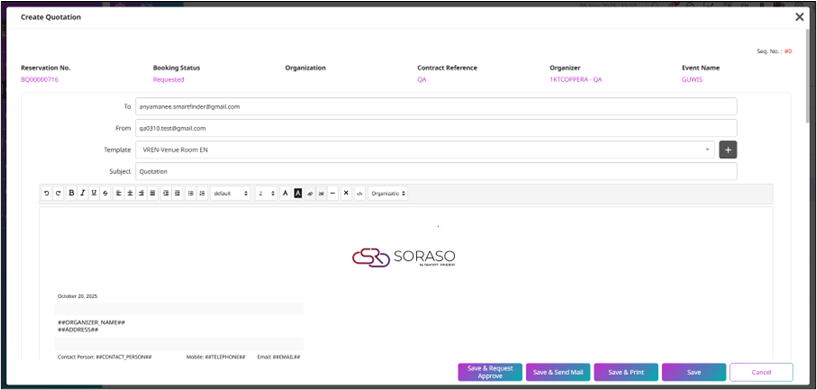
The system will display the Create Quotation pop-up.
-
The system will display the Reservation No., Booking Status, Organization, Contract Reference, Organizer, and Event Name information for the booking.
-
Enter the To and From email addresses.
-
Select the quotation Template.
-
If the system uses the Quotation Approval Policy, the pop-up will display the Save & Request Approve button.
-
If the system does not use this policy, the pop-up will display Save & Send Mail, Save & Print, Save, and Cancel buttons. You may select the appropriate option to save the quotation.
-
Press Cancel to discard the progress.
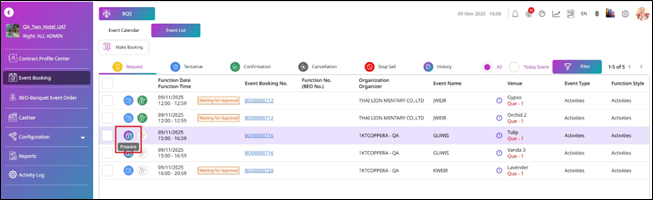
- If you press Save & Send Mail, Save & Print, or Save, the system will set the quotation status to Prepared.
-
If you press Save & Request Approve, the system will set the quotation status to Request Approve and wait for the approval process.
-
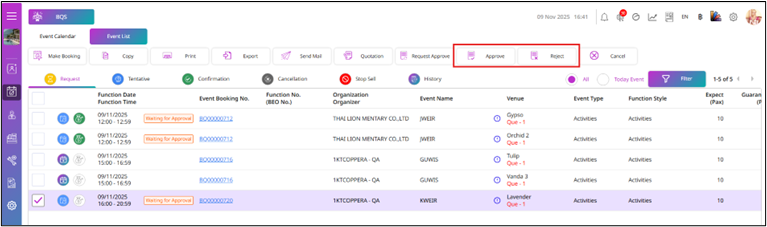
If you have permission to approve, when you select a booking with Request Approve quotation status, the system will display the Approve and Reject buttons.
-
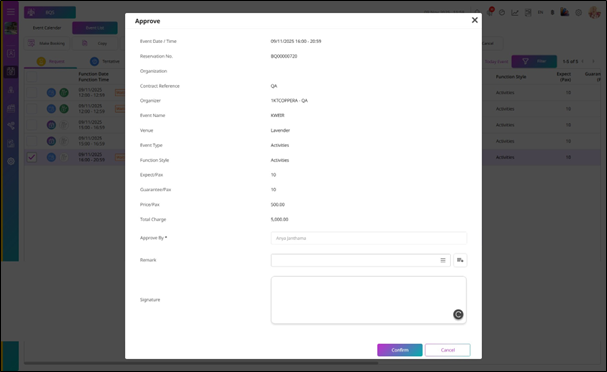
The Approve pop-up will display the Event Date/Time, Reservation No., Organization, Contract Reference, Organizer, Event Name, Venue, Event Type, Function Style, Expect/Pax, Guarantee/Pax, Price/Pax, and Total Charge information of the booking.
-
For Approve By, the system will default to the user who is performing the action. For Remark, you can enter a remark or select a predefined remark for approval. For Signature, you must provide your signature.
-
Press Confirm to approve the quotation.
-
Press Cancel to discard the progress.
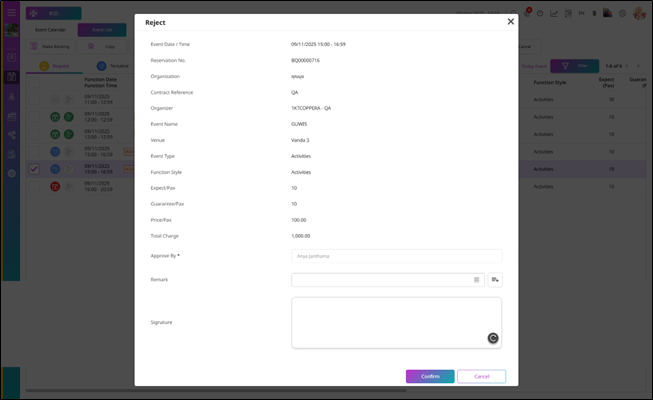
- For Reject, the system will display the process similar to the Approve Quotation step.
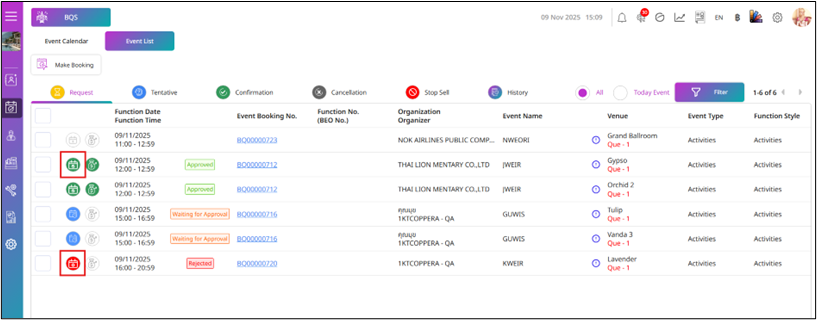
- After completing the Approve step, the quotation status will appear in green, which means Approved. If you perform the Reject step, the quotation status will appear in red, which means the quotation has been Rejected.
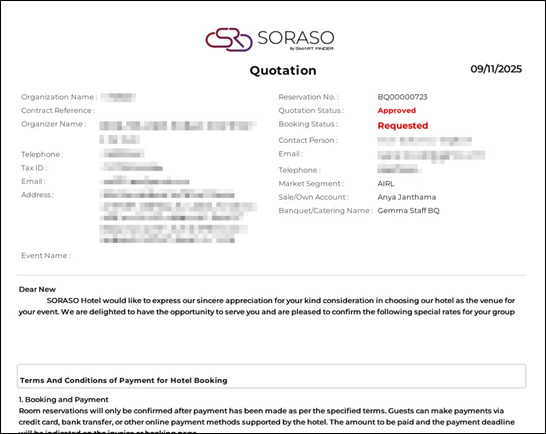
- To print the quotation, go to the Event List, select the booking event, then press Print and select Print Quotation.
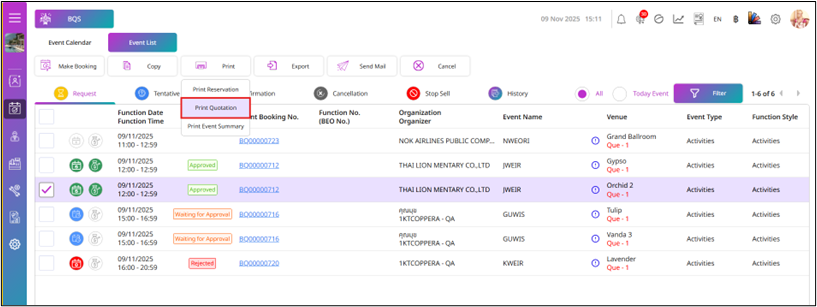
- The system will display the Quotation.
-
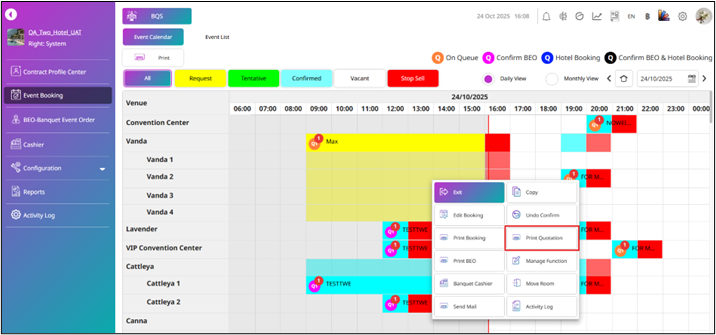
Or, if you want to print from the Event Calendar, press on a booking event that has already created a quotation.
-
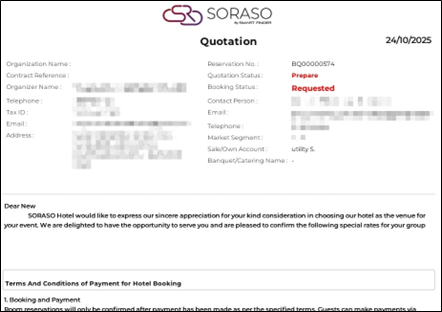
Press Print Quotation, and the system will show the quotation for this booking, displayed according to the template you created for the quotation.
3.8 Move Room
This function allows users to move the room revenue of a booking event. Users can move bookings with Request, Tentative, and Confirmed statuses to a different room, providing flexibility in room assignments while ensuring that revenue tracking for the event remains accurate.
To perform the task:
-
Press Event Booking, and the system will show you the display of the Event Calendar by default.
-
Press on a Booking Event on the Calendar.
-
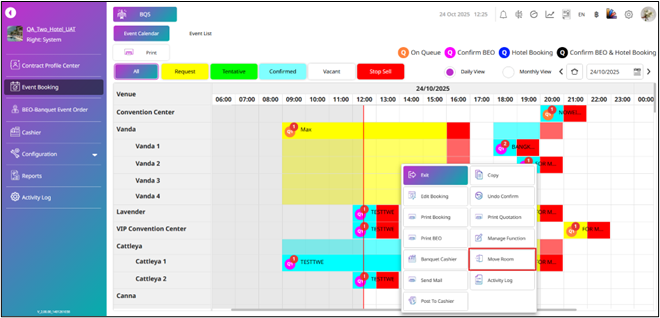
The system will show the command menu on the right for the user you are using.
-
Press Move Room.
-
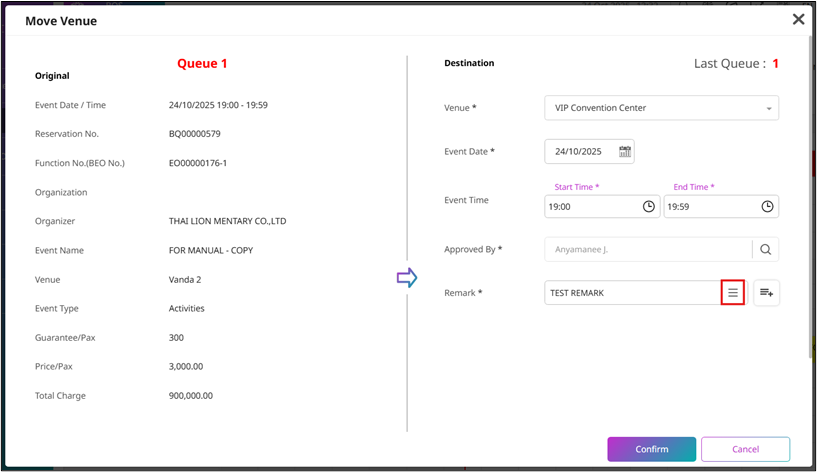
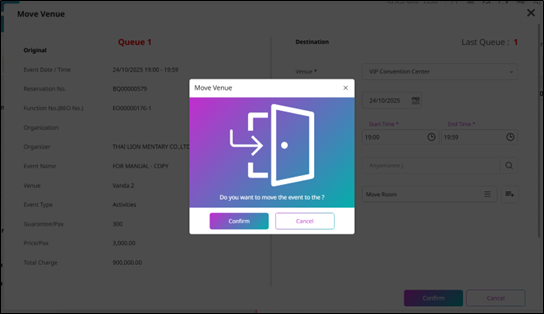
The system will show the Move Venue pop-up. On the left side, you will see the information of the booking event from the current room revenue as Original information, and on the right side, you will see the Destination information.
-
Select the Venue, and the system will show the Room Venue that is available to move the room.
-
Event Date: The system will show the Event Date of the booking event. You can change it by selecting another date.
-
Event Time: The system will show the Start Time and End Time of the booking event. You can change the event time.
-
Approved By: The system will default to the user that you used while doing this function. You can change it to another staff member if needed.
-
Select the Remark by pressing the Hamburger icon, and it will show the Remark pop-up. Select a remark, then press Select to continue.
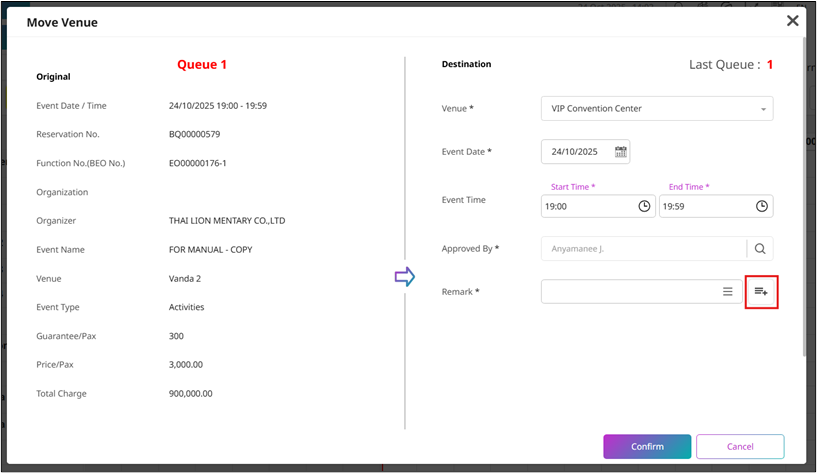
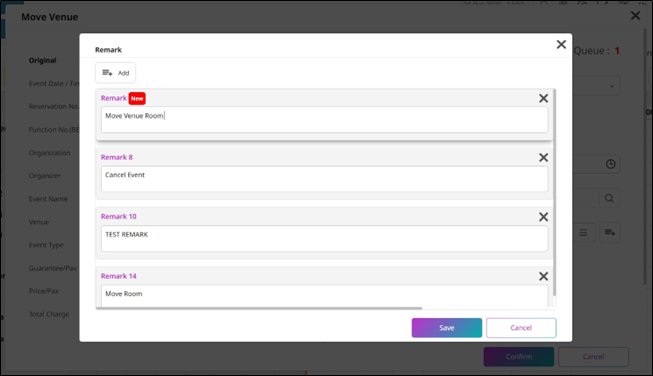
- Or, if you want to add a new remark, press the Add Remark icon. The system will show the Remark pop-up. You can press Add to add a new remark, enter the remark, then press Save.
-
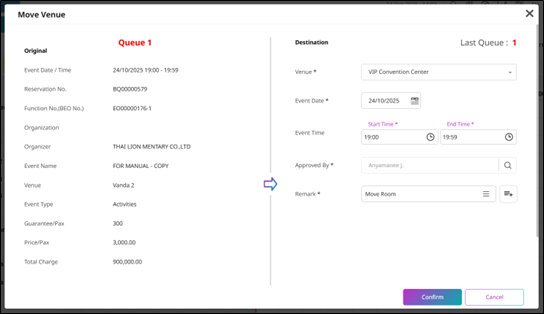
Press Save on the Move Venue pop-up, and the system will show the Confirm Move Venue pop-up. Press Confirm to continue the move venue for the booking event, or press Cancel to close the Confirm Move Venue pop-up.
-
Press Cancel on the Move Venue pop-up to discard the progress.
3.9 Cancellation (Cancel Booking)
This function allows users to Cancel a booking. The Cancellation tab displays a list of booking events that have been Canceled only. It provides the same set of information as the Request, Tentative, and Confirmation tabs, including Quotation status, Deposit status, Function Date, Function Time, Event Booking No., Function No., Organization, Organizer, Event Name, Venue, Event Type, Function Style, Expected Pax, Guaranteed Pax, Price per Pax, Total Charge, Discount, Net Total Charge, Contact Person, and Create BQ Sale. This tab functions similarly to the Request and Tentative tabs and allows users to perform actions such as Print, Export, Send Mail, and Recovery, subject to user permissions and hotel policy.
To perform the task:
-
Press Event Booking.
-
Press Event List.
-
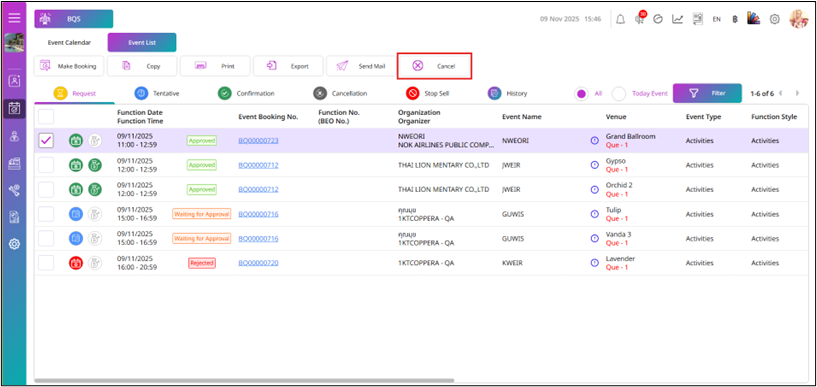
Select a booking, and the system will display the available function buttons based on the user’s permissions.
-
Press Cancel, and the system will display the Cancel pop-up.
-
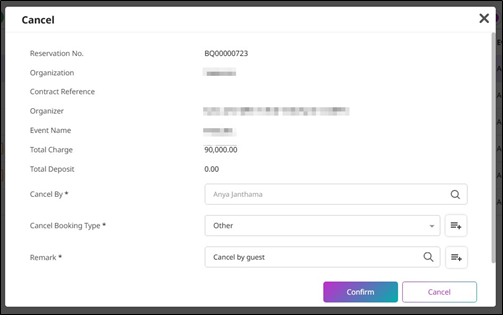
The Cancel pop-up will display the Reservation No., Organization, Contract Reference, Organizer, Event Name, Total Charge, and Total Deposit information for the booking.
-
Cancel By will default to the user who performs the cancellation. You may select another user by pressing the Search icon and choosing a staff member.
-
For Cancel Booking Type, select the appropriate cancellation type.
-
For Remark, you may press the Search icon to select a predefined remark or enter a remark manually.
-
Press Confirm to continue the process.
-
Press Cancel to discard the progress.
-
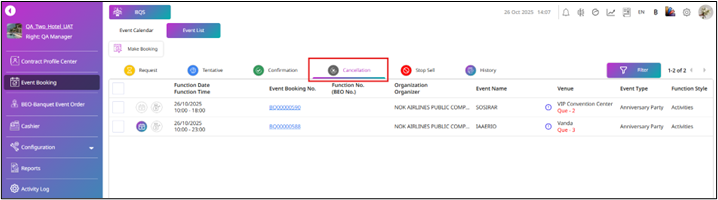
And for the Cancellation tab.
-
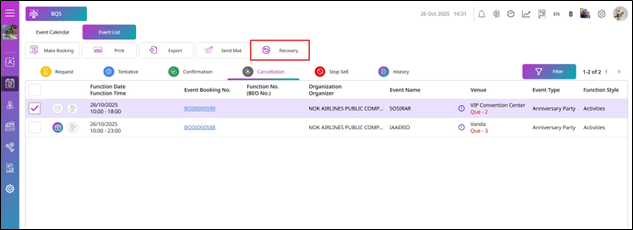
This list will display booking events with details including Quotation Status, Deposit Status, Function Date, Function Time, Event Booking No., Function No., Organization, Organizer, Event Name, Venue, Event Type, Function Style, Expected Pax, Guaranteed Pax, Price per Pax, Total Charge, Discount, Net Total Charge, Contact Person, and Create BQ Sale.
-
The system will display the buttons based on user permissions.
-
Press Recovery.
-
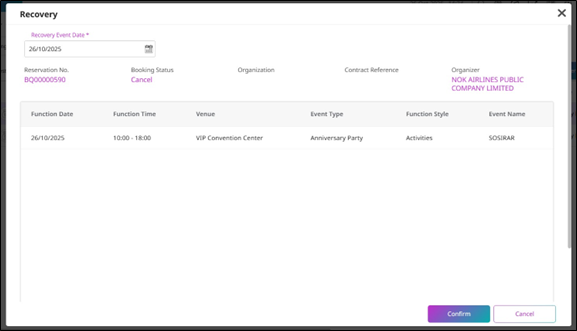
The Recovery pop-up will be displayed by the system. It will show the Reservation No., Booking Status, Organization, Contract Reference, Organizer, Function Date, Function Time, Venue, Event Type, Function Style, and Event Name of the booking.
-
The Recovery Event Date will default to the system date. You can change the recovery date if needed.
-
Press Confirm to continue the recovery process or press Cancel to discard the progress.
-
After you press Confirm, the system will show the booking in the Request tab with Request status.
Note: When a canceled booking is recovered, it will be placed into the queue for the selected venue room.
3.10 Send Mail
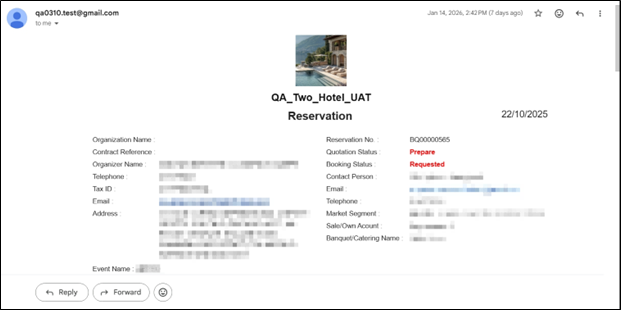
This function allows users to send an email related to a booking event. It enables users to quickly and efficiently communicate important details, updates, or confirmations about the booking to relevant parties, such as clients, event managers, or team members. The ability to send emails directly from the system streamlines communication, ensuring that all stakeholders are kept informed and up to date with the event status.
To perform the task:
-
Press Event Booking, and the system will show you the display of the Event Calendar by default.
-
Press on a Booking Event on the Calendar.
-
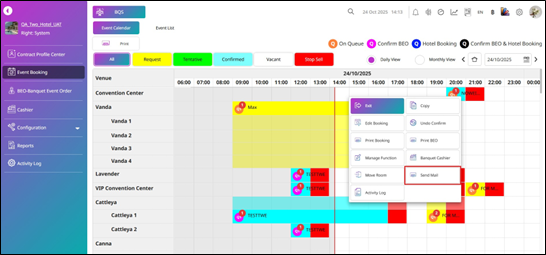
The system will show the command menu on the right for the user you are using.
-
Press Send Mail.
-
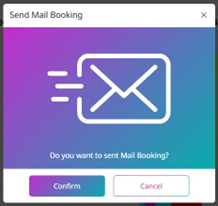
The system will show the Send Mail pop-up.
-
Press Confirm to continue the process.
-
Press Cancel to discard the process.
3.11 Confirm Booking
This function allows users to change the status of a booking to Confirmed on the calendar, indicating that the booking has been finalized and is ready for execution. However, this option is only available to users with the appropriate permissions, ensuring that only authorized personnel can confirm bookings and make them official.
To perform the task:
-
Press Event Booking, and the system will show you the display of the Event Calendar by default.
-
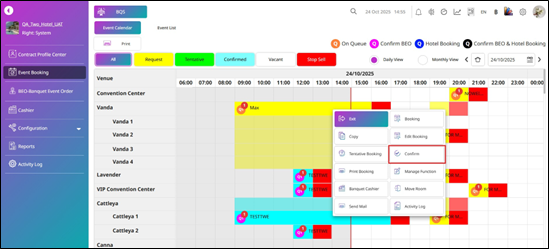
Press on a Booking Event that exists on the Calendar to close the event.
-
The system will show the command menu on the right for the user you are using.
-
Press on Confirm.
-
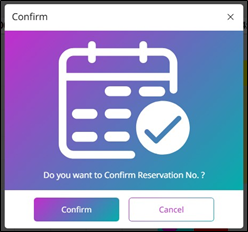
The system will show the Confirm pop-up.
-
Press Confirm to continue the progress.
-
Press Cancel to close this pop-up and discard the progress.
- After you press Confirm, the system will change the booking status to Confirmed.
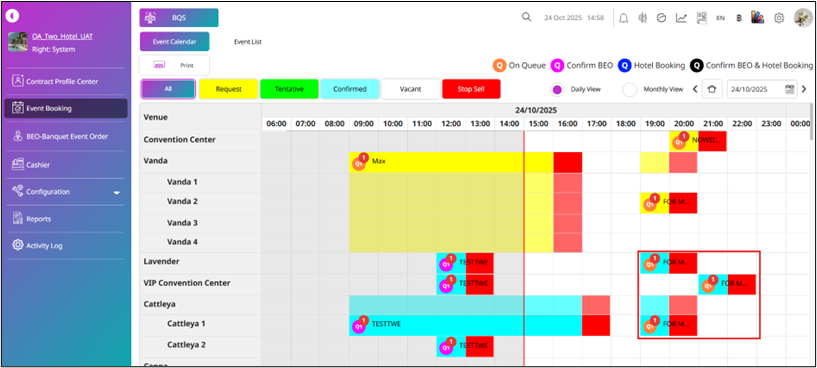
Note: You can confirm a booking that is in Request or Tentative status, changing it to Confirmed once it has been finalized. However, this action is only available to users with the appropriate permissions.
3.12 Undo Confirm Booking
This function allows users to undo a Confirmed booking and revert the status to what it was before the confirmation (e.g., Request or Tentative). However, this option is only available to users with the appropriate permissions, ensuring that only authorized personnel can make changes to the confirmed status.
To perform the task:
-
Press Event Booking, and the system will show you the display of the Event Calendar by default.
-
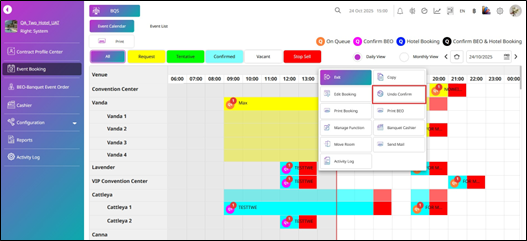
Press on a Confirm Booking Event on the Calendar.
-
The system will show the command menu on the right for the user you are using.
-
Press on Undo Confirm.
-
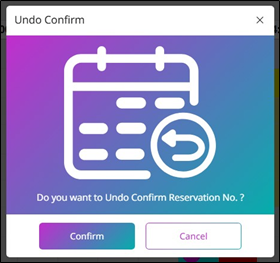
The system will show the Undo Confirm pop-up.
-
Press Confirm to continue the undo confirm progress.
-
Press Cancel to close this pop-up and discard the progress.
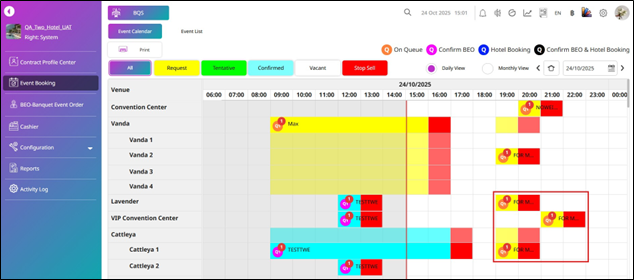
- After you press Confirm, the system will change the booking status back to the status it was before being confirmed.
3.13 Stop Sell & Release Stop Sell
This function allows users to temporarily set a Stop Sell status for a venue room, preventing new bookings during a specified period. It also allows authorized users to release the Stop Sell and reopen the venue room for bookings. Both actions are restricted by user permissions, ensuring controlled and authorized management of room availability.
To perform the task:
-
Press Event Booking, and the system will show you the display of the Event Calendar by default.
-
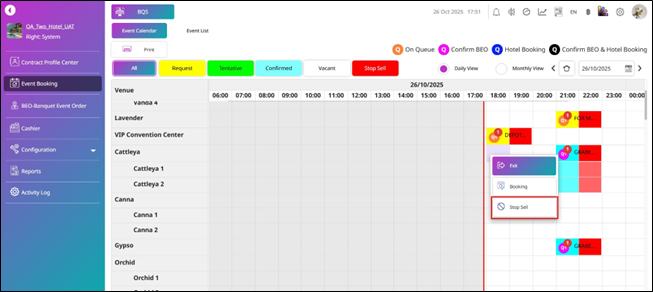
Press on a Vacant Room Venue.
-
The system will show the command menu on the right for the user you are using.
-
Press Stop Sell.
-
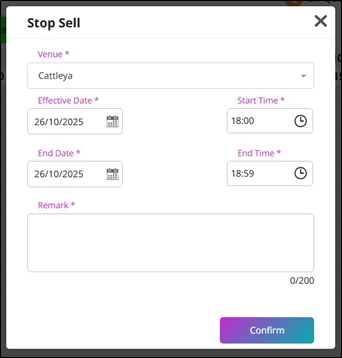
The system will show the Stop Sell pop-up. The Venue Room, Effective Date, End Date, Start Time, and End Time will be defaulted based on the period and venue you selected. You can change this information if needed.
-
Enter the Remark.
-
Press Confirm to apply the stop sell.
-
Press X to discard the progress.
-
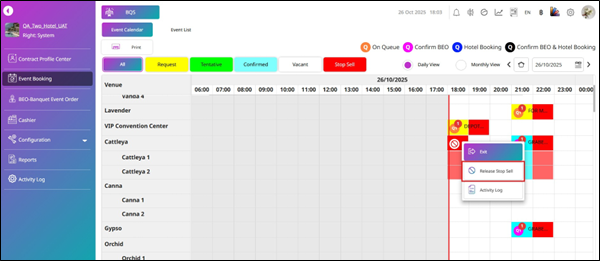
And if you want to release the Stop Sell, press on a Stop Sell period.
-
The system will show the command menu on the right for the user you are using.
-
Press Release Stop Sell.
-
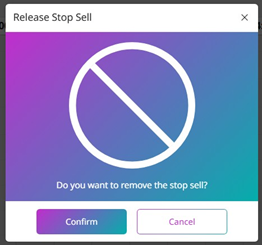
The system will show the Release Stop Sell pop-up.
-
Press Confirm to release the stop sell.
-
Press Cancel to discard the change.
Note: Booking will not be available during the Stop Sell period for the selected venue.
4. BEO-Banquet Event Order
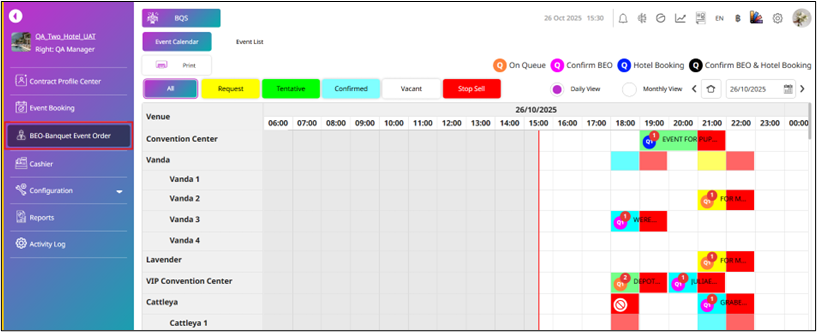
Available under BQS > BEO – Banquet Event Order, this function provides a calendar view and event list similar to the Event Booking screen. Users can perform all functions available in the Event Booking Calendar from this screen; however, each function is controlled by user permissions. The Event List displays booking events filtered by Confirmed or Canceled status, or by day or month, allowing users to manage and review banquet events from the BEO perspective with a focus on confirmed details and operational readiness.
4.1 Event Calendar
This function allows users to perform the same actions as the Event Booking screen, including Make Booking, Copy Booking, Edit Booking, Tentative Booking, Confirm Booking, Undo Confirm, Print Booking, Print BEO, Manage Function, Move Room, Send Mail, Post to Cashier, Stop Sell, and Release Stop Sell. All actions are controlled by user permissions, ensuring that only authorized users can access and perform each function according to the hotel’s policy.
To perform the task:
-
Press BEO – Banquet Event Order.
-
The system will show you the display of the Event Calendar by default.
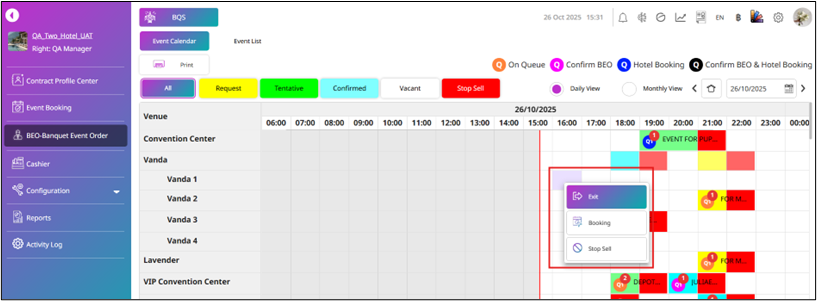
- If you press on a vacant period, the system will show the Booking and Stop Sell buttons.
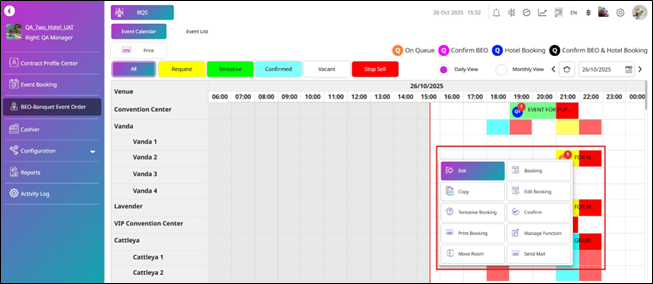
- If you press on a booking with Request or Tentative status, the system will display the Booking, Copy Booking, Edit Booking, Tentative Booking, Confirm Booking, Confirm, Print Booking, Manage Function, Move Room, and Send Mail buttons.
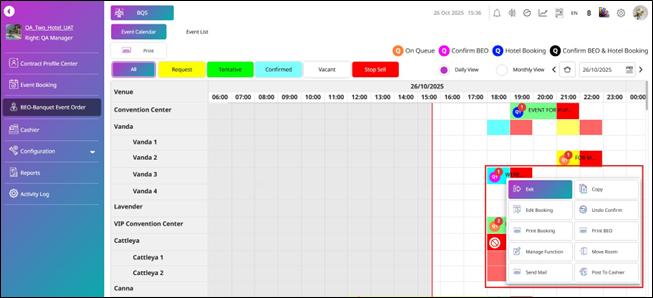
- If you press on a booking with Confirmed status, the system will display the Booking, Copy Booking, Edit Booking, Tentative Booking, Confirm Booking, Undo Confirm, Print Booking, Print BEO, Manage Function, Move Room, and Send Mail buttons.
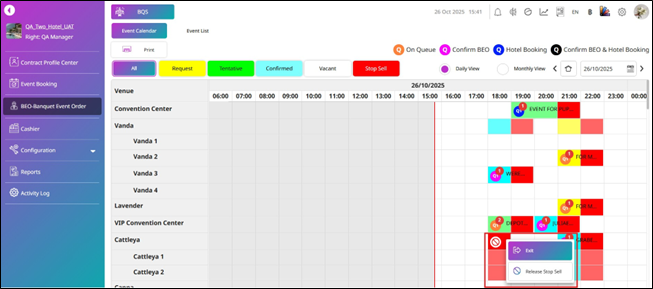
- If you press on a Stop Sell, the system will display the Release Stop Sell button.
Note: All buttons are displayed based on the user’s permissions, and you can perform the same functions as those available from the Event Calendar in Event Booking.
4.2 Event List
This function allows users to perform Print and Send Mail actions for banquet events. The information displayed in this section is organized into Event Confirmation, Event Today, This Month Event, Event Cancellation, and History. For each event, the system shows detailed information including Quotation status, Deposit status, Function Date, Function Time, Event Booking No., Function No., Organization, Organizer, Event Name, Venue, Event Type, Function Style, Expected Pax, Guaranteed Pax, Price per Pax, Total Charge, Discount, Net Total Charge, Contact Person, and Create BQ Sale. Access to actions and information is subject to user permissions and hotel policy.
To perform the task:
-
Press BEO – Banquet Event Order.
-
Press Event List.
-
The system will display the Event Confirmation tab by default.
-
This tab will display all events with Confirmed status.
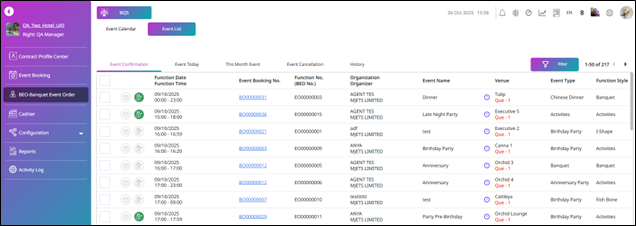
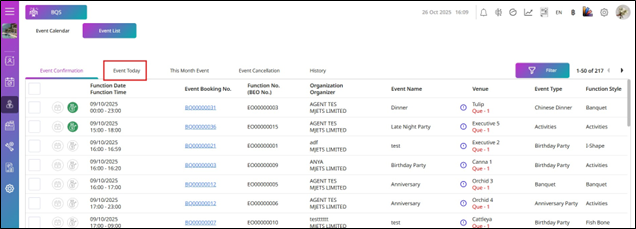
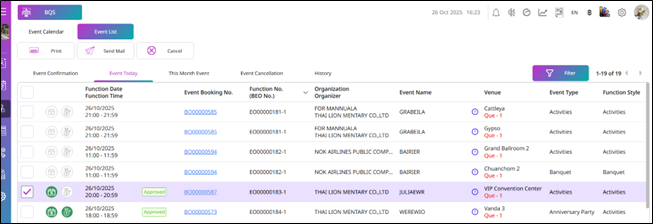
- Press Event Today.
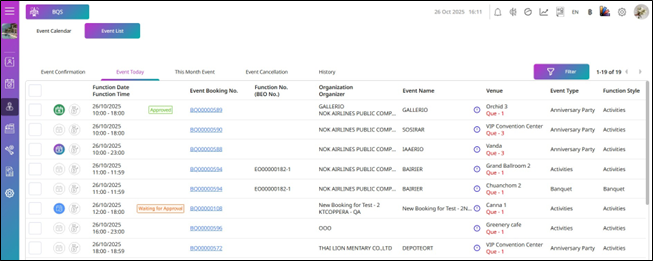
- The system will display booking information similar to the Event Confirmation tab, but it will show only the list of confirmed booking events for today.
-
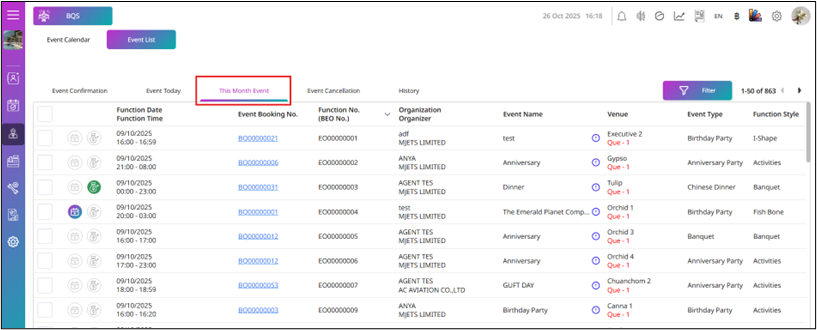
Press This Month Event.
-
This tab will display confirmed booking events for the current month only.
-
If you select a booking from the Event Confirmation, Event Today, or This Month Event tabs, the system will display the Print, Send Mail, and Cancel buttons.
-
You can press the buttons displayed by the system and perform the available functions as needed.
-
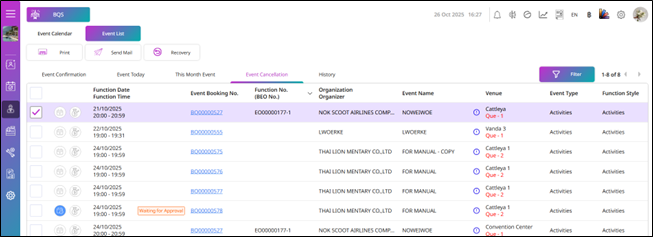
In the Event Cancellation tab, the system will display a list of all cancelled bookings.
-
If you select a booking from this list, the system will display Print, Send Mail, and Recovery buttons, depending on the user’s permissions.
-
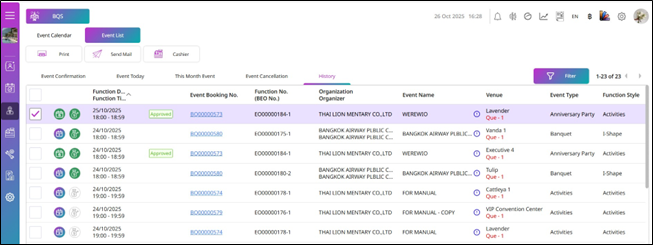
In the History tab, the system will display a list of all bookings, the same as the History tab in Event Booking.
-
If you select a booking from this list, the system will display Print, Send Mail, and Cashier buttons, depending on the user’s permissions. If the booking has not been checked out, the system will also show the transactions in the Banquet Cashier folio.
-
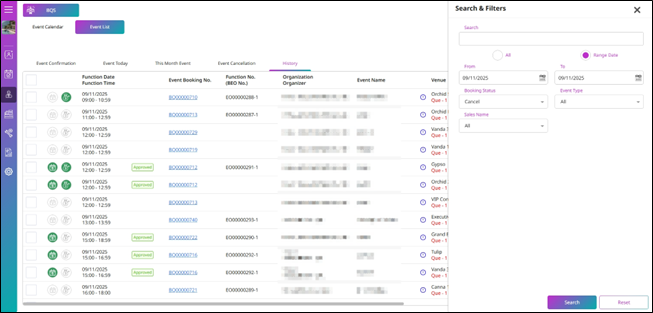
For the Search & Filter function in the Event List (BEO – Banquet Event Order), press the Filter button. The system will then display the Search & Filter panel on the right side.
-
You can search by entering a keyword in the Search field or filter by parameters such as Booking Status, Event Type, and Sales Name. If you select the Range Date radio button, the system will display the Date (From – To) parameters for selection. Then press Search.
-
The system will display the results based on the entered keyword and selected filter criteria.
-
Press Reset to reset the data in the Search & Filter panel to the default settings.
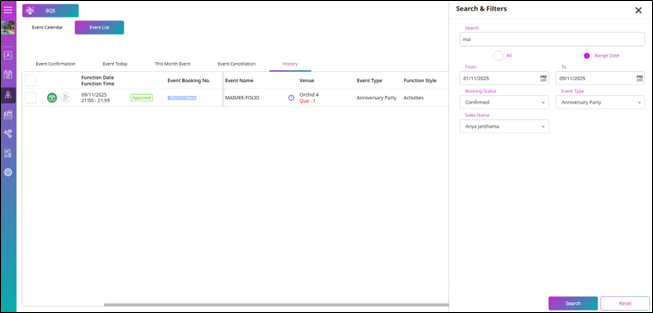
Note: For Event Confirmation, the Booking Status parameter will be fixed as Confirm, and for Event Cancellation, the Booking Status parameter will be fixed as Cancel. These parameters cannot be changed when using the filter.
4.3 Edit Booking
This function allows users to edit an existing booking on the calendar. However, the system restricts editing permissions based on user roles. Users with the appropriate rights can make changes, while those without editing privileges will not be able to modify the booking. The only exception is when the booking was created by the user, who is considered the "owner" of the booking, allowing them to edit it regardless of their role.
To perform the task:
-
Press Event Booking, and the system will show you the display of the Event Calendar by default.
-
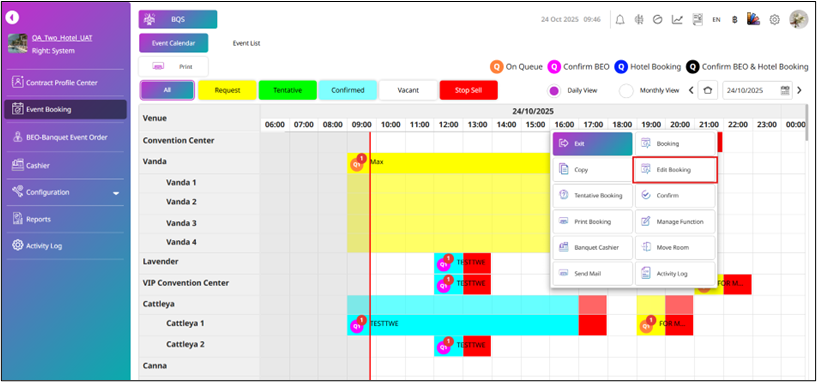
Press on a Booking Event that exists on the Calendar to close the event.
-
The system will show the command menu on the right for the user you are using.
-
Press on Edit Booking.
-
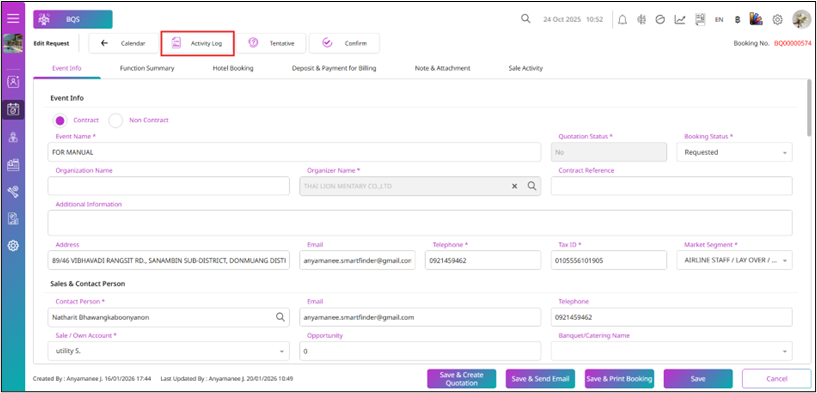
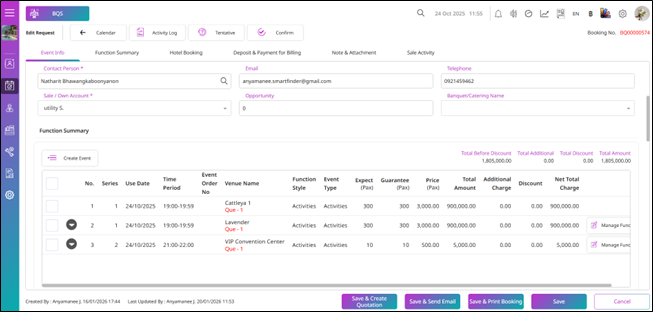
The system will show you the Edit Request, where you will see all the detailed information for the booking.
-
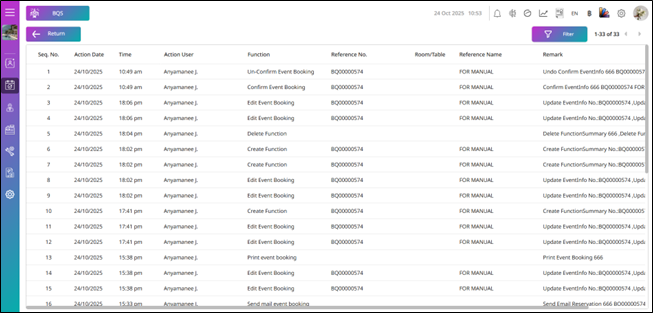
The system will show the Activity Log button. If you press the button, the system will show you the activity log of this booking.
- It will include entries such as Create Event Booking, Edit Event Booking, Create Function, etc., showing the activities and changes made to the booking.
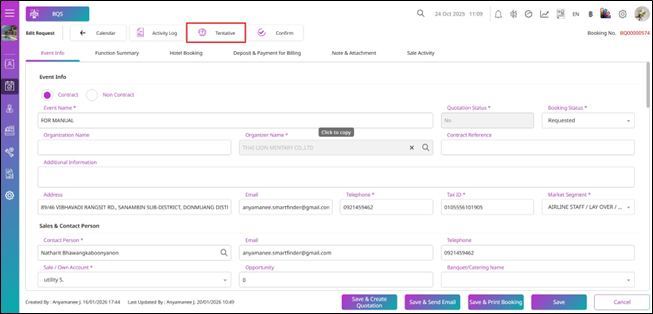
- If you press the Tentative button, the system will show the Tentative Event Booking pop-up.
-
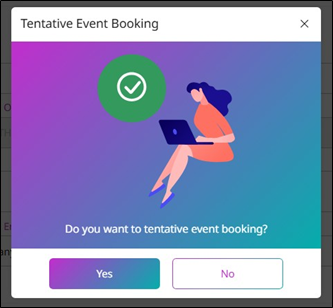
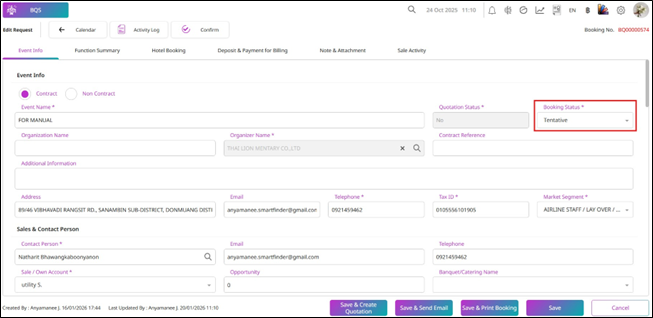
If you press Yes on the pop-up, the system will change the booking status to Tentative.
-
If you press No, the system will close the pop-up and discard the progress.
-
And if you press the Confirm button, the system will show the Confirm Event Booking pop-up.
-
The status of the booking will change to Confirmed.
-
And you can edit the information for this booking.
-
After editing, press Save, and the system will stamp the user and date/time for the Last Update.
-
Press Cancel to discard the changes or press Back to Calendar to return to the calendar without saving the changes.
Note: Only users with the appropriate permissions can edit bookings. Users can edit their own bookings, but others cannot unless they are the booking owner. Ensure permissions are properly set for access control.
4.4 Manage Function
This function allows users to manage banquet event details directly from the calendar. Users can view, update, or modify various items by function, such as room assignments, event timings, and resources. It offers an efficient way to make real-time changes, ensuring that all event details are accurate and up to date for seamless event execution.
To perform the task:
-
Press Event Booking, and the system will show you the display of the Event Calendar by default.
-
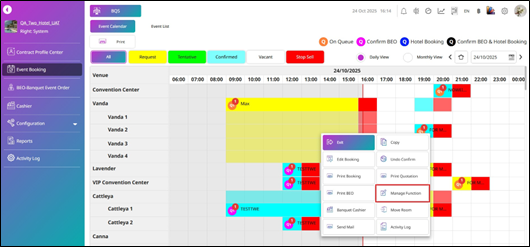
Press on a Booking Event on the Calendar.
-
The system will show the command menu on the right for the user you are using.
-
Press Manage Function.
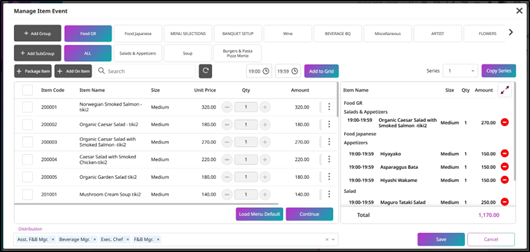
- The system will show the Manage Item Event. If the booking event hasn't made the Confirm BEO yet, this pop-up will show Save and Cancel buttons.
-
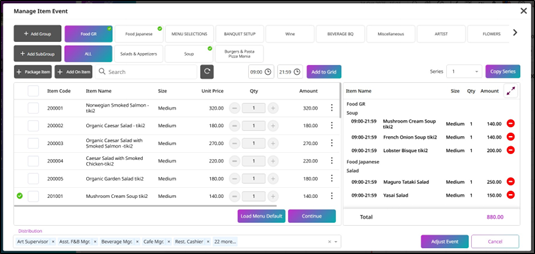
If the booking event has made the Confirm BEO, this pop-up will show Adjust and Cancel buttons.
-
You can manage the item you want.
-
Press Adjust or Save to save the progress.
-
Press Cancel to close this pop-up and discard the changes.
4.5 Confirm BEO
This function allows users to confirm the BEO (Banquet Event Order) for a booking that is already in Confirmed booking status. The confirmation is performed by Function Series, ensuring that each function within the booking is properly confirmed and ready for operational execution.
To perform the task:
-
Press Event Booking.
-
Press Event List.
-
Press the Confirmation tab.
-
Press the Event Booking No. that does not have a BEO No. yet.
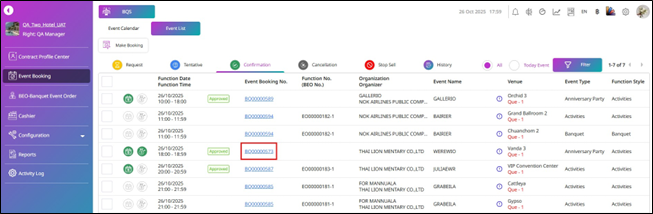
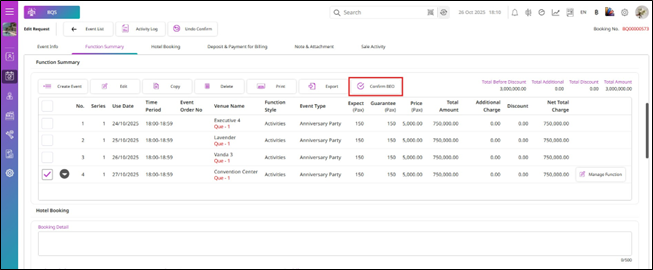
- Select the function, then press Confirm BEO.
-
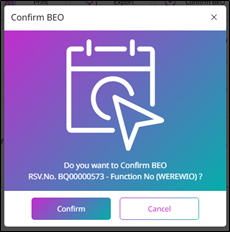
The Confirm BEO pop-up will be displayed.
-
Press Confirm to continue the process, or press Cancel to discard the progress.
- The system will automatically generate the Event Order No.
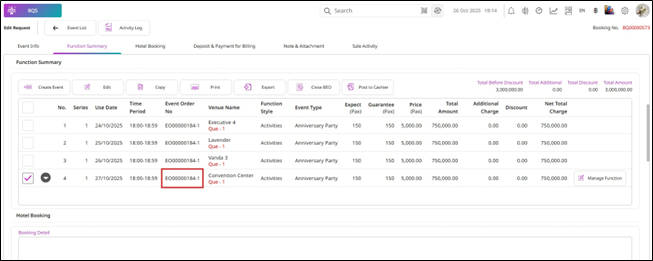
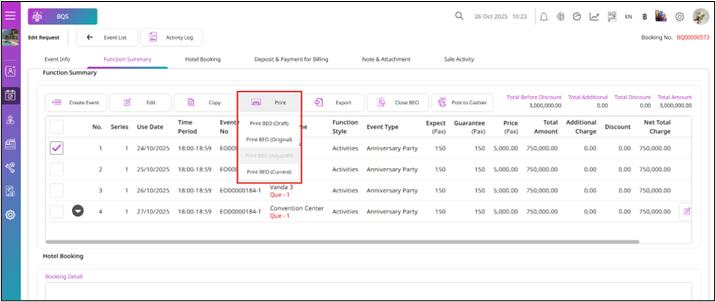
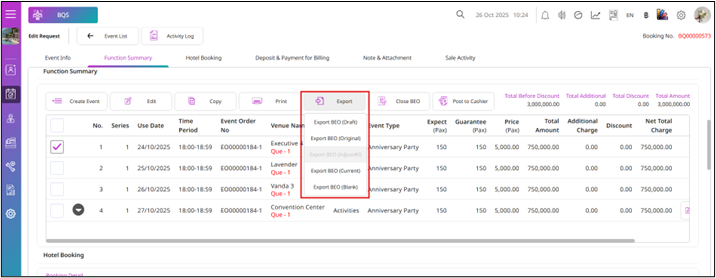
- After the Event Order No. is generated, when you press Print, the system will allow you to Print BEO Original and Export BEO Original.
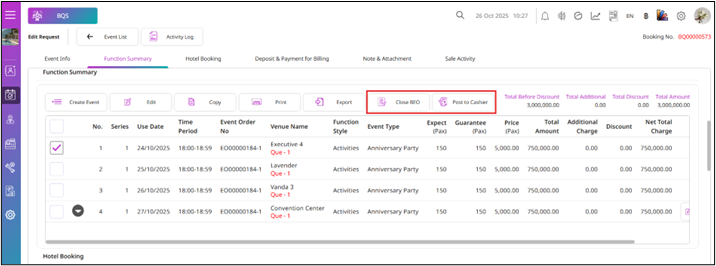
- The system will also allow you to perform the Close BEO and Post to Cashier functions.
4.6 Print BEO
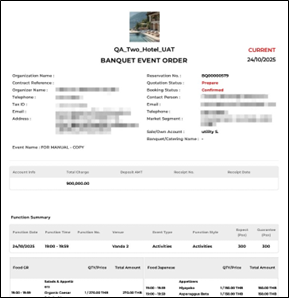
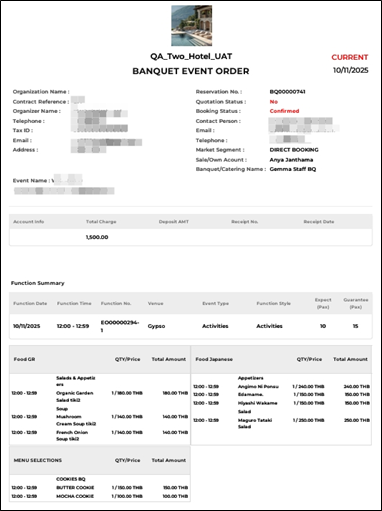
This function allows users to print the Banquet Event Order (BEO) and the details of a confirmed booking event. The print option is only available to users with the appropriate rights and can only be accessed for bookings that are in Confirmed status. The printed BEO includes all relevant event details and management information required for the event.
To perform the task:
-
Press Event Booking, and the system will show you the display of the Event Calendar by default.
-
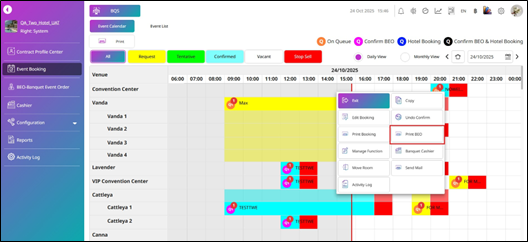
Press on a Confirmed Booking Event on the Calendar.
-
The system will show the command menu on the right for the user you are using.
-
Press Print BEO, and the system will show the event for this booking, including the function series for the event booking.
4.7 Post to Cashier & Print Proforma BEO
This function allows users to post transactions related to a booking event to the cashier for billing and payment processing. This option is available only for events that already have a Confirmed BEO, ensuring that transactions are posted only after the event details are finalized.
To perform the task:
-
Press Event Booking.
-
Press Event List.
-
Press the Confirmation tab.
-
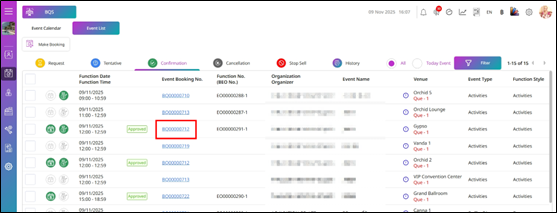
Press the Event Booking No. that already has a BEO No.
-
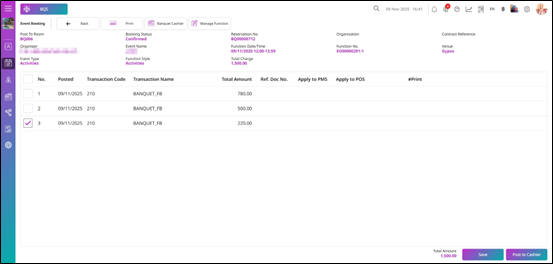
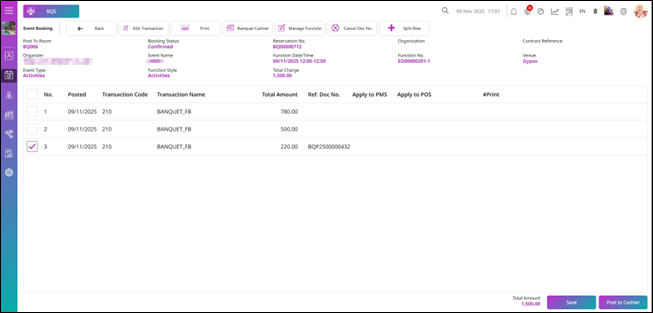
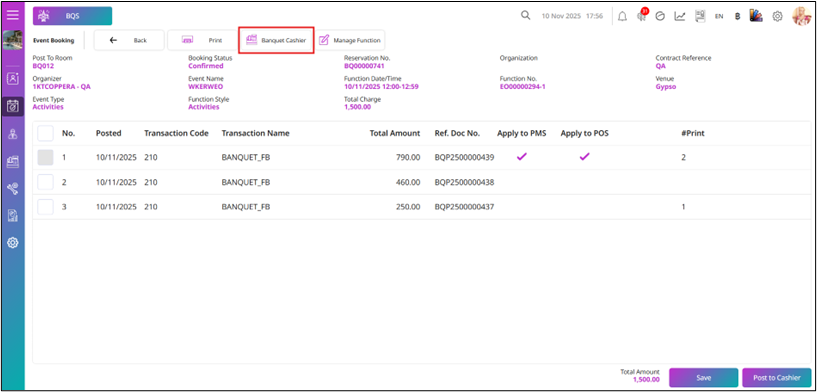
The system will show the Post to Cashier page. This page will display Banquet Cashier, Booking Status, Reservation No., Organization, Contract Reference, Organizer, Event Name, Function Date/Time, Function No., Venue, Event Type, Function Style, Total Charge, and the Transactions for this booking event by function series.
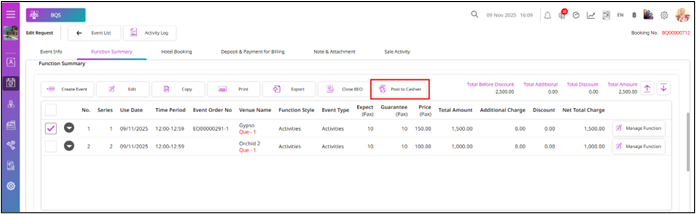
- Select event and press Post to Cashier.
- Select the transaction and press Save to generate the document, but it will not be posted to the Cashier yet.
- If you select a transaction that has a Ref. Doc. No., the system will display the Edit Transaction, Cancel Doc., and Split Bill buttons.
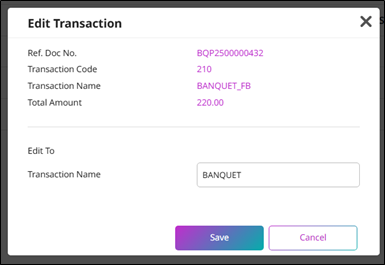
- Press Edit Transaction, and the Edit Transaction pop-up will be displayed. You can enter the Transaction Name and press Save to update the transaction, or press Cancel to discard the changes.
-
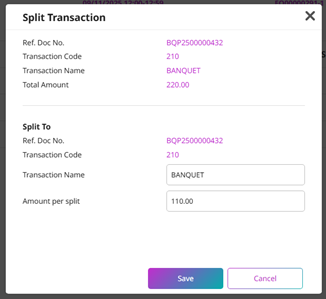
If you want to split the bill for the selected transaction, press Split, and the Split pop-up will be displayed.
-
You can enter the Transaction Name and the Amount per split for the new transaction you want to split. Press Save to continue, or press Cancel to discard the action.
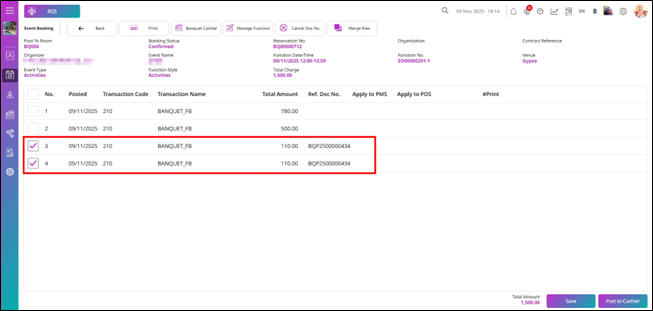
- After you press Save to continue the Split Bill process, the system will display the split bills.
-
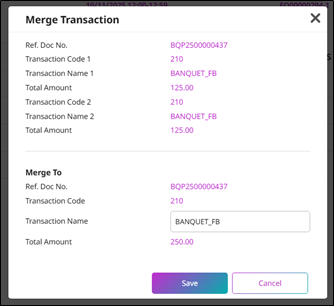
If you want to merge transactions, you can only merge transactions that have the same Ref. Doc. No. Select the two transactions with the same Ref. Doc. No., and the Merge button will be displayed.
-
Then press Merge, and the Merge Transaction pop-up will be displayed. In this pop-up, you can enter the Transaction Name to change the name for the merged transaction. Press Save to continue, or press Cancel to discard the action.
-
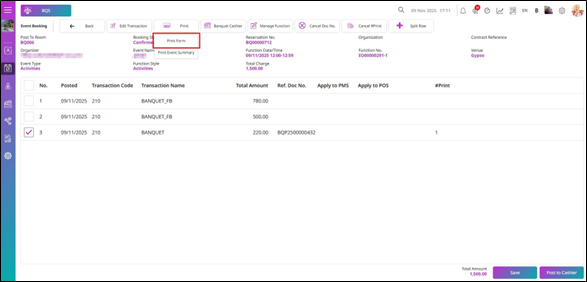
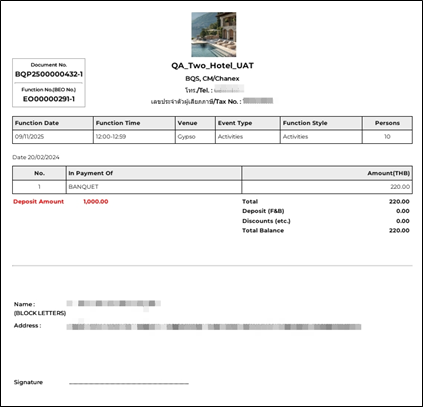
For Print Form, Press Print and select Print Form. The system will display the document and stamp 1 in the #Print column.
-
You can press Cancel #Print to cancel the print number.
-
If you press Cancel Doc. No., the system will cancel the actions performed for Split, Merge, #Print, and Ref. Doc. No.
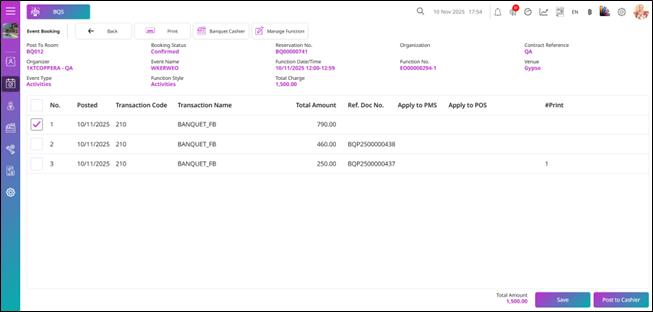
- You can also select the transaction and press Post to Cashier to post the transaction to the room folio cashier.
-
If the posting is successful, the system will automatically generate a Ref. Doc. No. and apply the transaction to both PMS and POS.
-
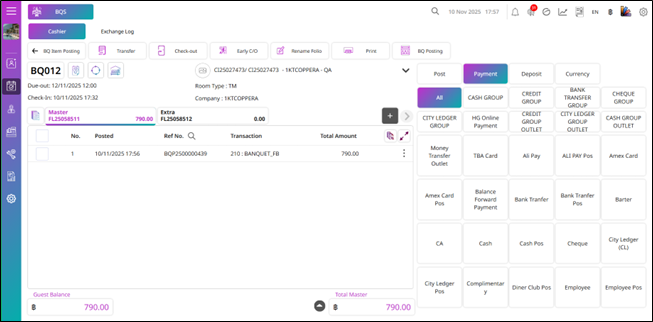
If you want to go to the cashier for this booking, press Banquet Cashier.
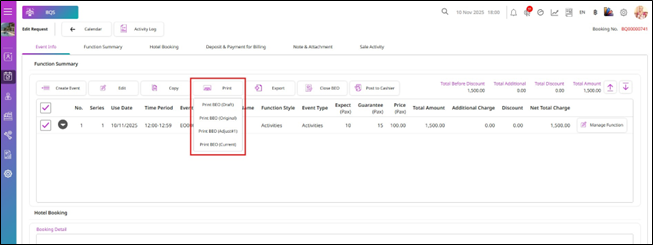
- To Print the BEO for a function by series, select the function and press Print. The system will display the Draft, Original, Adjust, and Current BEO options.
4.8 Close BEO
This function allows users to post transactions to the cashier and close the BEO (Banquet Event Order). This option is available only for events that already have a Confirmed BEO, ensuring that all event details and transactions are finalized before closing.
To perform the task:
-
Press Event Booking.
-
Press Event List.
-
Press the Confirmation tab.
-
Press the Event Booking No. that already has a BEO No.
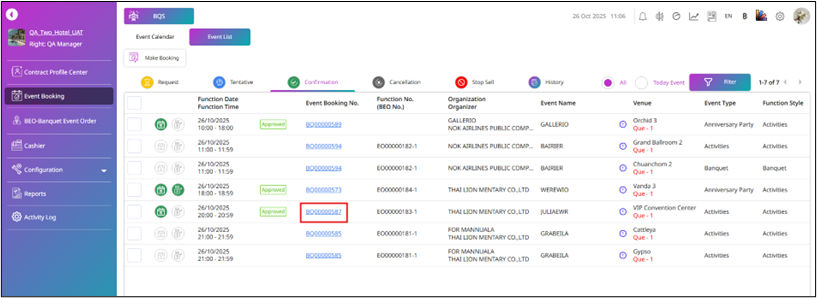
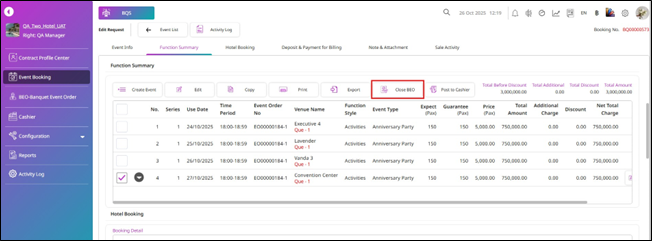
- Select the event and press Close BEO.
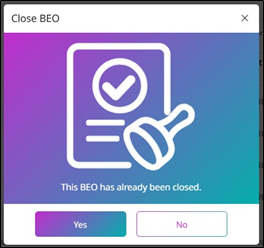
- The Close BEO pop-up will be displayed. Press Yes to continue the process or press No to discard the progress.
-
The system will show the Post to Cashier page. This page will display Banquet Cashier, Booking Status, Reservation No., Organization, Contract Reference, Organizer, Event Name, Function Date/Time, Function No., Venue, Event Type, Function Style, Total Charge, and the Transactions for this booking event by function series.
-
This page will allow you to perform functions that are almost the same as the Post to Cashier function.
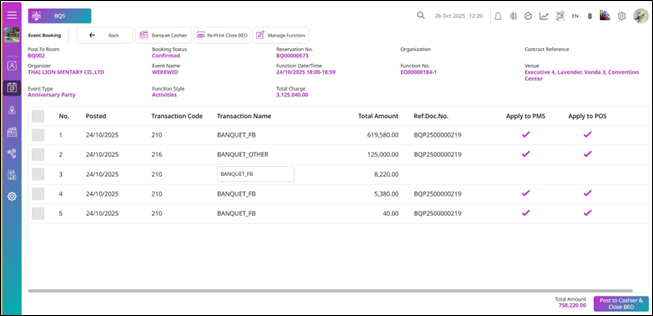
- Press Post to Cashier & Close BEO and the system will post the transaction to the cashier, automatically print the Close BEO, and then redirect you to the Banquet Cashier page.
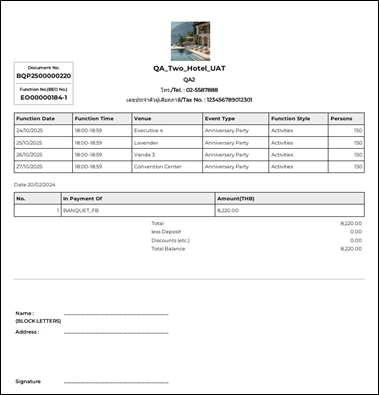
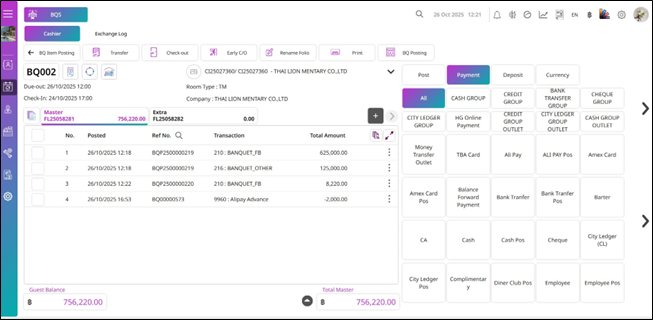
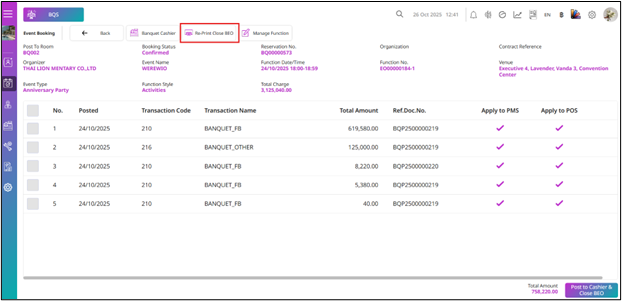
- The Re-Print Close BEO option will be displayed after you complete the Close BEO process.
5. Cashier
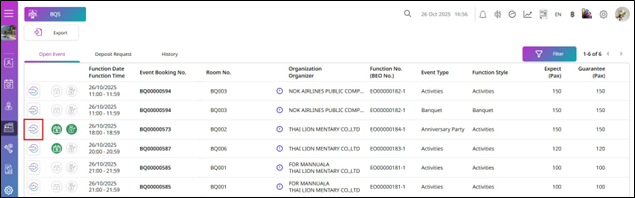
Available under BQS > Cashier, this function displays booking information across the Open Event, Deposit Request, and History tabs. The information includes Quotation status, Deposit status, Function Date, Function Time, Event Booking No., Function No., Organization, Organizer, Event Name, Venue, Event Type, Function Style, Expected Pax, Guaranteed Pax, Price per Pax, Total Charge, Discount, Net Total Charge, Contact Person, and Create BQ Sale. Users can export the information or navigate directly to the cashier page of a booking event to manage the associated folio.
To perform the task:
-
Press Cashier.
-
The system will show you the display of the Open Event by default.
-
The system will display booking event information including Quotation Status, Deposit Status, Function Date, Function Time, Event Booking No., Function No., Organization, Organizer, Event Name, Venue, Event Type, Function Style, Expected Pax, Guaranteed Pax, Price per Pax, Total Charge, Discount, Net Total Charge, Contact Person, and Create BQ Sale.
-
The Open Event list will display only bookings that have already completed the Confirm BEO process.
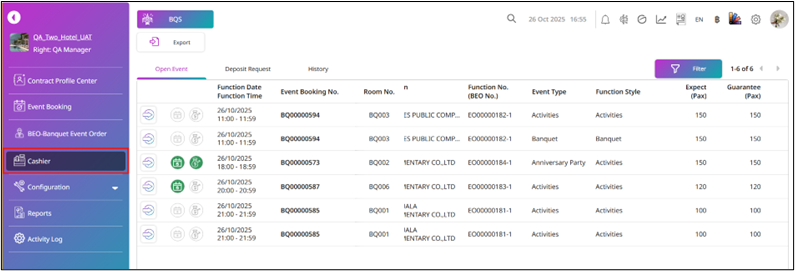
- Press Select & Go icon to go to the Banquet Cashier for this booking event.
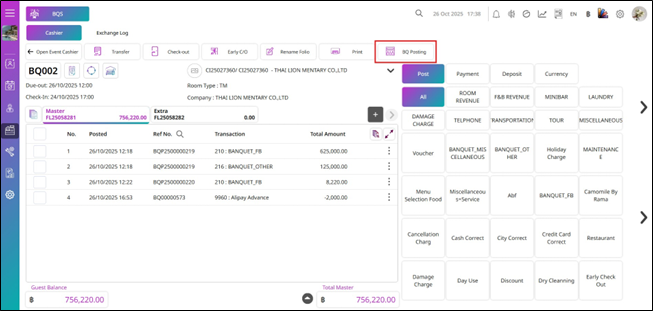
-
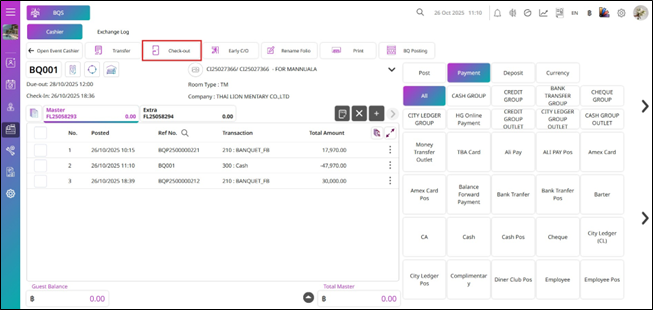
You will see all transactions for the booking event by folio.
-
If you want to further manage functions, you can press BQ Posting to adjust the functions by event.
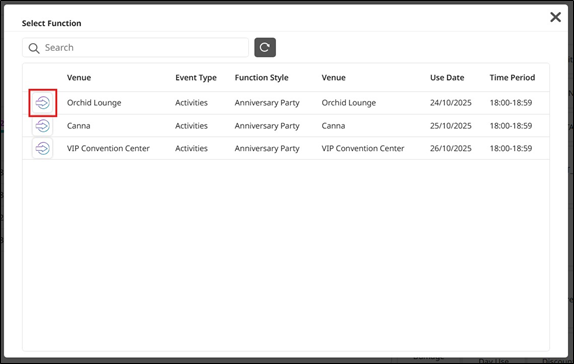
- The Select Function pop-up will be displayed. Press the Select & Go icon for the function you want.
- The system will show the Manage Item Event pop-up. You can manage the items for the function and press Adjust Event to continue the process, or press Cancel to discard the progress.
- After you clear all transactions in the folio, you can press Check Out to complete the checkout for this booking’s folio.
-
For the Deposit Request tab, the system will display a list of bookings that have deposit records.
-
Press Select & Go icon.
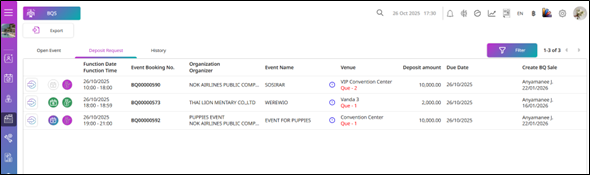
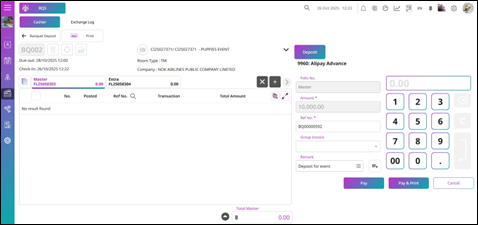
- If the deposit for a booking event is still in Request Deposit status, the system will show the Cashier page, and you must receive the deposit before proceeding.
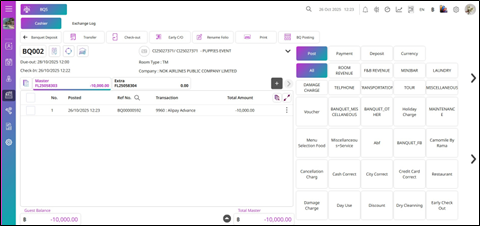
- If the deposit status for a booking event is Paid, the system will show the Cashier page.
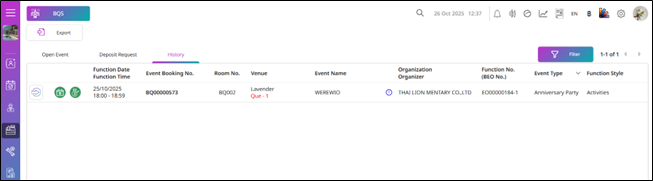
- In the History tab, the system will display the history records of booking events, and by default, the list will show data from 1 day prior to the system date.
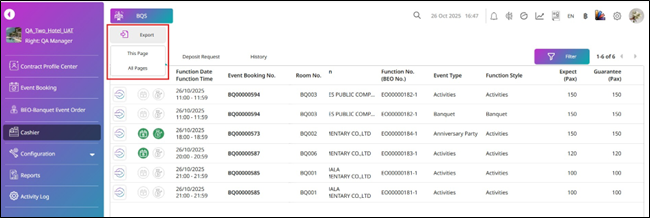
- Press Export if you want to export the information. You can choose to export This Page or All Pages.
.
Note: All tabs in the Cashier menu display the same booking event information; however, the ability to perform actions is controlled by user permissions.
6. Activity Log
This function allows users to access the Activity Log for a booking event. The system records and stores all actions taken on the booking event, providing a detailed history of updates, changes, and user interactions. This helps track the event’s progress, ensures accountability, and allows for easy review of past actions.
To perform the task:
-
Press Event Booking, and the system will show you the display of the Event Calendar by default.
-
Press on a Booking Event on the Calendar.
-
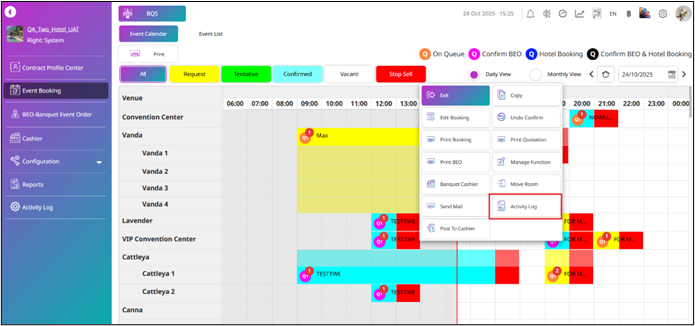
Press Activity Log.
-
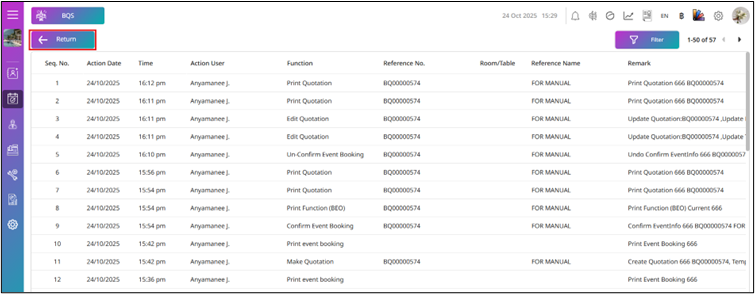
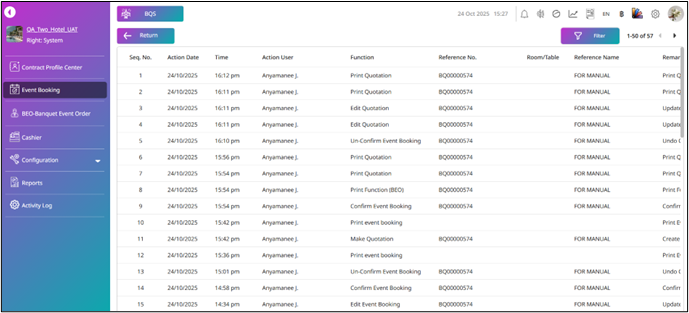
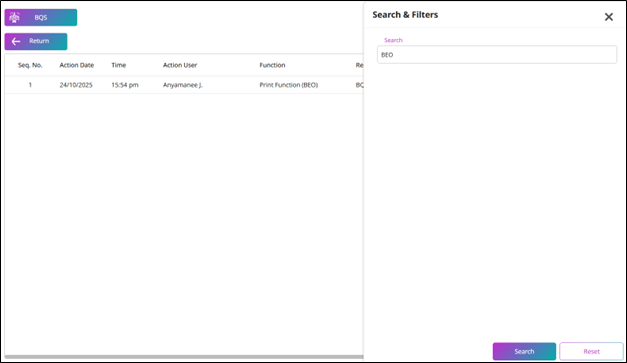
The system will show the Activity Log page for this booking event.
-
You will see the log activity of the booking event, sorted by the latest actions.
-
Press Filter to open the Search & Filters function.
-
You can enter a keyword and press Search to search and show the activities related to the keyword, or press Reset to reset the keyword.
-
Press X to close the Search & Filters function.
- Press Return to go back to the Event Calendar.