BQS - Banquet Quotation System Setup User Guide
1. Overview
This BQS Operation guide explains how to use the BQS (Banquet Quotation System) for Sales / Event / Operations teams to manage banquet events end-to-end. It covers the full process from creating an Event, preparing a Quotation, generating operational documents such as the BEO / Function Sheet, recording and tracking Deposits, to Confirming the event and handing over relevant information to the operations team or other connected systems.
2. Banquet Policy
Available under BQS > Configuration > Policy, the BQS Policy defines the default banquet reservation time (start/end and any buffer time) used for room blocking and conflict prevention, and it also sets the default values applied when adding an Open Item Add-on through the Manual Function, including category/type, quantity/unit, and time alignment with the event.
To perform the task:
-
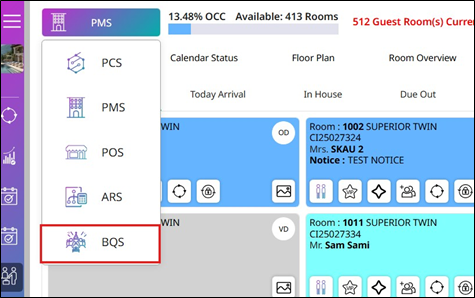
Press Business Unit
-
Select BQS as the Business Unit.
-
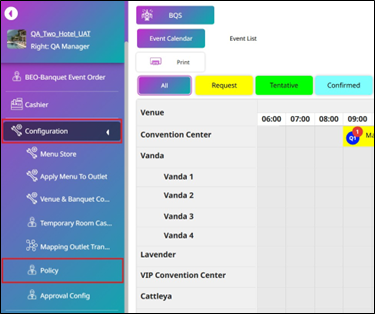
Press Configuration.
-
Press Policy.
-
Press Policy.
-
From the top-left dropdown, press Banquet Policy.
-
Press the Subject you want to enable.
-
Enter the required values in the Parameter column:
- Can reservation on time: The earliest time the system allows reservations/blocking (HH: mm, e.g., 05:00).
- Can reservation to end time: The latest time the system allows reservations/blocking (e.g., 23:00 or 02:00 if your policy allows past midnight).
- Default Menu code for post open food: Default menu code used when posting Open Food (e.g., OPF001) , and the item code must match the one set for Open Food items.
- Path template form: File path/location for the template form (if used).
-
Press Save to confirm and apply the policy settings.
-
Press Cancel to discard changes.
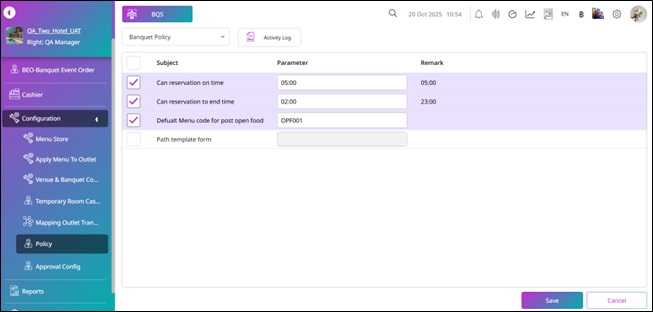
Note: Ensure the selected Subject and all Parameter values are correct before pressing Save, as this may affect reservation time blocking and conflict prevention. Also, make sure the Default Menu code for posting Open Food matches the one set for Open Food items.
3. Approval Config
Available under BQS > Configuration > Approval Config, the Approval Config is used to define the approval workflow for banquet quotations, including the required approval steps before a quotation can be confirmed or finalized. This configuration depends on each hotel’s operating policy; if the hotel does not require quotation approval, staff should turn OFF the Approval Banquet Quotation status so quotations can proceed without approval routing.
To perform the task:
-
Press Configuration.
-
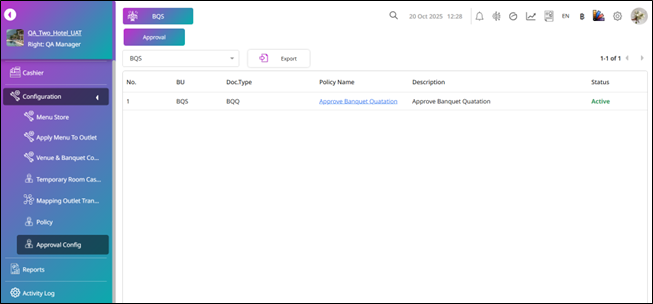
Press Approval Config.
-
Select the Business Unit as BQS.
-
The system will display the Approve Banquet Quotation approval policy. By default, the policy status is Active.
-
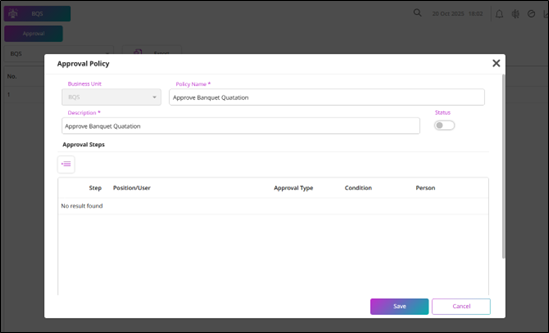
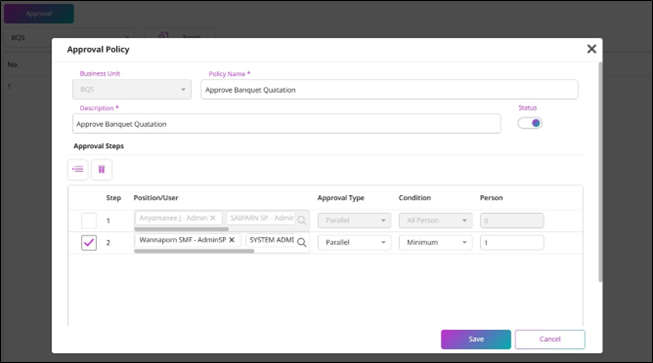
Press the Policy Name (Approve Banquet Quotation). The Approval Policy pop-up will be displayed.
- If the hotel does not use the approval flow for banquet quotations, turn the policy Status to Inactive, then press Save to update the policy status.
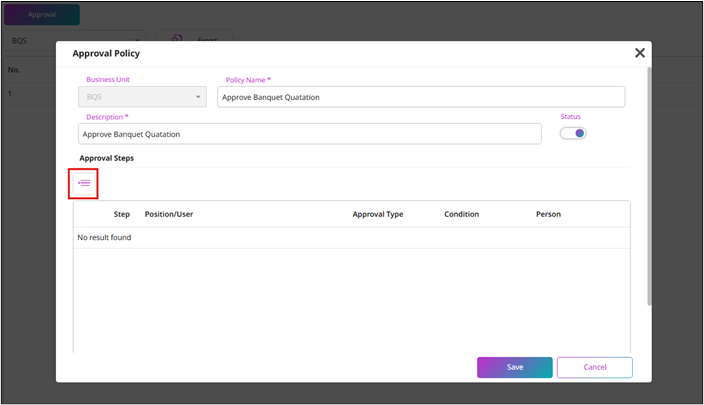
- If the hotel uses the approval flow for banquet quotations, keep the policy Status set to Active, then press Add Approval Steps.
-
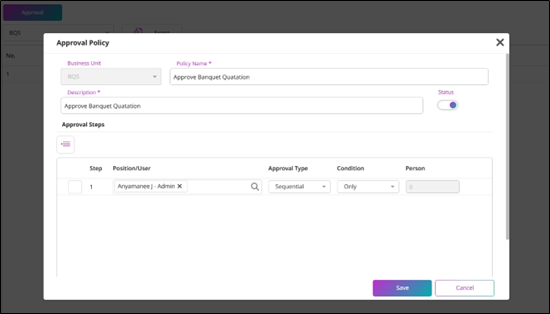
After you press Add Approval Steps, the system will display the step records one by one. By default, the approval type will be set to Sequential, and the sequential flow will allow the Condition to be set as Only.
-
Press the Search icon in the Position/User field. The system will display the Select User Position. You can then press the select icon to choose a user.
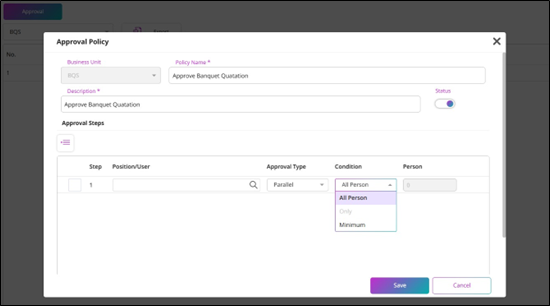
- If you select the Approval Type as Parallel, you can choose the Condition as either All Person or Minimum (in which case you must enter the number of persons required for approval). When selecting the Position/User, you will be able to select more than one user.
- You can also add more steps to set up the approval flow as needed.
For example, to get the approval for the quotation:
- Every user in Step 1 must approve the quotation first.
- Once all users in Step 1 approve it, the user in Step 2 can approve it, but at least 1 person must approve it (as set in the Minimum condition).
- The approval process will be successful when the flow follows this sequence.
-
Press Save to confirm and apply the changes.
-
Press Cancel to discard the changes.
4. Venue Setup
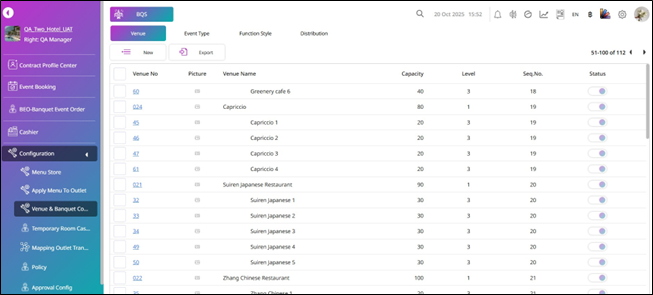
Available under BQS > Configuration > Venue & Banquet Config > Venue, this function allows users to create, merge, and delete Venue rooms for banquet events. It helps manage the available rooms for various events, ensuring the system accurately reflects room availability and the correct setup for each event.
4.1 Create Venue
This function allows users to add new venue rooms into the system by defining the room’s level, capacity, and sequence. This feature enables the hotel to accommodate new event spaces as they become available, ensuring that the system remains up to date with the hotel’s current room inventory and is ready for event scheduling.
To perform the task:
-
Press Configuration.
-
Press Venue & Banquet Config, and the system will default to the Venue tab menu.
-
Press New to create a new venue room.
-
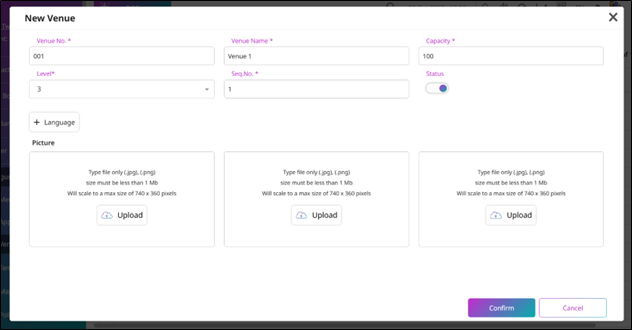
The system will show you the New Venue pop-up.
-
Enter the Venue No. and Venue Name.
-
Enter the Capacity for this venue room.
-
The system will default the Level to Level 3, but you can change the level. When creating a new venue, you can only select Level 1 or Level 3.
-
Enter the Seq. No.
-
If you want to add another language, press the + Language button and fill in the information.
-
If you want to add a picture, press Upload, and select the picture you want.
-
Press Save to create the venue room.
-
Press Cancel to discard the progress.
4.2 Merge Venue
This function enables the user to merge multiple smaller venue rooms into one combined space in the system. It is especially helpful for events that require more space than a single room can offer, allowing for flexible room configurations to accommodate larger events.
To perform the task:
-
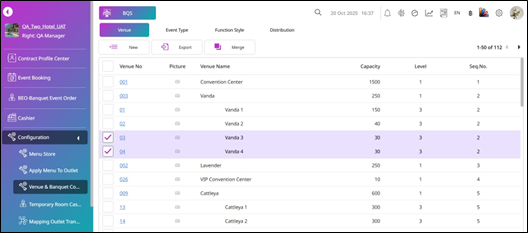
To merge the venue rooms, you must select more than one venue room in Level 3
-
Then press Merge.
-
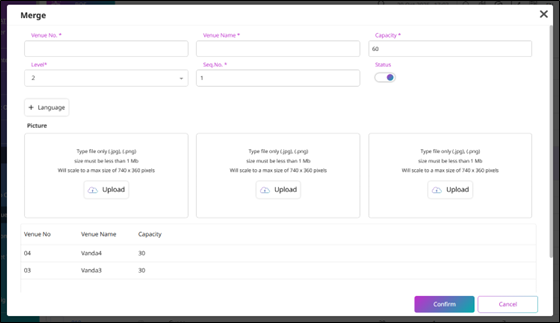
The Merge pop-up will be displayed.
-
You will see all the venue rooms that you selected to merge listed below.
-
Enter the information just like when you create a new venue room, but the Level will be defaulted to Level 2. You can change the level to either Level 1 or Level 2.
-
Press Save to create the merged venue room.
-
Press Cancel to discard the progress.
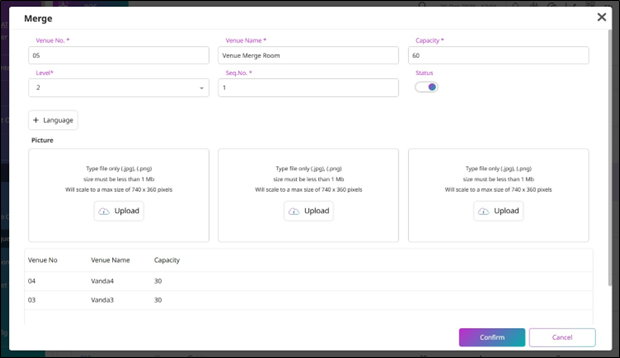
Note: Merging rooms creates a single venue space, removing the individual rooms from the system. Ensure the combined space meets event requirements and check for scheduling conflicts.
5. Event Type Setup
Available under BQS > Configuration > Venue & Banquet Config > Event Type, this function allows users to manage and configure various Event Types for banquet events. By defining different event categories (e.g., conferences, weddings, corporate events), this feature helps organize and classify events in the system, making it easier to track, manage, and allocate resources based on the specific requirements of each event type.
To perform the task:
-
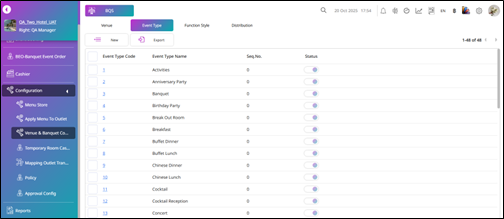
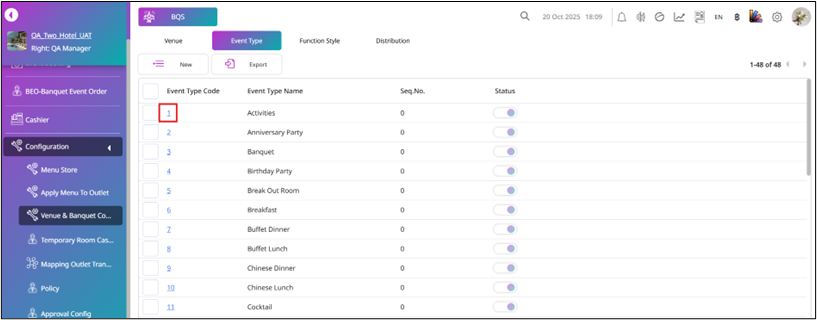
Press the Event Type tab menu, and the system will display data for event types.
-
The data for event types will be default from the script. You can edit the data or create an event type.
-
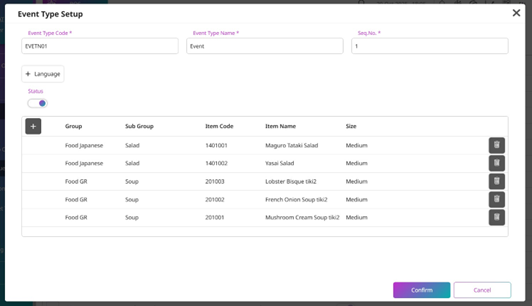
Press New to create a new Event Type, and the system will display the Event Type Setup pop-up.
-
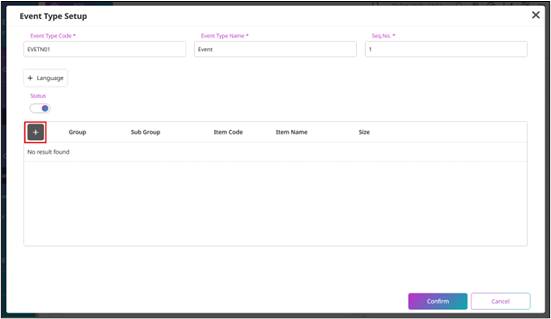
Enter the Event Type Code and Event Type Name and the Seq. No.
-
Press + to select the items to set the default load for this event type.
-
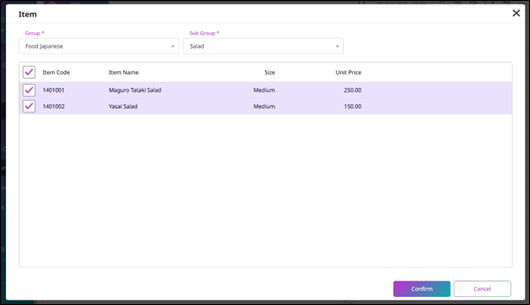
The system will display the Item pop-up.
-
Select the Group and Subgroup, and the system will load and display the items in this subgroup.
-
Select the items and press Confirm, and the system will bring you back to the Event Type Setup pop-up, showing the selected items. Alternatively, press Cancel to discard the progress and not select any items.
-
Press Save to continue the progress.
-
Press Cancel to discard the changes.
- If you want to edit the event type, you must press on the Event Type Code.
-
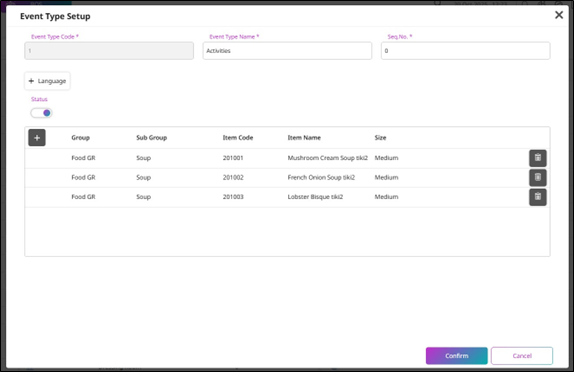
The Event Type Setup pop-up will then be displayed.
-
It will be allowed to change the Event Type Name, Seq. No, and Items. You can modify this information if needed.
-
Press Save to save the changes.
-
Press Cancel to discard the changes.
6. Function Style Setup
Available under BQS > Configuration > Venue & Banquet Config > Function Style, this function allows users to manage and configure various Function Styles for banquet events. By defining different function styles (e.g., classroom, theatre, banquet), this feature helps organize events based on their layout and setup requirements, ensuring efficient room allocation and setup management.
To perform the task:
-
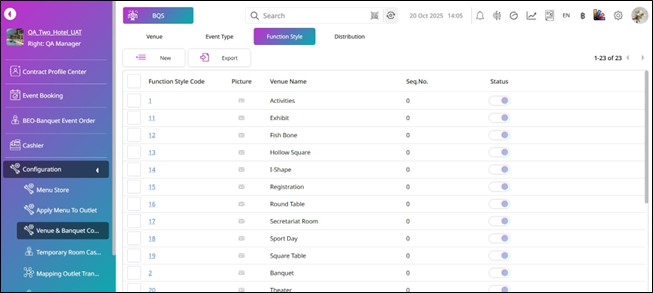
Press the Function Style tab menu, and the system will display data for function styles.
-
The data for function styles will be default from the script. You can edit the data or create a new style.
-
To create a new function style, you must press New.
-
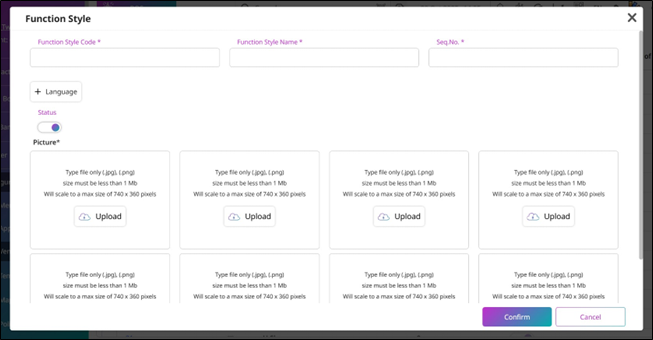
The system will show the Function Style pop-up.
-
Enter the Style Code, Style Name, and Seq No.
-
If you want to add more languages, press + Language, and you can enter the Style Name in any other language you want.
-
If you want to upload a picture for the function style, press Upload.
-
Press Save to continue creating the function style.
-
Press Cancel to discard the progress.
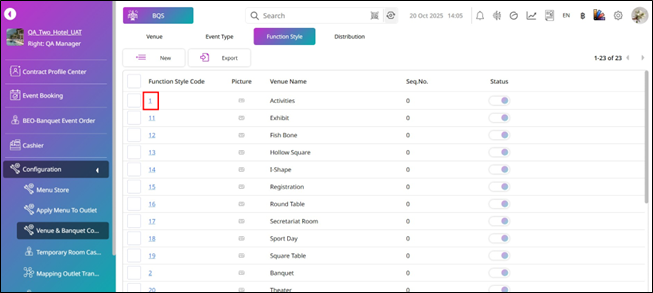
- If you want to edit the function style, you must press on the Function Style Code.
-
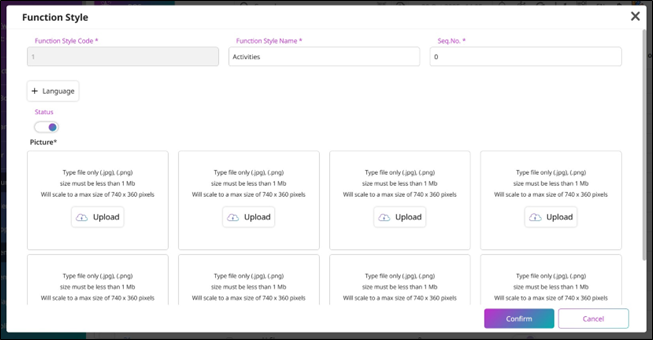
The Function Style pop-up will be displayed, but it will allow you to edit only the Style Name, Seq No., and the Picture.
-
Press Save to save the changes.
-
Press Cancel to discard the changes.
7. Distribution Setup
Available under BQS > Configuration > Venue & Banquet Config > Distribution, this function allows users to manage and configure various distributions for banquet events. The default data for distributions is automatically populated from the system script, ensuring consistency, and reducing manual input when setting up distribution details for events.
To perform the task:
-
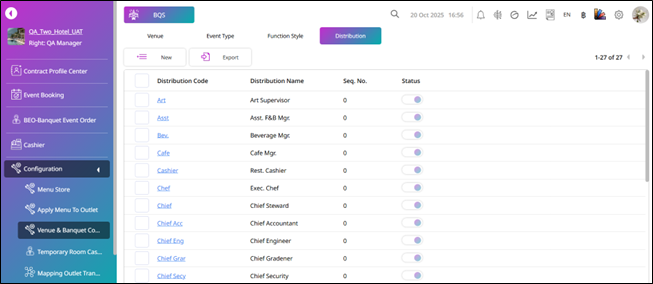
Press the Distribution tab menu, and the system will display data for distributions.
-
The data for distributions will be default from the script. You can edit the data or create a new distribution.
-
To create a new distribution, you must press New.
-
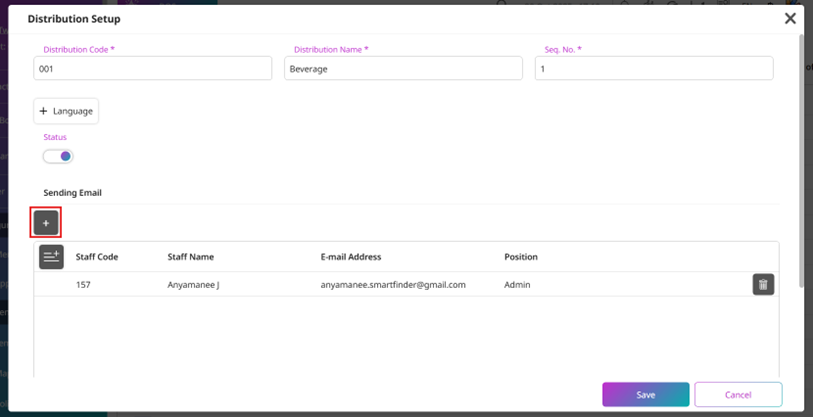
The system will show the Distribution Setup pop-up screen.
-
Enter the Distribution Code, Distribution Name, and the Seq. No.
-
If you want to add more languages, press + Language, and you can enter the Distribution Name in any other language you want.
-
The Status will default to on (Active Status).
-
Press + Sending Mail to add staff, and the Select Staff pop-up will be displayed.
-
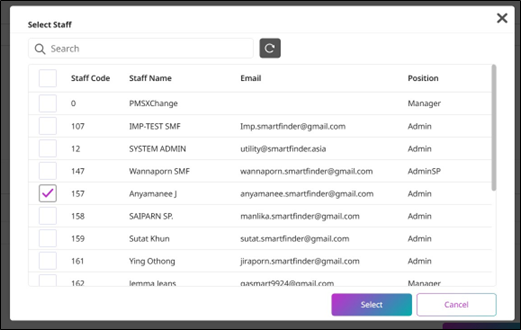
The Select Staff pop-up will be displayed.
-
Select the staff that you want to add for sending mail.
-
Press Select to continue.
-
Press Cancel to close this pop-up.
-
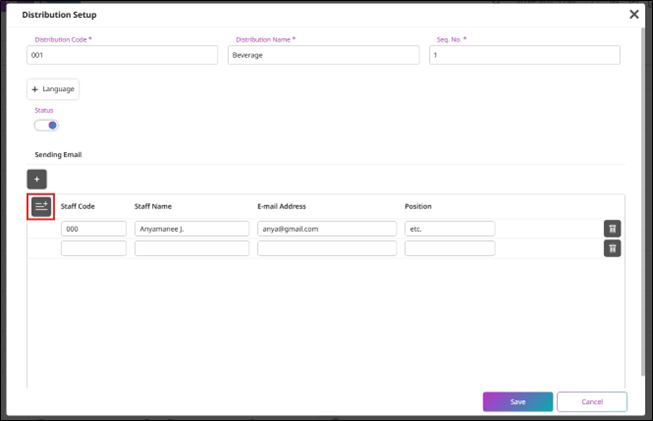
Or, if you want to add staff manually, press Add Staff.
-
Enter the Staff Code, Staff Name, E-mail Address, and the Position.
-
Press Save to save the created distribution.
-
Press Cancel to discard the progress.
8. Temporary Room Cashier Setup
Available under BQS > Configuration > Temporary Room Cashier, this function allows staff to set up a temporary room for use with the banquet system. This feature ensures that a designated room can be assigned for cashier operations during events, allowing for smooth handling of payments and transactions.
To perform the task:
-
Press Configuration.
-
Press Temporary Room Cashier
-
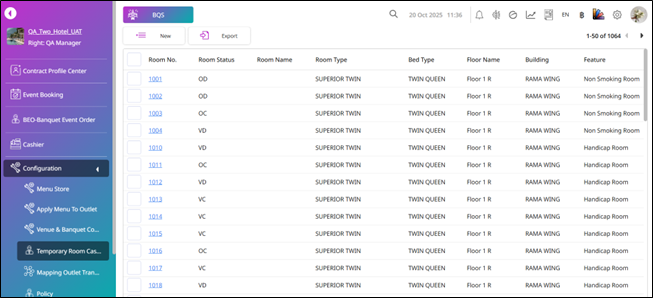
The system will show the room record data, similar to the Room Master from the PMS.
-
Press New to create a new room.
-
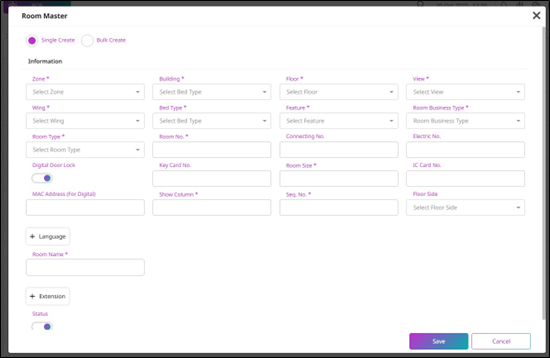
The system will show the Room Master pop-up.
-
By default, the system will select Single Create, allowing you to create rooms one by one.
-
Fill in the required information, including:
- Zone, Building (Must select BANQUET to use with Banquet), Floor, View, Wing, Bed Type (Select Temp for Temporary Room), Feature (Select House Folio for Temporary Room), Room Business Type (Select System Interface POS for Banquet Temporary Room), Room Type (Select House Folio for Temporary Room), Room No., Room Size, Show Column, Seq No., and other details like Key Card No., Connecting No., Electric No., Digital Door Lock (if you use a digital lock for this room, you must enter the MAC Address), IC Card No., and Floor Side.
- Enter the Room Name and Extension (if applicable).
- If you want to add another language or additional extensions, press the + Language or + Extension buttons, respectively.
- Upload a picture for the room, if needed.
- Set the Status to Active or Inactive as needed.
-
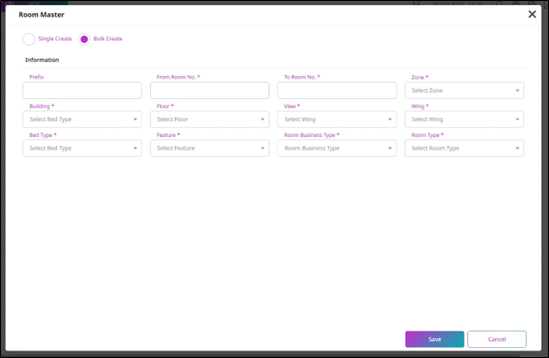
However, if you select Bulk Create, you can create multiple rooms at once.
-
Fill in the required information, including:
- Prefix, From Room No. To Room No., Zone, Building (Must select BANQUET to use with Banquet), Floor, View, Wing, Bed Type (Select Temp for Temporary Room), Feature (Select House Folio for Temporary Room), Room Business Type (Select System Interface POS for Banquet Temporary Room), and Room Type (Select House Folio for Temporary Room).
- Once you have filled in the details, proceed with the process.
-
Press Save on the Room Master pop-up to create the room master.
-
Press Cancel on the Room Master pop-up to discard the progress.
Note: For using the temporary room with banquet, the Building must be selected as BANQUET, and the Room Business Type must be selected as System Interface POS.
9. Mapping Group Menu with PMS Transaction
Available under BQS > Configuration > Menu Store > Group, this function allows users to map banquet group menu items with the corresponding transactions in the PMS. This mapping ensures that the selected menu items for banquet events are properly linked to the appropriate PMS transactions, streamlining the billing, and reporting processes for seamless event management.
To perform the task:
-
Press Configuration.
-
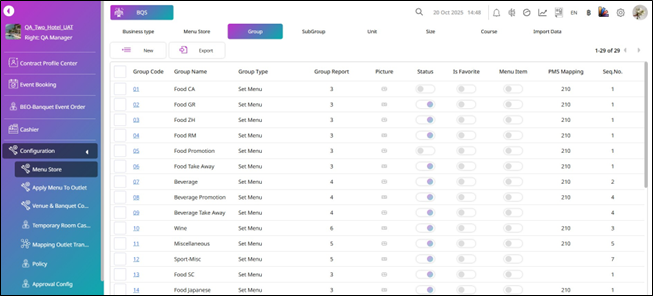
Press Menu Store, and then press the Group tab menu.
-
Press New to create a new group for the banquet.
-
The system will show you the Group pop-up.
-
If you press New, you must enter the Group Code, Seq. No., and Group Name.
-
Select the Column Report, Payment Apply Redemption, PMS Mapping (Must be the transaction to use with Banquet), and the Group Type.
-
Turn on the toggle Status to Active.
-
Press + Language if you want to add more languages.
-
Press Upload to upload a picture for the group.
-
Press Save to create the group.
-
Press Cancel to discard the progress.
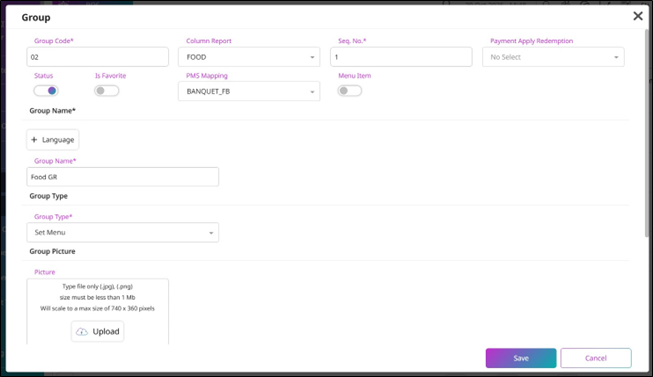
Note: To map with PMS, the transaction must be one that is created to be used with Banquet.
10. Set Default Size Menu for Banquet
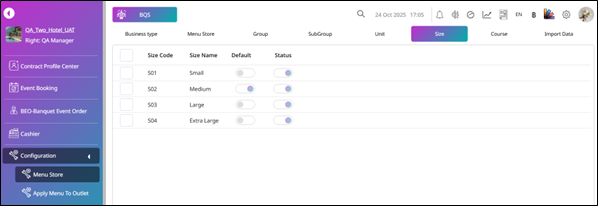
Available under BQS > Configuration > Menu Store > Size, this function allows users to set the default sizes and their status for menu items. It is essential to define a default size for each menu item, as this will be used when managing banquet functions, ensuring consistency and accuracy in menu item configurations for events.
To perform the task:
-
Press on the Business Unit.
-
Press Menu Store, and then press the Size tab menu.
-
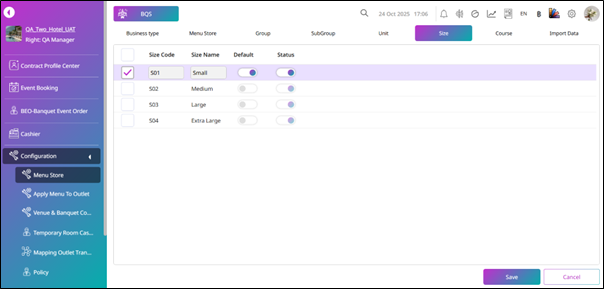
Press the Select Box to edit only the Default and Status toggle.
-
Turn on the Default toggle (only one size can be set as Default).
-
Press Save to save the changes.
-
Press Cancel to discard the changes.
11. Outlet for Banquet
Available under BQS > Configuration > Menu Store > Group, this function allows users to set up outlets for use with banquet events. Additionally, it provides the flexibility to manage other outlets within the system, ensuring that both banquet-specific and general outlets are properly configured for seamless operation and service during events.
To perform the task:
-
Press on the Business Unit.
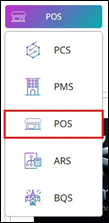
-
Select POS.
-
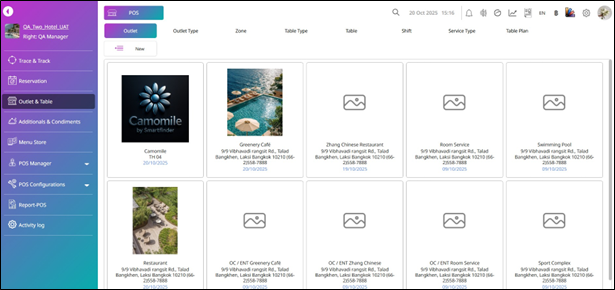
Press Outlet & Table.
-
The system will show the Outlet displayed by default.
-
Press New to create the new outlet.
-
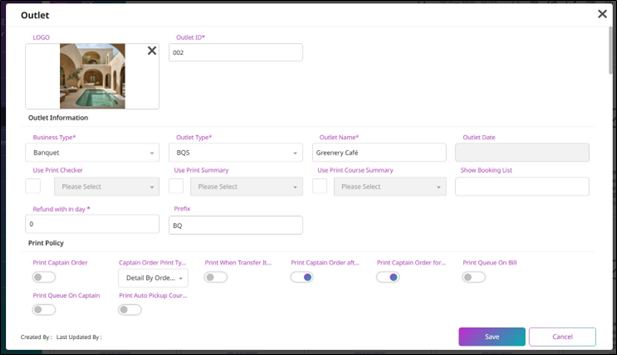
The system will show the Outlet pop-up.
-
Enter the required filled information.
-
For Business Type, you must select Banquet to use with the Banquet.
-
For Outlet Type, you must select BQS to use with the Banquet.
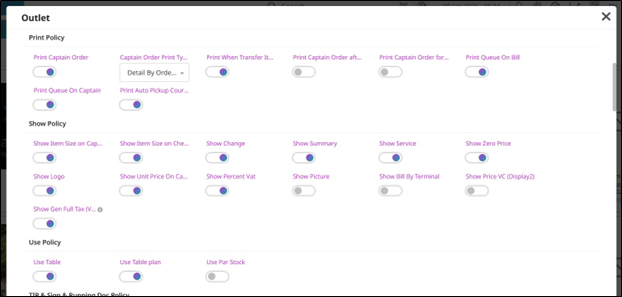
- For the Print Policy, Show Policy, Use Policy, TIP & Running Doc. Policy, and Other Policy, you can select and turn on the toggle to set the policy for this outlet.
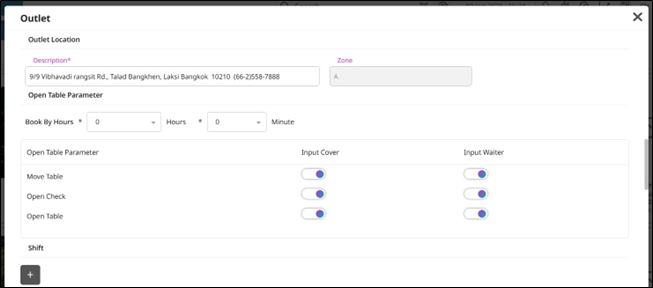
- Select the Hours and Minutes, then turn on the toggle for the Open Table Parameter.
-
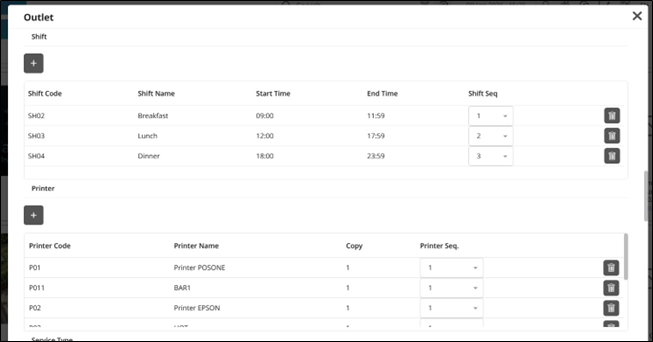
Add the Shift and set the Shift Seq. for the outlet.
-
Add the Printer and set the Printer Seq. for using the printer with this outlet.
-
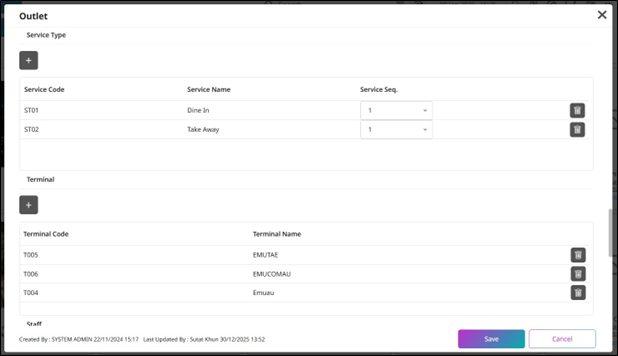
Add the Service Type and set the Service Seq. for using the service type with this outlet.
-
Add the Terminal for using with this outlet.
-
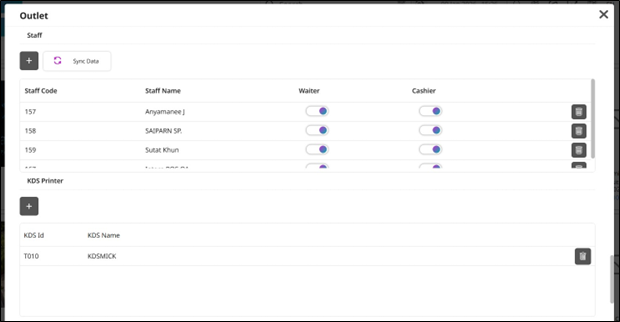
Add the Staff and turn on the toggle for Waiter or Cashier based on the staff's user position.
-
Add the KDS Printer if this outlet is using a KDS Printer.
-
Set the Formula & Tax for this outlet (use Inclusive for banquet).
-
Turn on the Status toggle (default is Active Status).
-
Press Save to create the outlet.
-
Press Cancel to discard the progress.
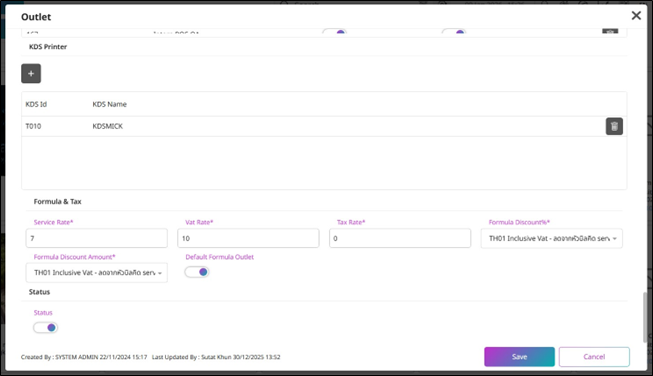
Note: If you want to use an outlet that already has information, you can change the Business Type to Banquet and set the Outlet Type to BQS and the Formula to Inclusive for banquet.
12. POS Configuration for Banquet
Available under BQS > POS Manager > POS Policy, this function allows users to set the policy for the Default Terminal and Payment methods in the BQS system for banquet events. It ensures that the appropriate payment processing and terminal settings are configured for seamless transaction handling during banquet operations.
To perform the task:
-
Press POS Manager.
-
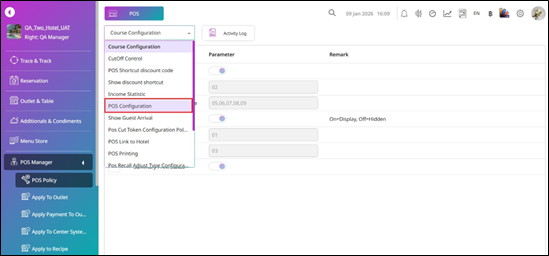
Press POS Policy.
-
Press the policy and select the POS Configuration.
-
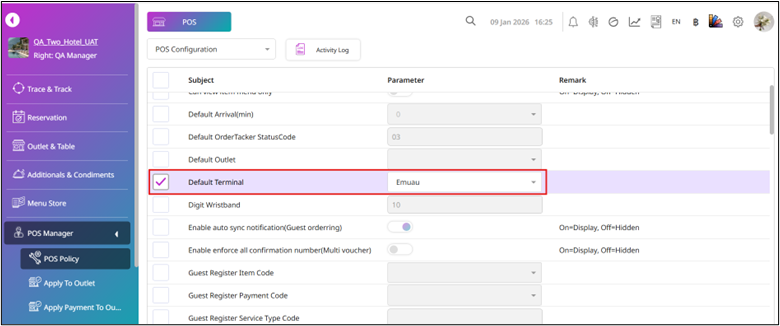
Select the Subject of Default Terminal.
-
Press and select the Parameter to choose the terminal that you use with the outlet for Banquet.
-
Select the Subject of Payment for BQS System.
-
Press and select the Parameter to choose the transaction for banquet payment.
-
Press Save to save the changes.
-
Press Cancel to discard the changes.
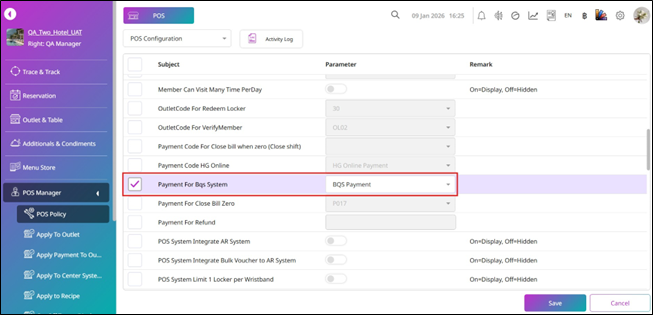
Note: Ensure the terminal is used with the banquet outlet, and the payment must be the banquet payment transaction.