POS- Menu Store User Guide
1. Overview
This POS – Menu Store User Guide provides hotel staff and system users with clear instructions to manage and configure POS menu items, including additional items and condiments. It supports accurate order processing and enhances guest experience through structured, easy-to-follow steps.
2. Additional Group
Available under the Additionals & Condiments Menu > Additional Group , this function allows staff to manage additional item groups. Users can create and configure additional groups that can be linked to menu items for better customization and upselling options.
To perform the task:
-
Press New to create a new additional group.
-
Enter the Additional Group Code.
-
Enter the Additional Group Name (default language).
-
Press + Language.
-
Select a language and enter the Additional Group Name in the selected language.
-
Press Save to create the additional group.
Press Cancel to discard the action and close the pop-up.

Note: Ensure all required information accurately. If you press Add Language, you must fill in the name for the selected language.
3. Additional
Available under Additionals & Condiments > Additional , this function allows staff to manage additional items within their groups. Users can create and assign additional items to menu items for better customization and upselling.
To perform the task:
-
Press New to create a new additional group.
-
Fill in the required information (Additional Code, Additional Group Name (default language) and Price).
-
Press + Language.
-
Select a language and enter the Additional Name in the selected language.
-
Press Save to create the additional item.
Press Cancel to discard the action and close the pop-up.

Note: Ensure all required information accurately. Uploading a picture for the additional item is optional.
4. Condiment Group
Available under Additionals & Condiments > Condiment Group , this function allows staff to manage condiment groups. Users can create and assign condiments to menu items for better customization and upselling.
To perform the task:
-
Press New to create a new additional group.
-
Enter the Condiment Group Code.
-
Enter the Condiment Group Name (default language).
-
Press + Language.
-
Select a language and enter the Condiment Group Name in the selected language.
-
Press Save to create the Condiment group.
Press Cancel to discard the action and close the pop-up.
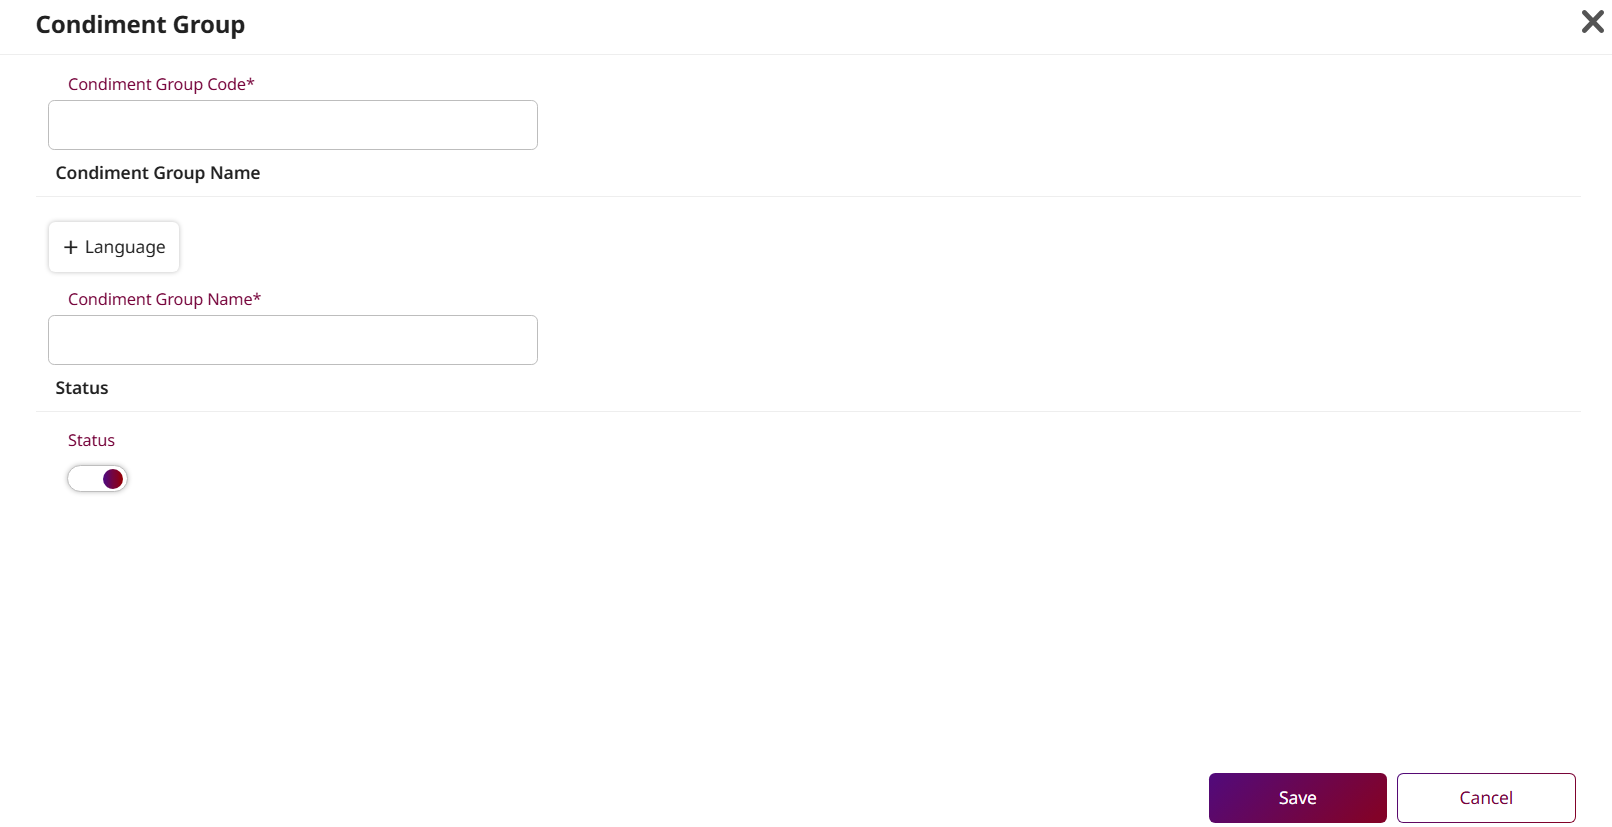
Note: Ensure all required information accurately. If you press Add Language, you must fill in the name for the selected language.
5. Condiment
Available under Additionals & Condiments > Condiment , this function allows staff to manage condiments under their respective groups. Users can create and assign condiments to menu items for better customization and upselling.
To perform the task:
-
Press New to create a new condiment.
-
Fill in the required information: Condiment Code and Condiment Name (in the default language)
-
Press + Language.
-
Select a language and enter the Condiment Name in the selected language.
-
Press Save to create the Condiment group.
Press Cancel to discard the action and close the pop-up.
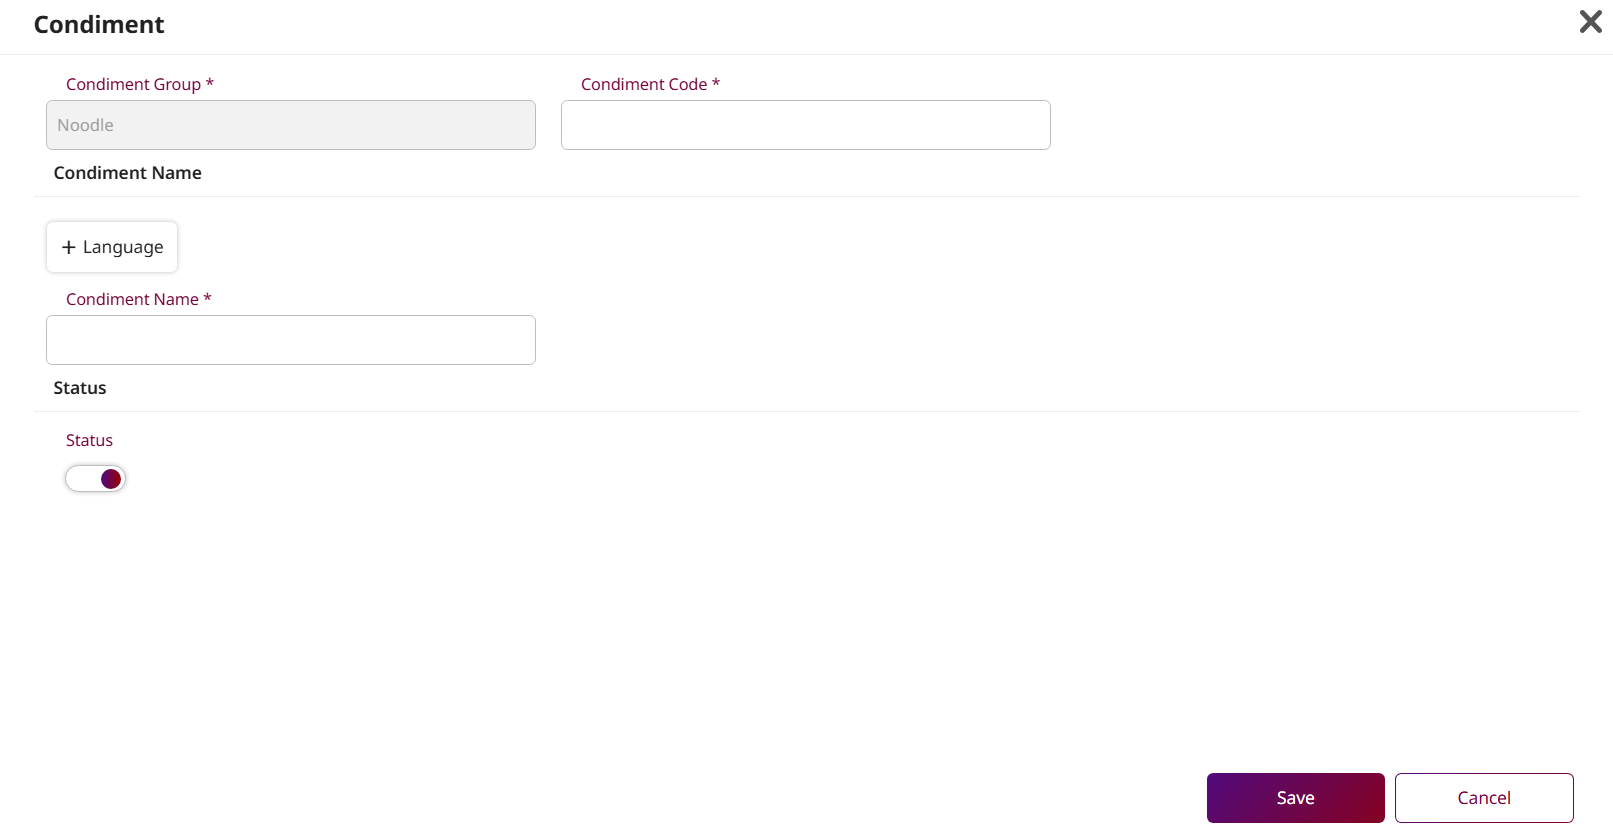
Note: Ensure all required information is filled in.
6. Business Type
Available under Menu Store > Business Type , this function allows staff to manage business types. These business types can be applied to menu items and outlets for better classification and control.
To perform the task:
-
Press New to create a new business type entry.
-
Enter the Business Type Code and Business Type Name in the input fields.
-
Toggle the Status switch to activate or deactivate the business type.
-
Press Save to confirm and create the new business type.
Press Cancel to discard the action and close the input row.
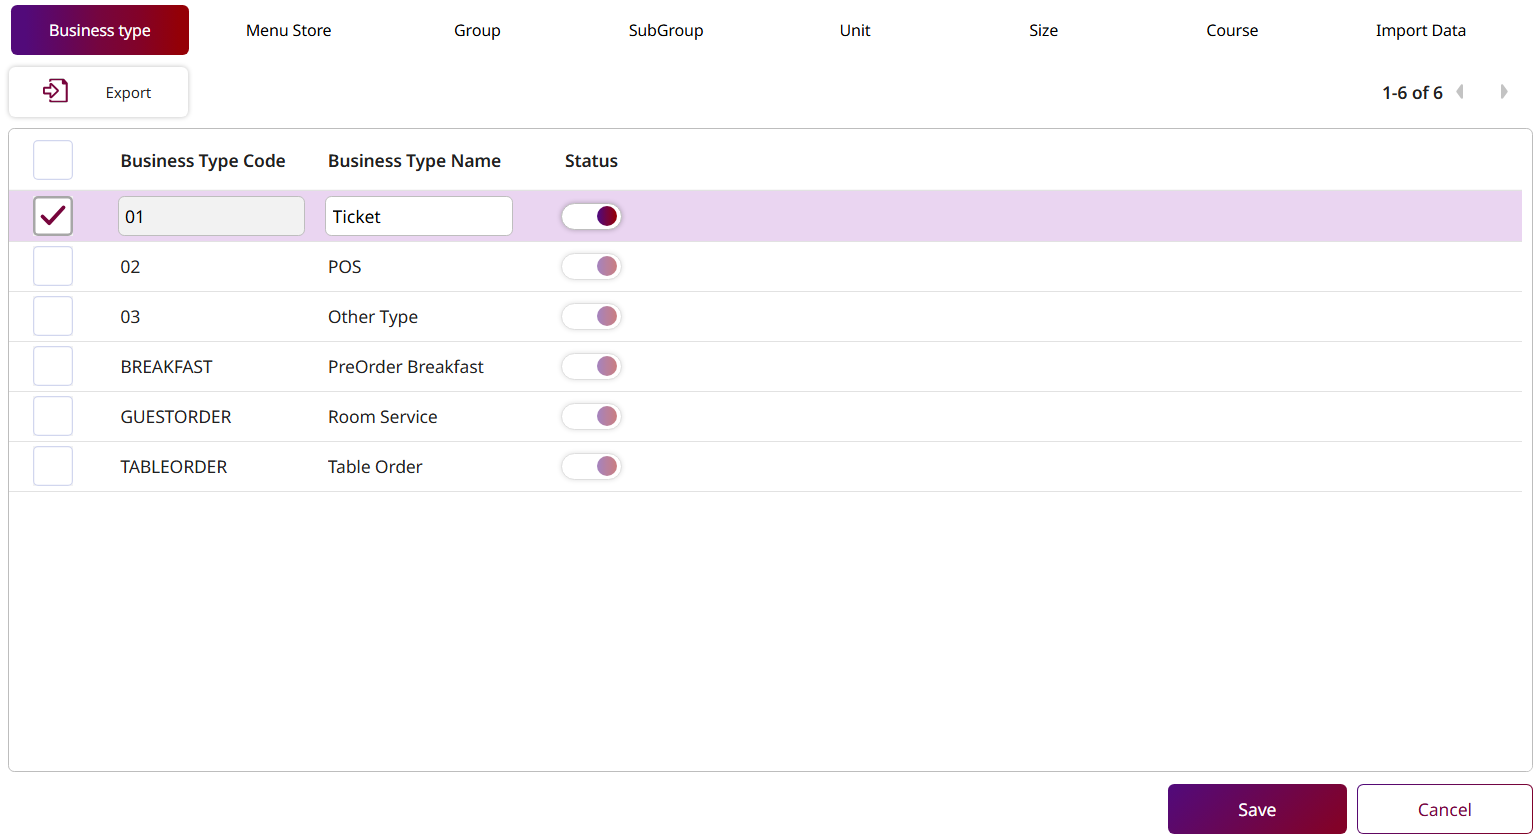
Note: Ensure that the Business Type Code is unique and does not duplicate any existing Business Type.
7. Group
Available under Menu Store > Group , this function allows staff to manage menu groups, which are used to categorize and organize related menu items in the POS system.
To perform the task:
-
Press New to create a new group.
-
Fill in the required information: Group Code, Seq. No., Group Name (in default language) and Group Type.
-
Toggle the Status switch to enable or disable the group.
-
Toggle Is Favorite if this group should appear as a favorite.
-
Press + Language to add the group name in other languages.
-
Upload a Group Picture.
-
Add a KDS Printer by pressing the button.
-
Press Save to confirm and create the new group.
Press Cancel to discard the action and close the form.
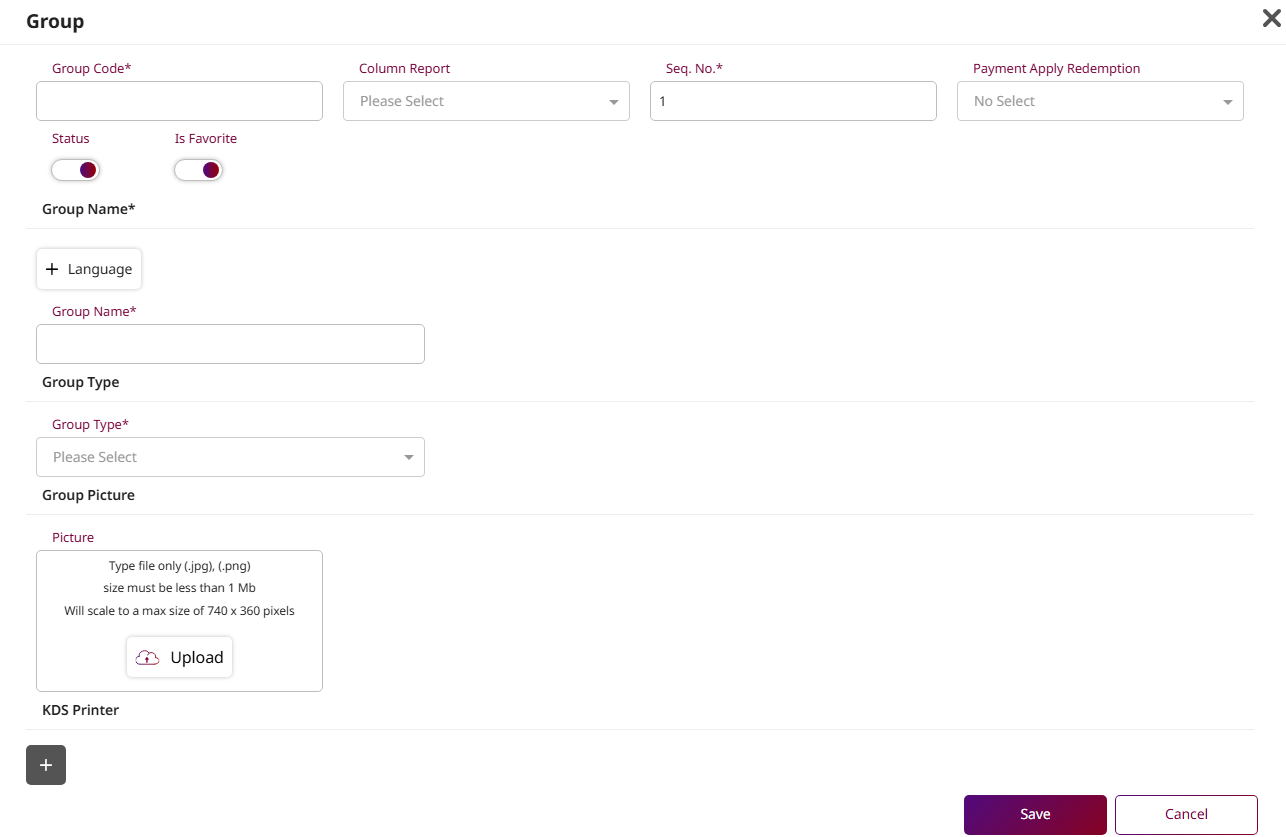
Note: Ensure the Group Code you enter is unique and not already used by another group in the system.
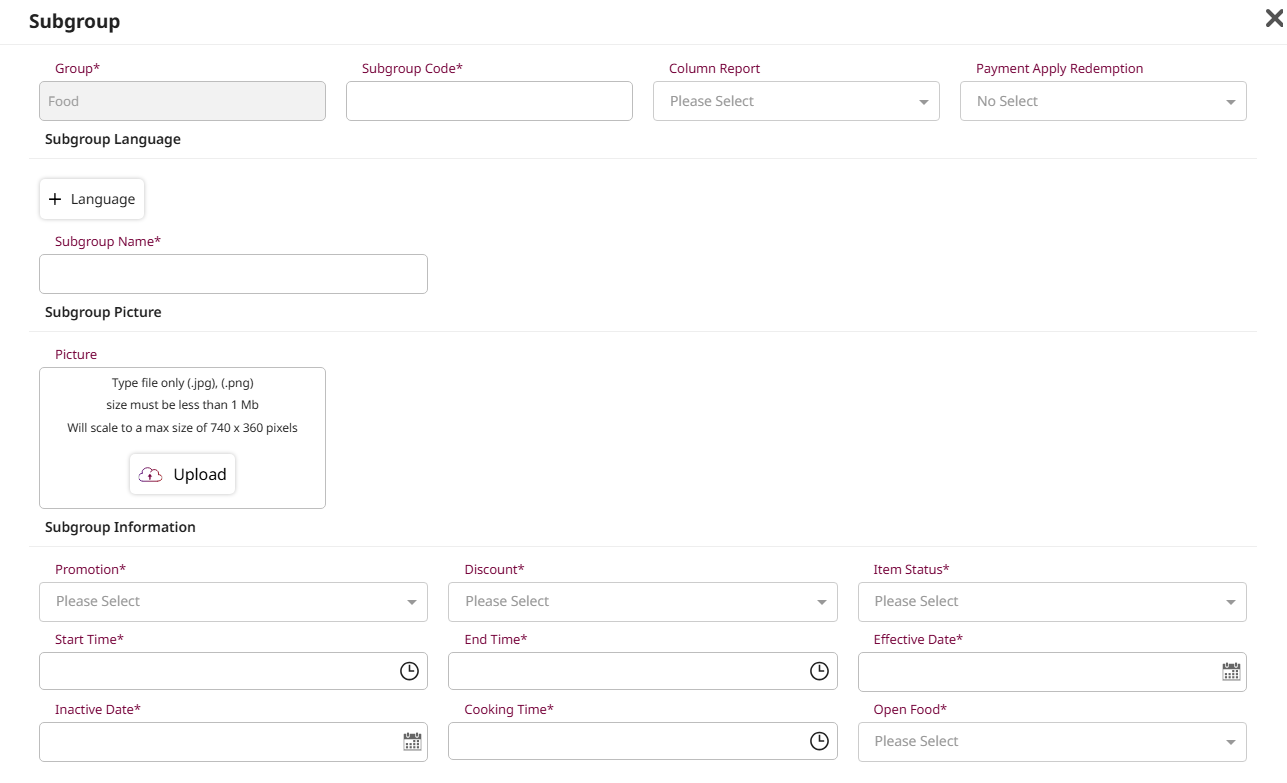
8. Subgroup
Available under Menu Store > Subgroup , this function allows staff to manage subgroups, which are used to further categorize and organize related menu items within their assigned group in the POS system.
To perform the task:
- Select a Group to which this Subgroup will belong.
- Press New to create a new Subgroup.
- Fill in the required information: Subgroup Code, Subgroup Name (default language) , Promotion, Discount, Item Status, Start Time, End Time, Effective Date, Inactive Date, Cooking Time, and Open Food.
- Press + Language to add names in other languages.
- Upload a Subgroup Picture.
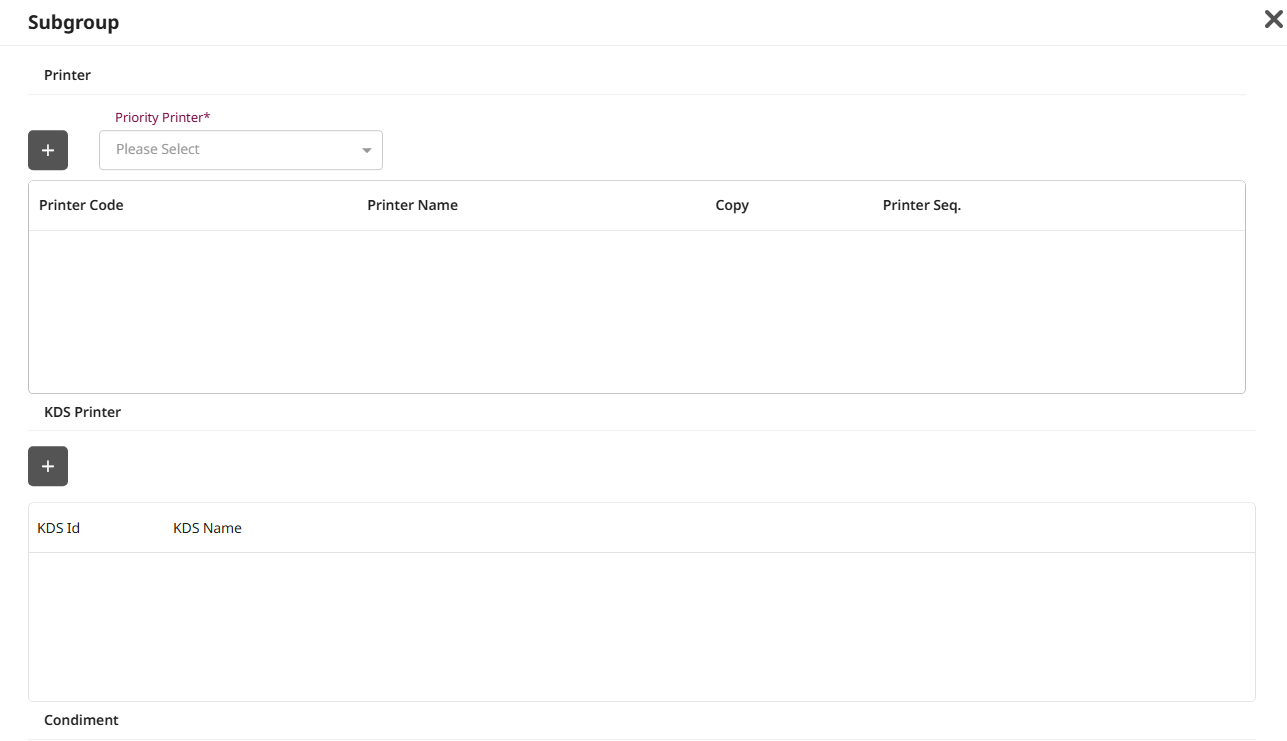
- In the Printer section, select a Priority Printer from the dropdown list.
- Press the button to add the Printer , then select the desired printer from the list.
- Press the button to add the KDS Printer , then select the desired printer from the list.
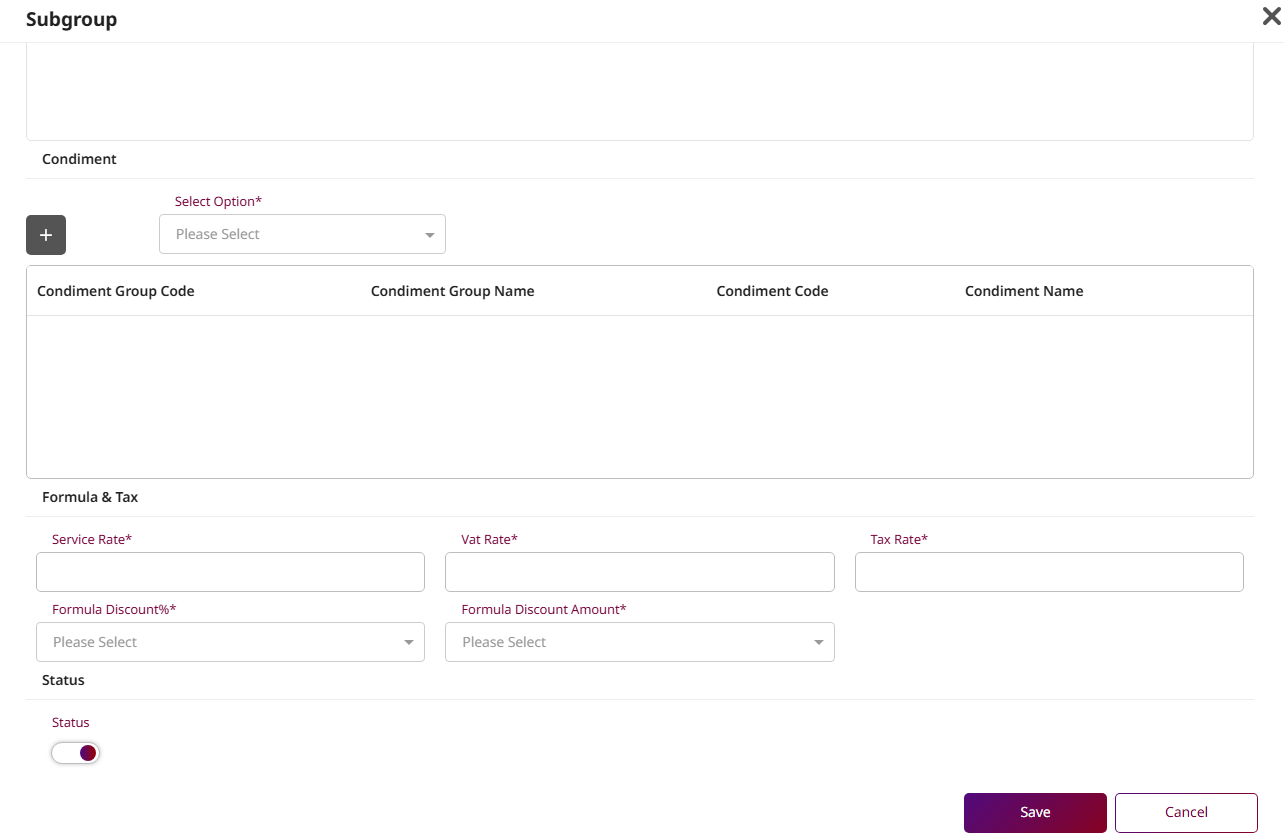
- the Select Option dropdown, choose the appropriate condiment option type.
- Press the button to add a Condiment , then select the desired Condiment Group and Condiment from the list.
- Enter the applicable Service Rate, VAT Rate , and Tax Rate as percentages.
- Select a Formula Discount% and Formula Discount Amount from the dropdown.
- Toggle the Status switch to activate or deactivate this configuration.
- Press Save to confirm and create the new subgroup.
- Press Cancel to discard the action and close the form.
Note: Ensure that the Promotion, Discount, and Item Status values are set correctly, as they are important for how items behave in the POS system.
9. Unit
Available under Menu Store > Unit , this function allows staff to manage units of measurement, which are used to define and organize how menu items are quantified and displayed in the POS system. Proper unit setup ensures consistency in ordering, pricing, and overall menu management.
To perform the task:
-
Press New to create a new Unit.
-
Fill in the required information: Unit Code and Unit Name (in the default language)
-
Press + Language to add Unit Name in other languages.
-
Select the appropriate Post Method from the dropdown.
-
Toggle the Status switch to activate or deactivate the unit.
-
Press Save to confirm and create the new unit.
Press Cancel to discard the action and close the form.

Note: Ensure the Unit Code is unique and does not duplicate any existing unit in the system. Duplicate codes may prevent saving and cause issues with data accuracy.
10. Size
Available under Menu Store > Size , this function allows staff to manage sizes by editing how they are displayed for menu item quantities in the POS. Proper setup ensures consistency in ordering and pricing.
To perform the task:
-
Press New to create a new Unit.
-
Toggle the Default switch to set this size as the default option.
-
Toggle the Status switch to activate or deactivate this size.
-
Press Save to apply the changes.
Press Cancel to discard the changes.
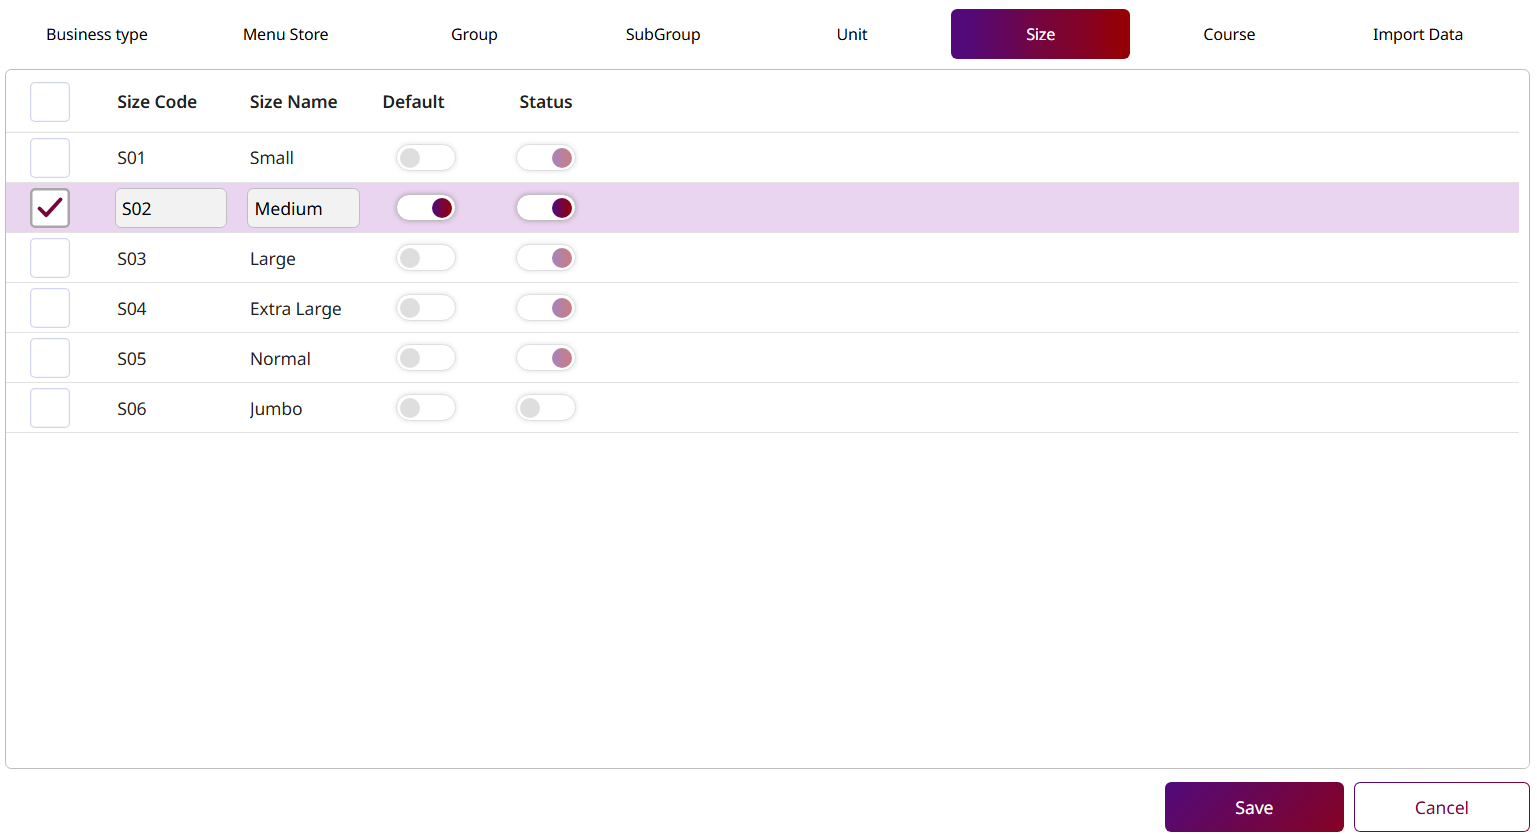
Note: This function does not allow editing of existing size names, and you cannot add or delete size entries in this section.
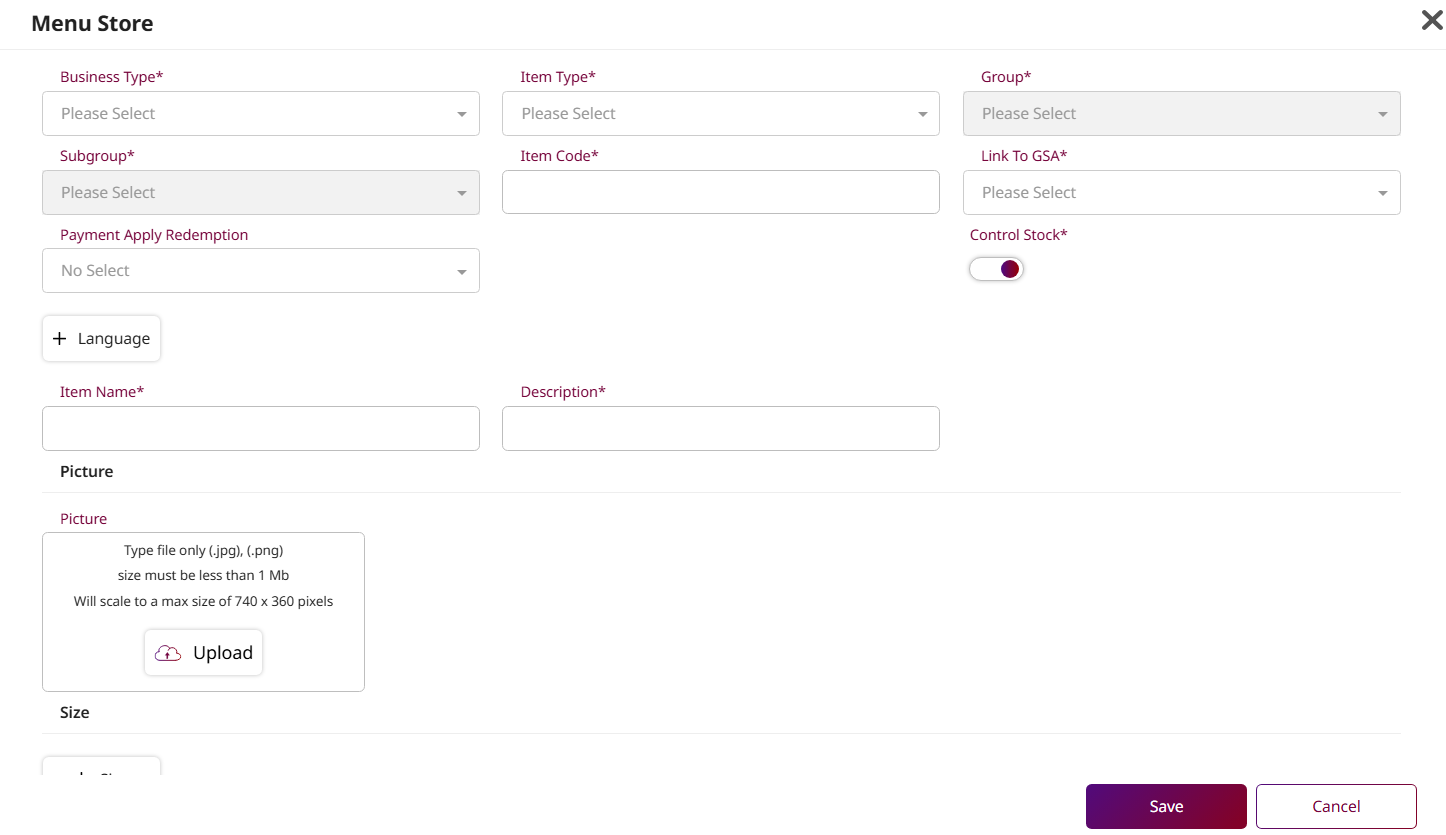
11. Menu Store
Available under Menu Store > Menu Store , this function lets staff create and configure menu items by selecting a Business Type, defining Item Type and Group, setting prices, linking to GSA, and assigning multiple sizes for flexible POS display and accurate pricing.
To perform the task:
- Select a Business Type from the dropdown.
- Press New to create a new menu item.
- Fill in the required fields: Item Type, Group, Subgroup, Item Code, Item Name, Description, Link to GSA , and toggle Control Stock.
- Upload a menu picture.
- Press + Language to add item names in other languages.
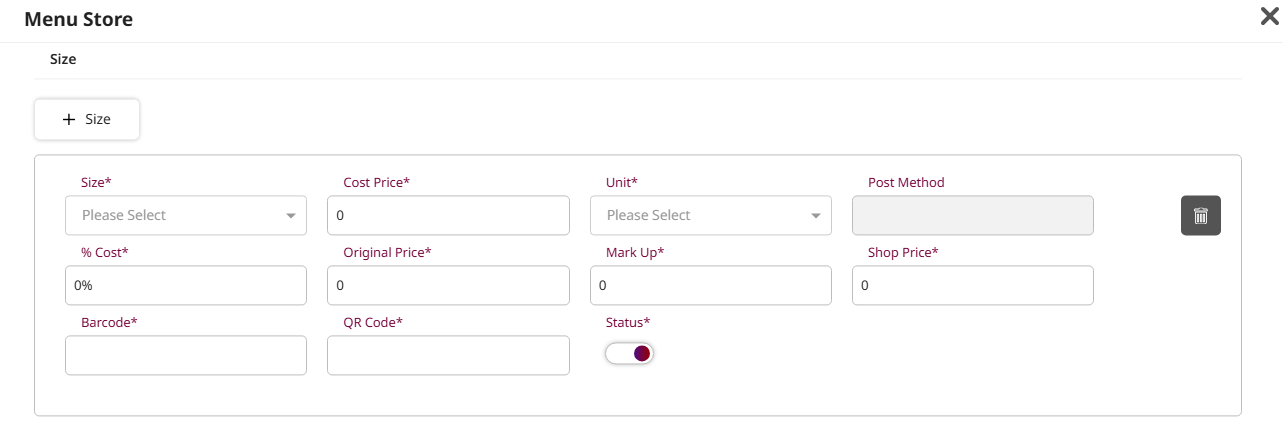
- Press + Size to add size options.
- For each size, fill in: Size, Cost Price, Unit, % Cost, Original Price, Markup, Shop Price, Barcode, QR Code, and toggle Status.
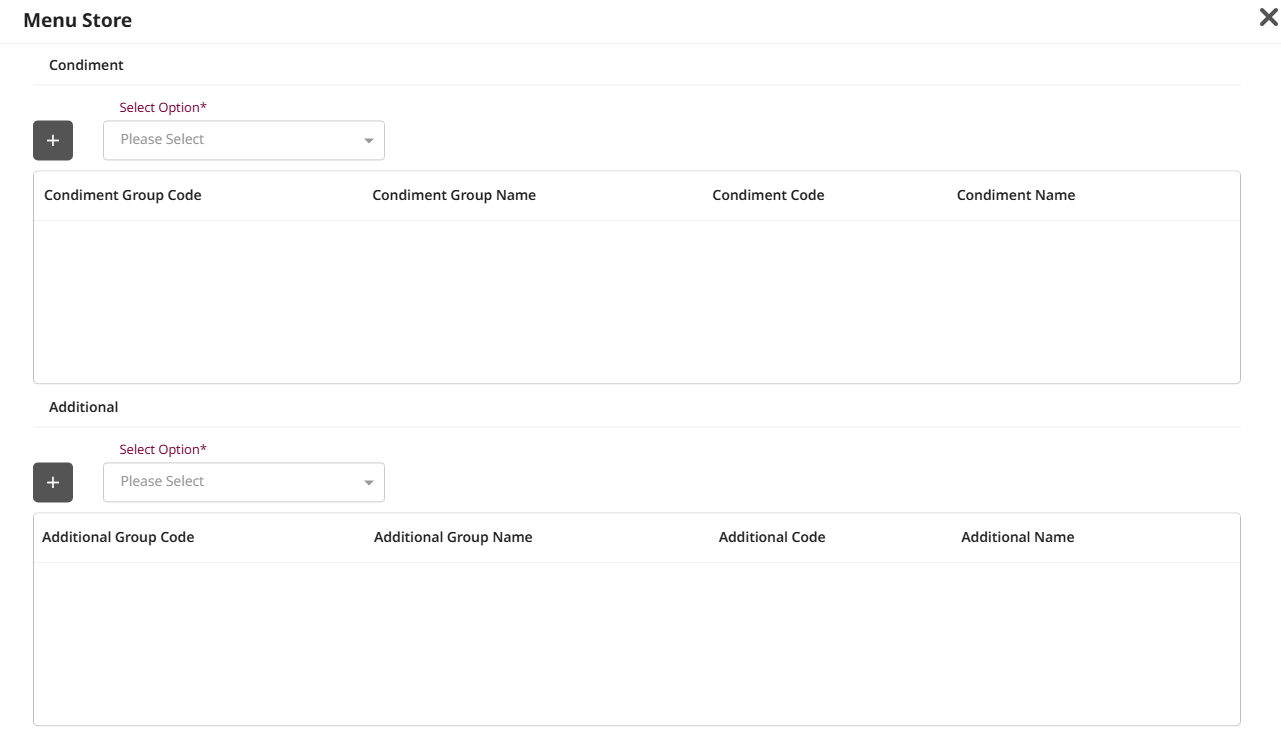
- Select the Option Type under Condiment section.
- Press and choose Condiment Group and the corresponding Condiment Item from the list.
- Select the Option Type under Additional section.
- Press and choose Additional Group and the corresponding Additional Item from the list.
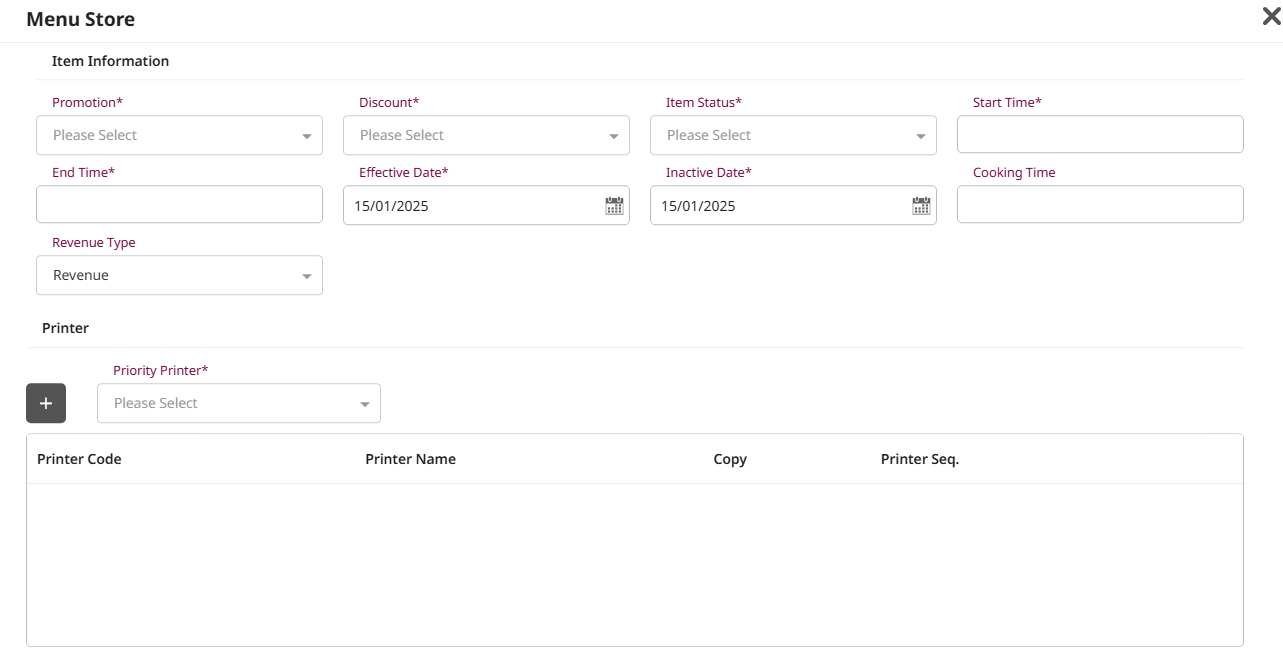
- Fill in the required fields under Item Information: Promotion, Discount, Item Status, Start/End Time, Effective/Inactive Date, Cooking Time, and Revenue Type.
- Select the Priority Printer option from the dropdown under the Printer section.
- Press and choose Printer from the list.
-
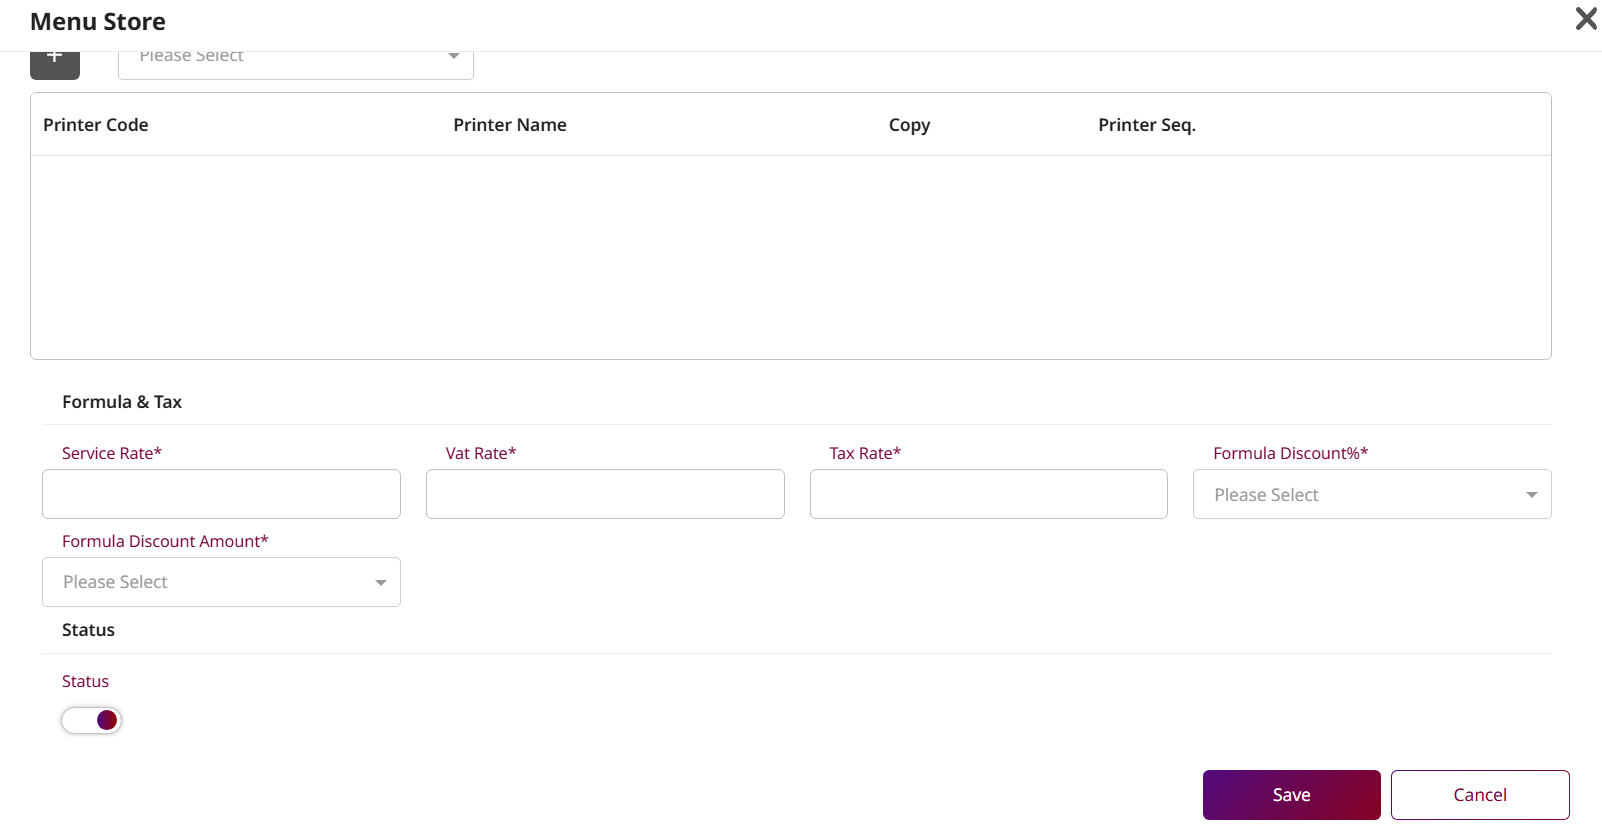
Fill in the required fields under Formula & Tax section: Service Rate, VAT Rate, Tax Rateม Formula Discount% and Formula Discount Amount.
-
Toggle final Status to activate the menu.
-
Press Save to complete the menu creation.
Press Cancel to discard the changes.
Note: The Group field becomes active after selecting an Item Type. When a Group is selected, the Subgroup is automatically set to the first available option. The Post Method is auto filled based on the selected Unit.
12. Course
Available under Menu Store > Course , this function allows staff to manage courses displayed on the POS, helping organize menu items by serving sequence.
To perform the task:
-
Press New to create a Course.
-
Fill in the required fields: Course Code, Sequence Number, Course Name, and Course Short Name.
-
Press + Language to add course names in other languages.
-
Upload an Icon image for the course.
-
Toggle the Status switch to activate or deactivate the course.
-
Press Save to confirm and create the course.
Press Cancel to discard changes.

Note: To use the Course feature on the POS, you must enable it in the POS Policy settings before it becomes available.
13. Apply to Outlet
Available under Apply to Outlet > Apply to Outlet , this function allows staff to assign or apply configured menus to specific outlets. Staff Users can also add or remove menu items for each outlet, ensuring that only relevant and approved menus are available at the appropriate locations based on operational needs.
To perform the task:
-
Select the Business Type from the dropdown list.
-
Select the desired Group , then choose the corresponding Subgroup.
-
Press Search to display the menu items under the selected subgroup.
-
By default, the system is set to Add or Update Item , this will apply the selected menu items to the outlet. If you want to remove menu items instead, switch to Delete Item.
-
Select the menu items you want to apply. If you wish to update pricing, enter values in the Original Price or Mark Up fields. The Shop Price will calculate accordingly.
-
On the right panel, select the Outlet where the selected menus should be applied.
-
Choose the appropriate Default Formula for tax and pricing logic.
-
Press Apply to assign the menu items to the selected outlets.
Press Cancel to discard any changes.
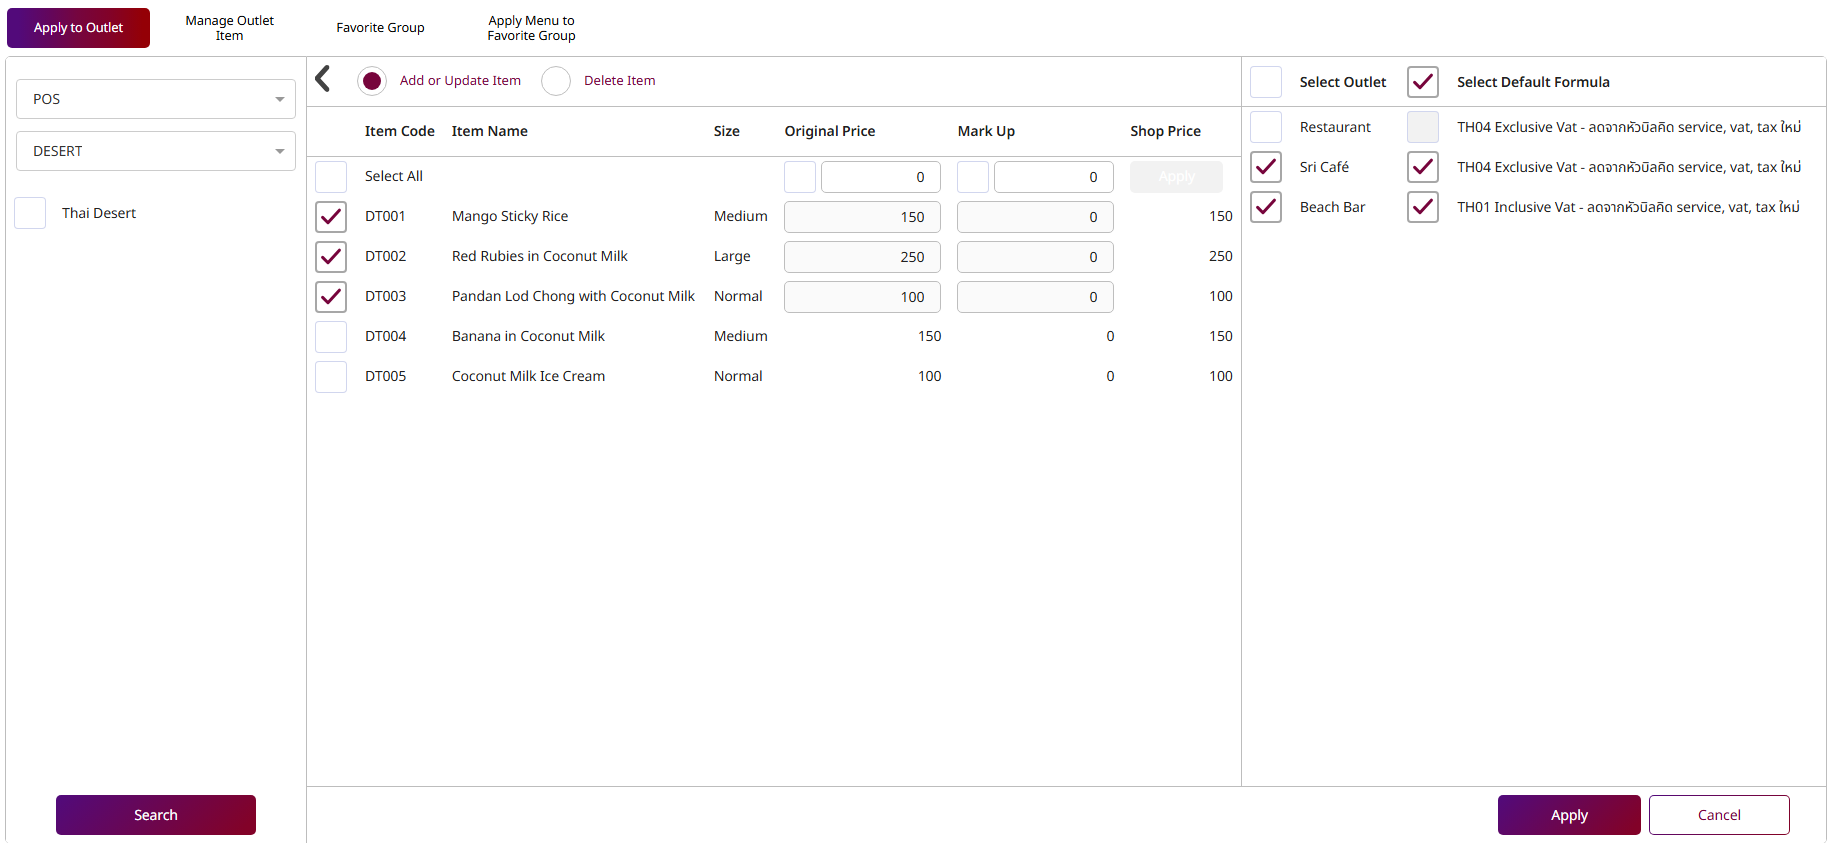
Note: The outlets displayed on the right panel include all business types. Only active outlets are shown and available for selection.
14. Manage Outlet Item
Available under Apply to Outlet > Manage Outlet Item , this function allows staff to manage menu items assigned to each outlet by enabling the removal of specific items based on operational needs.
To perform the task:
-
Select the Outlet from the dropdown list.
-
Select the checkbox(es) to select the menu items you want to remove.
-
Press Delete a confirmation pop-up will appear.
-
Press Delete on the pop-up to confirm and remove the selected items from the outlet.
Press Cancel to discard the action and close the pop-up.
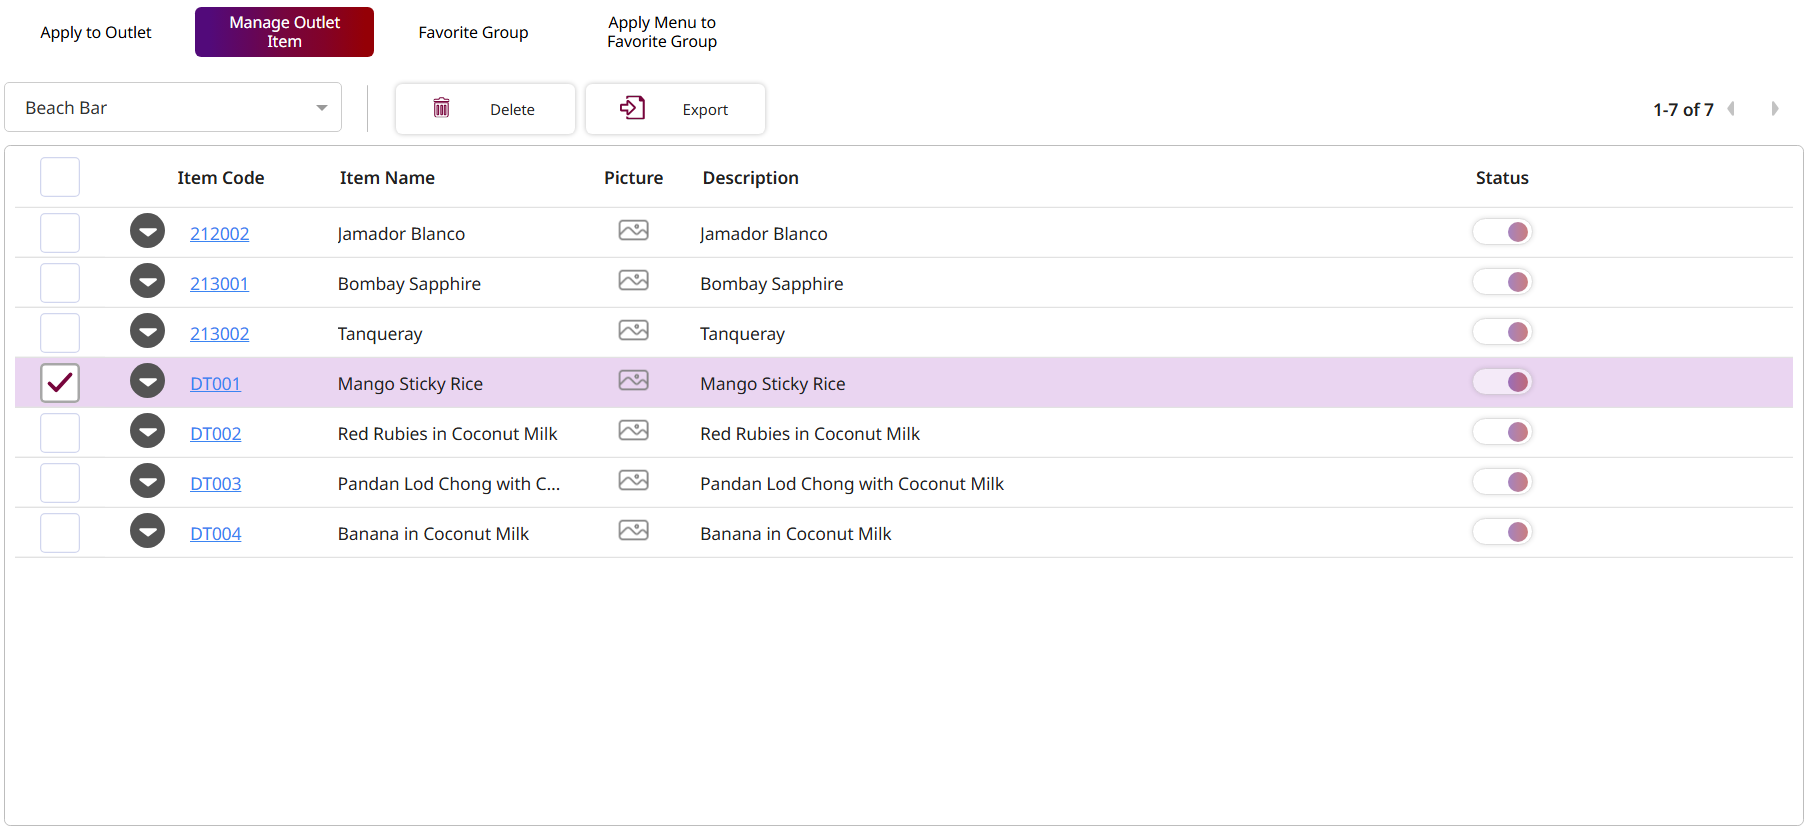
Note: Deleting a menu item from an outlet will remove it from the POS menu at that specific location. This action does not delete the item from the system, only from the selected outlet.
15. Favorite Group
Available under Apply to Outlet > Favorite Group , this function allows staff to manage favorite groups for each outlet. It helps organize frequently used or promoted menu items, allowing for quicker and easier access from the POS interface.
To perform the task:
-
Select the Outlet from the dropdown list.
-
Press New to create a new favorite group.
-
Fill in the required fields: Outlet Favorite Code, Favorite, and Name Seq. No.
-
Toggle the Status switch to activate the group.
-
Press Save to confirm and create the favorite group.
Press Cancel to discard changes.
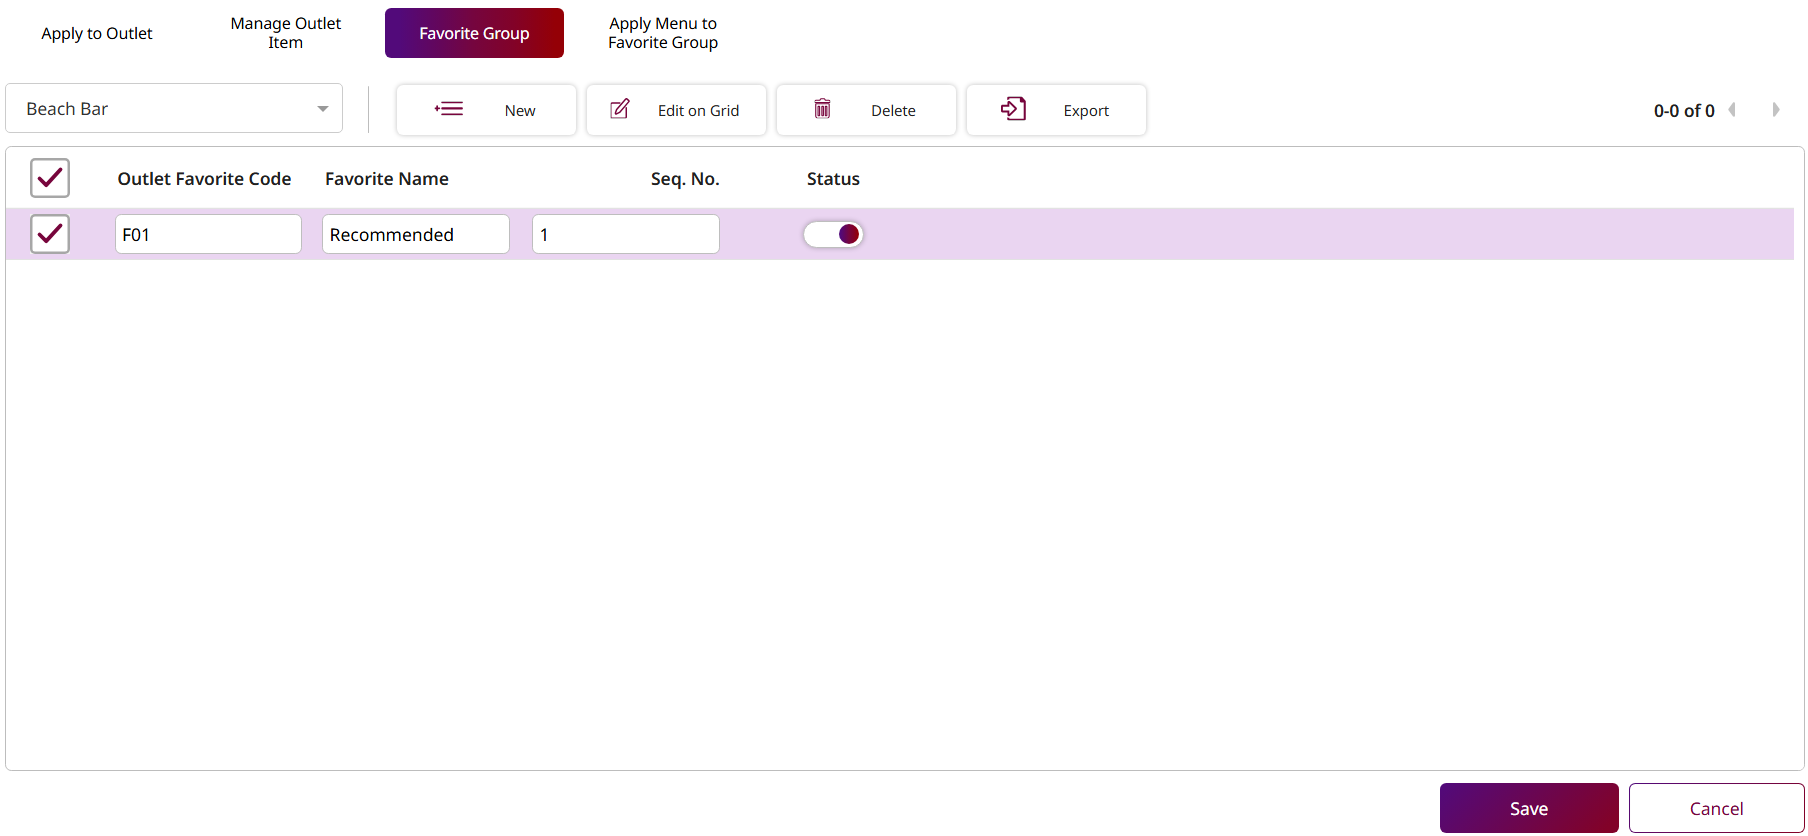
Note: Favorite Groups allow easy access to frequently used or promoted menu items on the POS. Groups can be created per outlet and ordered by sequence number.
16. Apply Menu to Favorite Group
Available under Apply to Outlet > Apply Menu to Favorite Group , this function allows staff to add menu items to specific favorite groups for each outlet, organized by favorite group.
To perform the task:
- Select the Outlet from the dropdown list.
- Press the Favorite Group to which you want to add menu items.
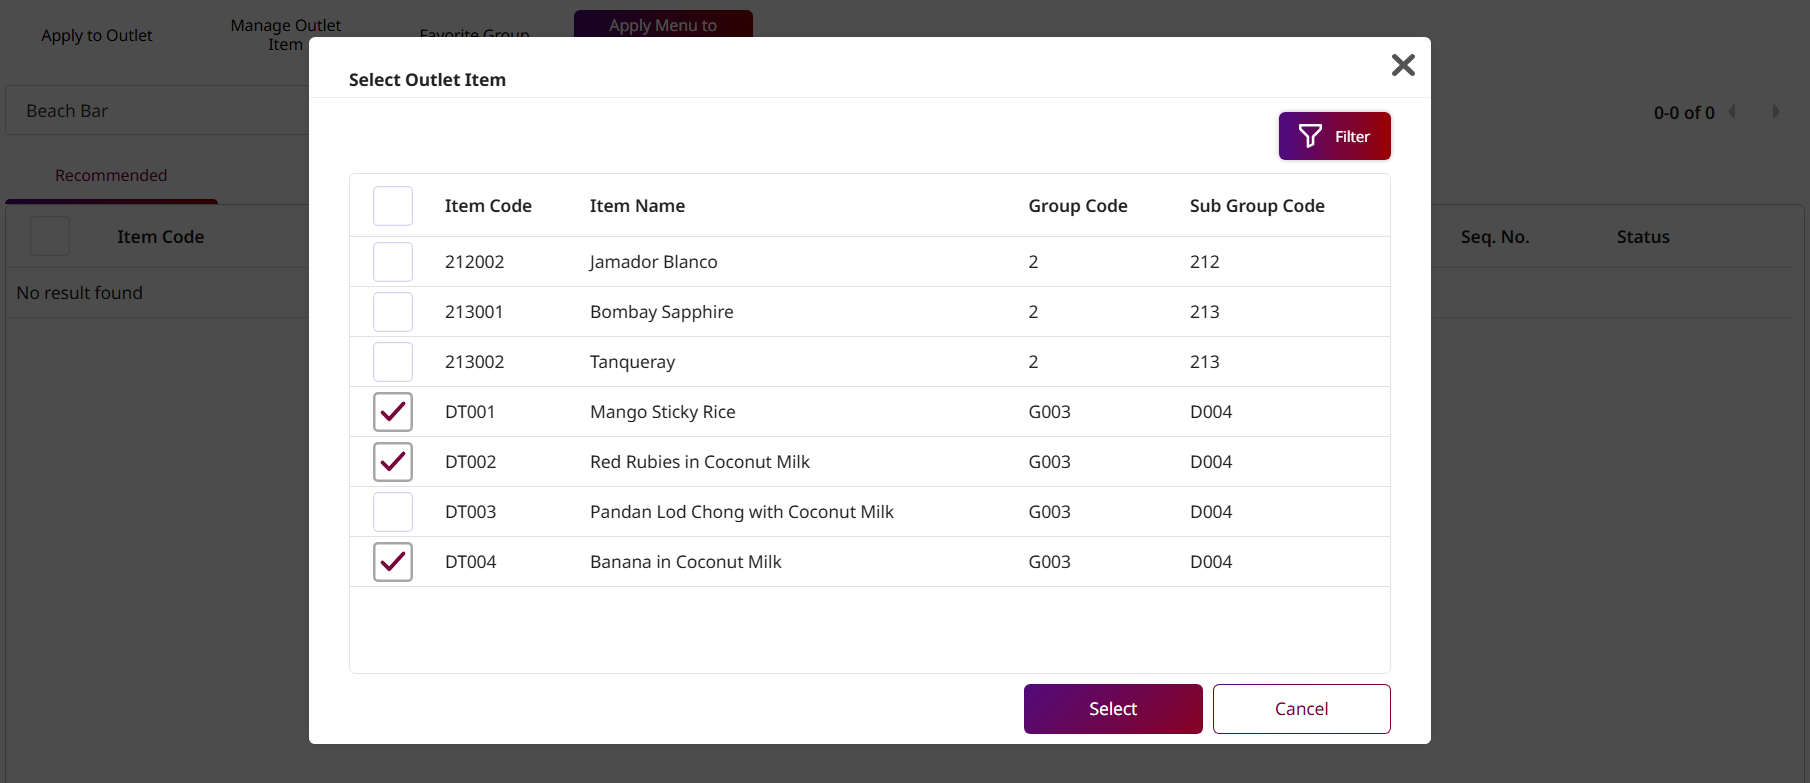
- Press New , the system will display the menu items available for the selected outlet in a pop-up.
- Select the menu items you want to add.
- Press Select to add the items to the favorite group.
- Press Cancel to discard the action and close the pop-up.
- Select the items you want to edit.
- Press Edit on the grid, you will be allowed to edit only the Sequence Number and toggle the Status.
- Enter a number in the Seq. No. field.
- Enable the Status toggle to activate the item.
- Press Save to confirm the changes.
- Press Cancel to discard and exit.
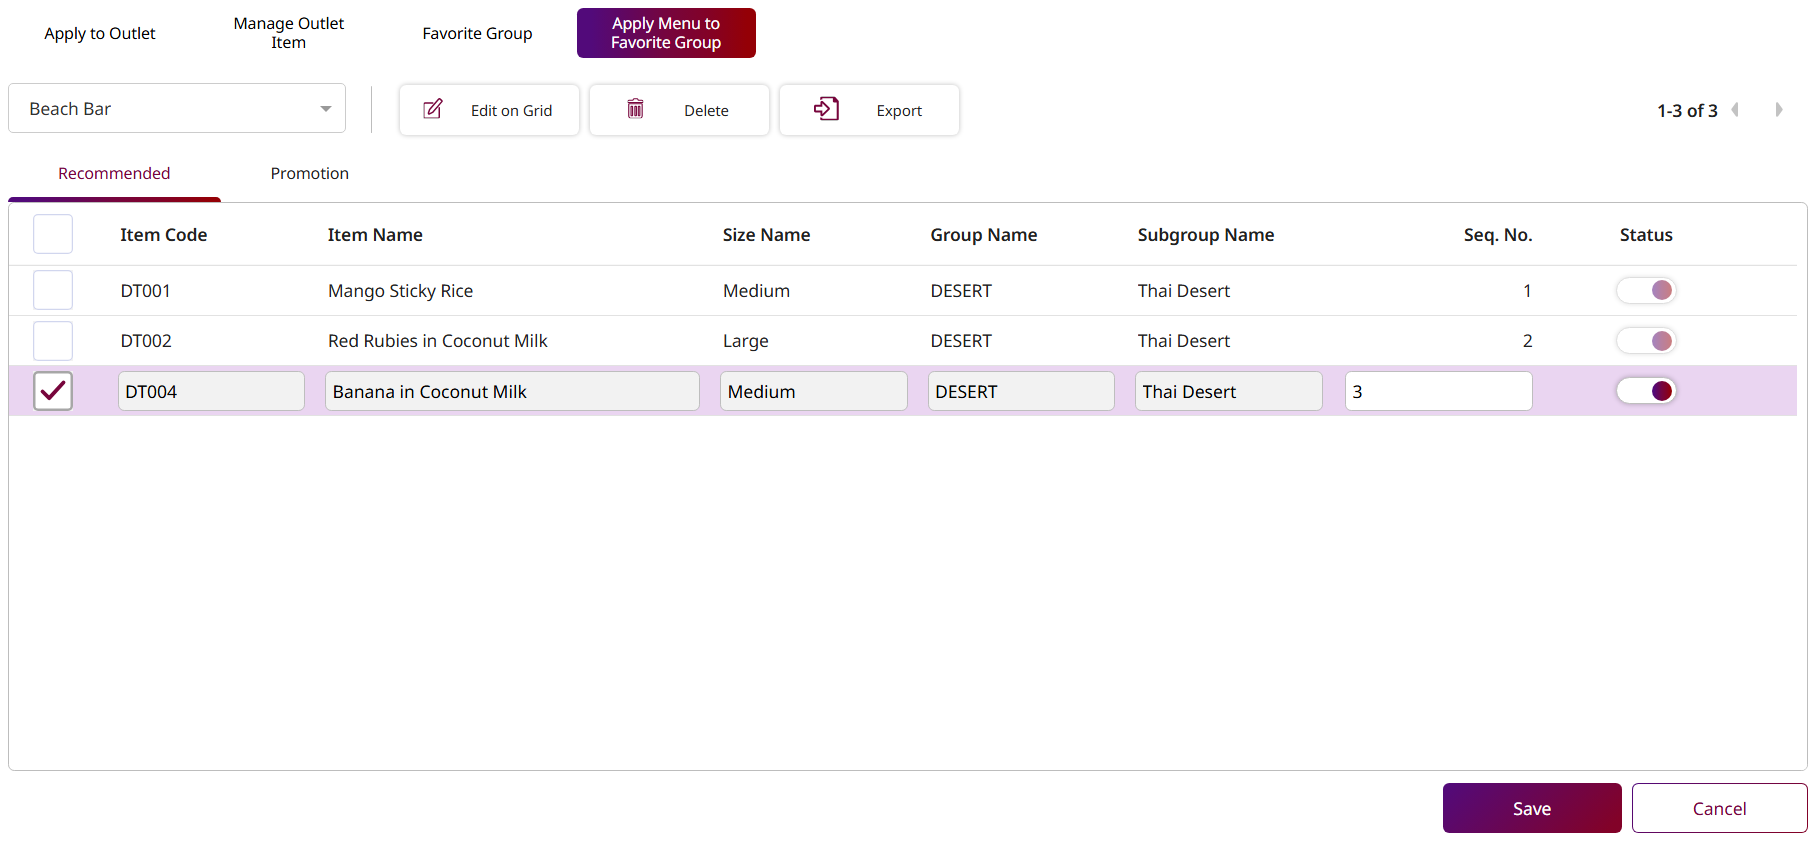
Note: When adding menu items to a Favorite Group, ensure the Status is enabled for the items to appear in the outlet’s favorite menu.
17. Import Data
Available under Menu Store > Import Data , this function allows staff to export a predefined template, populate it with additional or updated menu item data, and then import the completed file back into the system. This helps speed up bulk menu creation or editing without manually inputting each item one by one.
To perform the task:
- Press Export Template , the system will automatically download an Excel (.xlsx) template file.
- Enter your data into the template and save the file to your computer.
- Select a value from the dropdown list.
- Press Import Data , then browse and select the saved Excel file.
- After importing, you can review or edit the data directly in the table.
- Press Save to confirm and add the data.
- Press Cancel to discard any changes.
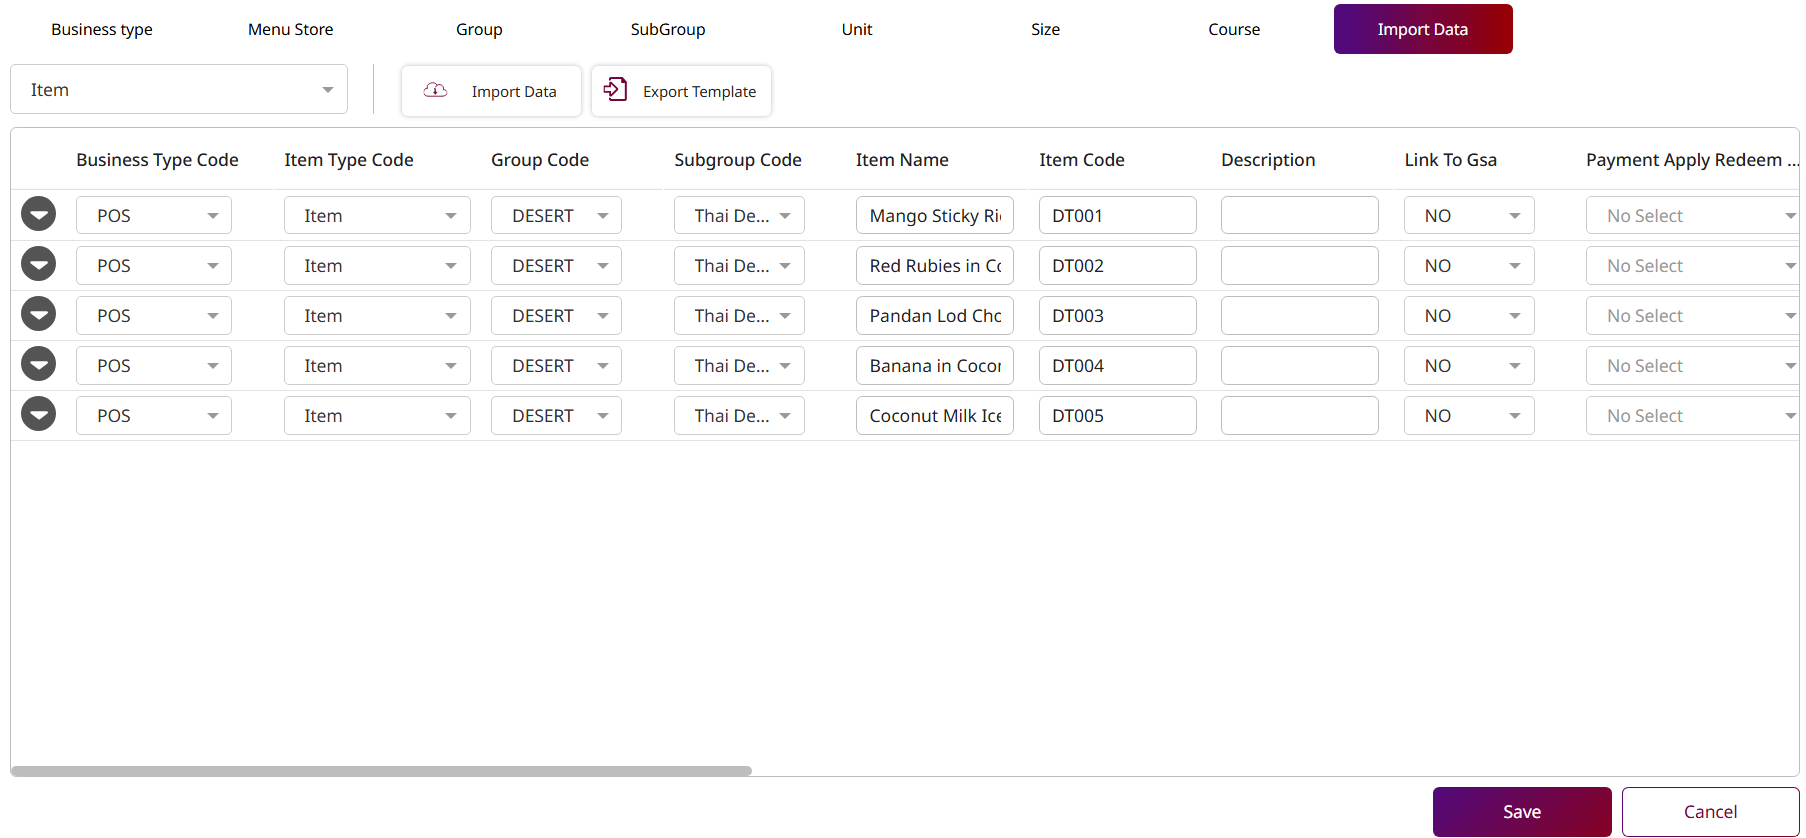
Note: If the imported data from the template already exists in the system, a duplicate warning will appear. Only non-duplicate records will be saved, while existing duplicates will be ignored.