POS- Outlet & Table User Guide
1. Overview
This section guides users to create and manage outlets in the POS system. It includes steps for logging in, selecting the POS unit, and configuring outlet information such as name, shift, and operating preferences.
2. Outlet
The Outlet menu lets users create and manage sales points within the POS system. It covers adding new outlets, editing existing ones, duplicating configurations, and deleting outlets no longer needed. Users set core details—such as outlet name, booking mode, and service times (via Shifts)—to match real-world operations.
2.1 New an outlet
Creates a brand-new outlet by capturing basic information (name, booking mode, service hours) and linking it to the appropriate shift schedule, ensuring the outlet is ready for use in the POS.
To perform the task
- Log in with email and password
- Select business unit “POS”
- Select “Outlet & Table”
- Click the “Outlet” button
- Click the “New” button
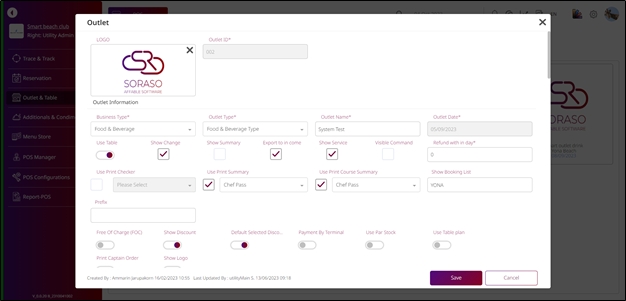
- Enter outlet information
- Select “Book by hours” (if applicable)
- Click “Select Shift” to set start and end time
- Select a shift and click “Select” or “Cancel”
- Click “Save” or “Cancel” to finish the setup
Note: Ensure the outlet name and shift time do not overlap with existing settings. Conflicting schedules may cause booking errors or operational inconsistencies.
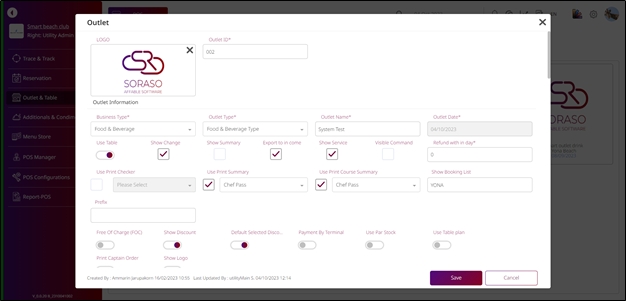
2.2 Edit or manage an existing outlet
Allows staff to update any existing outlet’s details—name, booking settings, or other attributes—so the POS always reflects the latest operational requirements.
To perform the task
- Click “Outlet”
- Click “Edit” to modify outlet
- Update desired information
- Click “Save” or “Cancel” to complete editing
Note: Editing a live outlet may affect ongoing operations. It is recommended to perform updates during non- peak hours and verify changes immediately after saving.
2.3 Duplicate an outlet
Copies an existing outlet’s configuration to quickly spin up a new outlet with identical settings, saving time when multiple branches share similar setups.
To perform the task
- Click “Duplicate”
- Click “Save” or “Cancel” to finish duplicating
Note: After duplicating, make sure to update unique identifiers such as outlet name and shift to avoid confusion or duplication issues in reports and operations.
2.4 Delete an outlet
Removes an outlet that is no longer in service. A confirmation step prevents accidental deletion; note that deleting an outlet erases all related data unless previously backed up
To perform the task
- Click “Delete”
- Click “Delete” again to confirm or “Cancel” to abort
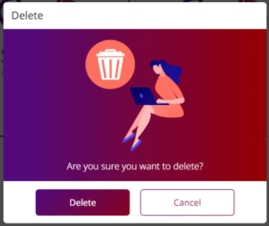
Note: Deleted outlets cannot be recovered unless backed up. Always verify dependencies—such as linked tables, zones, or transactions—before deletion.
3. Outlet Type
This section allows users to define and manage outlet types within the POS system. Each outlet type can have multi-language support and is used to categorize outlets for better configuration and reporting.
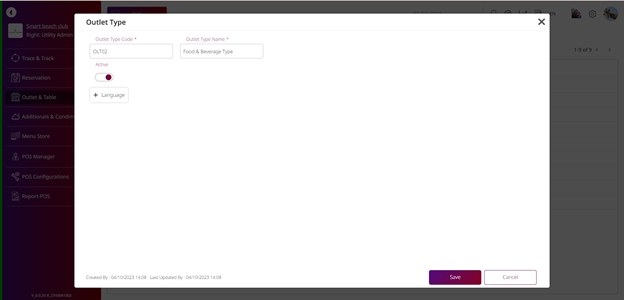
3.1 New outlet type
Creates a new outlet type by entering basic information and adding names in multiple languages. This helps classify outlets by type and supports international operations.
To perform the task
- Click the “Outlet Type” button
- Click “New” to create a new outlet type
- Enter outlet type information
- Click “Language” to add multiple languages
- Select desired language
- Enter outlet type name for each language
- Click “Delete” next to a language to remove it
- Click “Save” or “Cancel” to complete the process
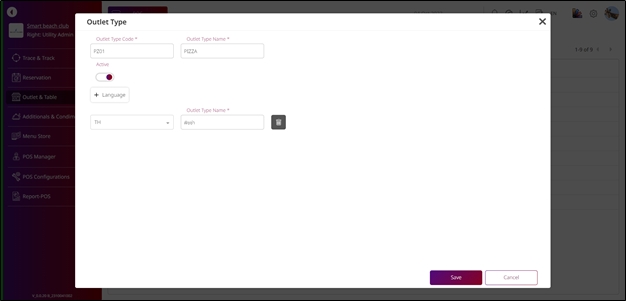
Note: When using multiple languages, ensure that each translation clearly represents the same outlet concept. Incomplete or inconsistent translations may confuse staff and affect reporting.
3.2 Edit or manage an existing outlet type
Allows staff to edit the outlet type’s name or settings. This ensures that existing outlet types stay aligned with operational changes.
To perform the task
- Click the outlet type code to edit
- Update the necessary fields
- Click “Save” or “Cancel” to confirm changes
Note: Changes to outlet type names will reflect across all linked outlets. Always review impacts before saving.
3.3 Delete an outlet type
Removes an unused outlet type from the system. Users must confirm deletion to prevent accidental removal.
To perform the task
- Select the outlet type
- Click “Delete”
- Click “Delete” again to confirm or “Cancel” to abort
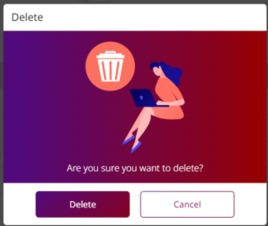
Note: Do not delete outlet types that are currently assigned to active outlets. This may disrupt configuration and create reporting errors.
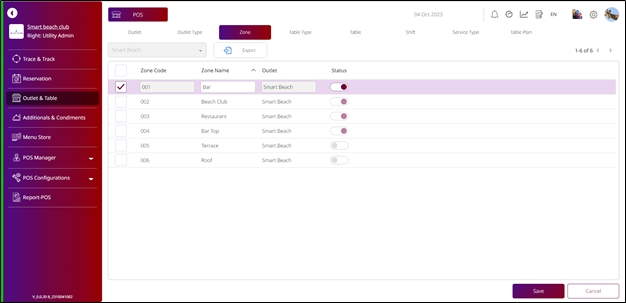
4. Zone
The Zone function helps organize seating or service areas within each outlet. It allows users to create, edit, or delete zones to support table planning and service efficiency in restaurants or cafes.
4.1 New a zone
Allows users to create a new zone under a specific outlet by entering zone details such as name or description. Zones are essential for organizing tables logically within the POS layout.
To perform the task
- Click the “Zone” button
- Select the desired outlet
- Click “New” to create a new zone
- Enter zone information such as name or description
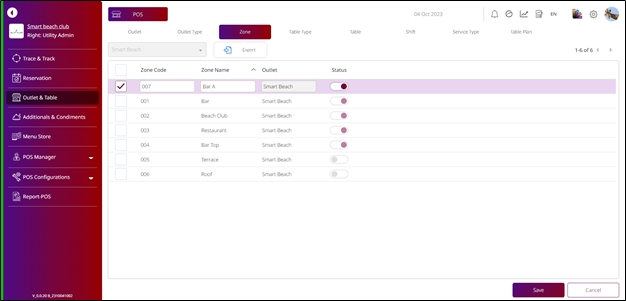
Note: Be sure to use consistent naming conventions across outlets for clarity. Each zone must be linked to a selected outlet before it can be used in table configuration.
4.2 Edit a zone
Enables users to update existing zone details such as name or description. This is useful when reorganizing seating plans or renaming areas for operational clarity.
To perform the task
- Click “Save” or “Cancel” to complete the creation
- Select the zone to edit
- Click “Edit on grid”
- Update zone information as needed
- Click “Save” or “Cancel” to confirm changes
Note: Changes to zone information will reflect across table plans. Always review layout dependencies before editing zones in active use.
4.3 Delete a zone
Removes a zone that is no longer needed. Deletion requires user confirmation to prevent accidental loss.
To perform the task
- Select the zone to delete
- Click “Delete”
- Click “Delete” again to confirm or “Cancel” to abort
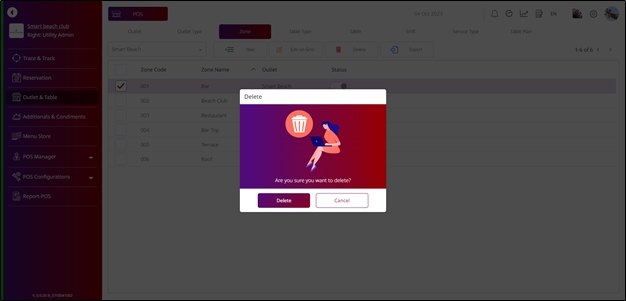
Note: Do not delete zones that have tables assigned to them. Reassign or remove those tables first to avoid orphaned data or layout issues.
5. Table Type
The Table Type feature allows users to define different categories of tables (e.g., standard, VIP, outdoor) to suit various service setups. Each type helps in identifying table characteristics and improving service assignment.
5.1 New Table Type
Used to create a new table type by entering descriptive details. Table types are useful for managing seating plans and defining how specific tables are used in the POS system.
To perform the task
- Click the “Table Type” button
- Click “New” to create a new table type
- Enter table type information
- Click “Save” or “Cancel” to complete the process
- Select the desired table type
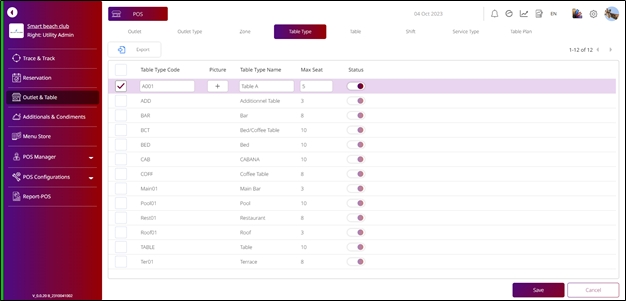
Note: Be consistent when naming table types across outlets. A clear naming convention makes it easier for staff to assign or identify table types accurately during service.
5.2 Edit a table type
Allows users to update the details of an existing table type, such as its name or characteristics, to reflect operational changes.
To perform the task
- Click “Edit on grid”
- Modify the table type details
- Click “Save” or “Cancel” to confirm changes
- Select the table type
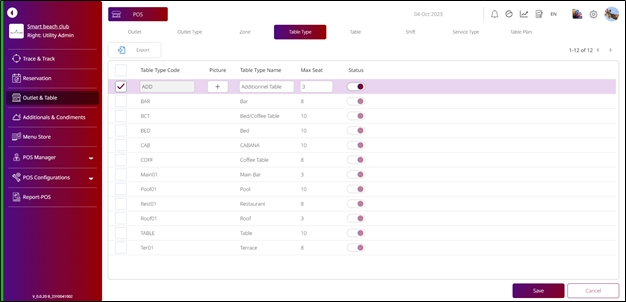
Note: Changes to a table type affect all tables currently assigned to it. Confirm that the update won’t interfere with reporting or floor plans.
5.3 Delete an outlet type
Removes a table type that is no longer needed. The system will request confirmation before deleting.
To perform the task
- Click “Delete”
- Click “Delete” again to confirm or “Cancel” to abort
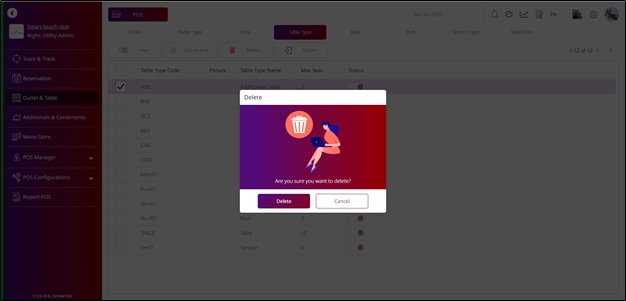
Note: Do not delete table types that are still in use. Reassign or remove associated tables first to prevent layout and service errors.
6. Table
This section allows users to create and manage tables assigned to each outlet and zone. It supports configuration of table properties such as name, size, and zone assignment, which are essential for reservations and service operations.
6.1 New a Table
Used to add a new table by specifying its name, capacity, type, and assigning it to the correct outlet and Zone
To perform the task
- Click the “Table” button
- Select the desired outlet
- Click “New” to create a new table
- Enter table information such as name, capacity, and type
- Click “Save” or “Cancel” to complete the creation
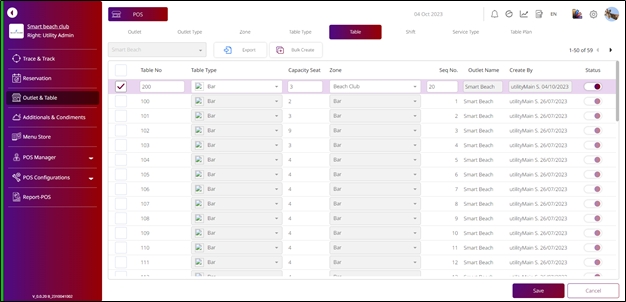
Note: Make sure that the table name is unique within each outlet. Proper zone assignment is required to display the table correctly in the layout and booking views.
6.2 Edit a Table
Allows users to modify existing table details, such as name, type, or seating capacity, to reflect changes in layout or operations.
- Select the table to edit
- Click “Edit on grid”
- Update table information as needed
- Click “Save” or “Cancel” to confirm changes
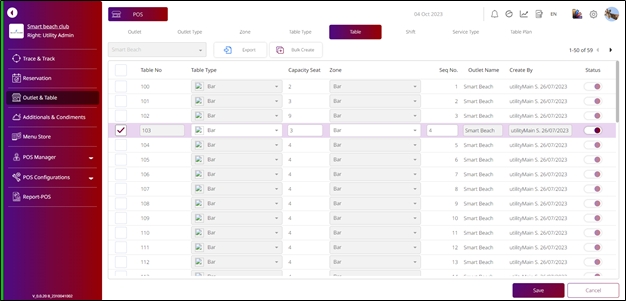
Note: Changes will apply to all linked services or reservations. It is recommended to avoid edits during peak Service Type
6.3 Delete a Table
Removes a table from the system when no longer in use. Deletion requires confirmation to prevent accidental data loss.
To perform the task
- Select the table to delete
- Click “Delete”
- Click “Delete” again to confirm or “Cancel” to abort
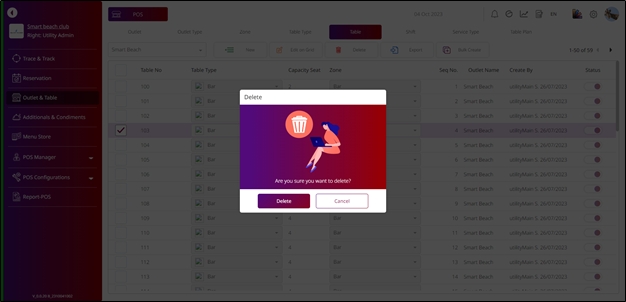
Note: Ensure the table is not assigned to active reservations or included in current layouts before deleting. Unused tables can also be deactivated instead of deleted.
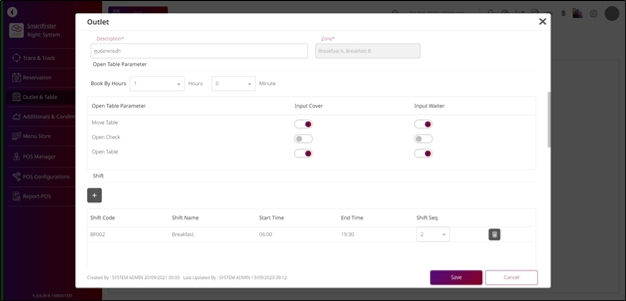
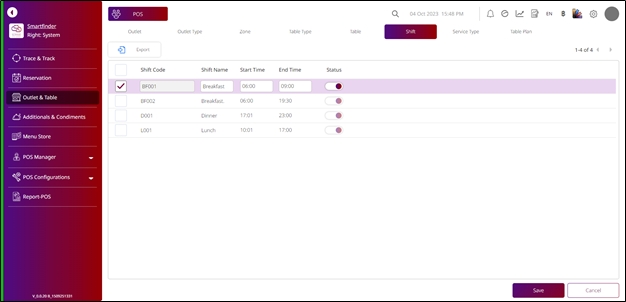
7. Shift
The Shift function is used to define service time intervals for each outlet, such as breakfast, lunch, or dinner shifts. Shifts help control booking time slots and manage service availability throughout the day.
7.1 New a shift
Used to create a new shift by entering key details like name, start time, and end time. This enables the system to organize service periods and support time-based operations.
To perform the task
- Click the “Shift” button
- Click “New” to create a new shift
- Enter shift information (e.g., shift name, start time, end time)
- Click “Save” or “Cancel” to complete the creation

Note: Avoid overlapping shifts within the same outlet. Overlapping times may cause double bookings or unexpected scheduling issues.
7.2 Edit a shift
Allows users to modify shift details, such as timing or name, to reflect changes in service schedule or operation hours.
To perform the task
- Select the shift to edit
- Click “Edit on grid”
- Update shift information as needed
- Click “Save” or “Cancel” to confirm changes
Note: Editing a shift affects all related bookings or configurations. Always notify staff of any timing changes to avoid confusion.
7.3 Delete a shift
Removes a shift no longer in use. The system asks for confirmation to prevent accidental deletion.
To perform the task
- Select the shift to delete
- Click “Delete”
- Click “Delete” again to confirm or “Cancel” to abort
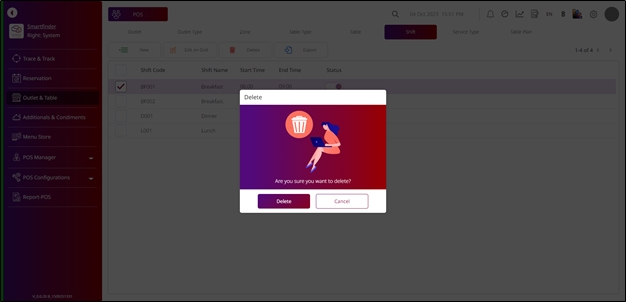
Note: Do not delete shifts that are currently linked to active outlets or bookings. Consider disabling or archiving instead.
8. Service Type
The Service Type function categorizes the types of services available within an outlet (e.g., dine-in, takeaway, delivery). This helps define how each table or order is handled within the POS system.
To perform the task
- Click the “Service Type” button
- Select the service type you want to edit
- Click “Edit on grid”
- Update service type information such as name or description
- Click “Save” or “Cancel” to complete the editing process
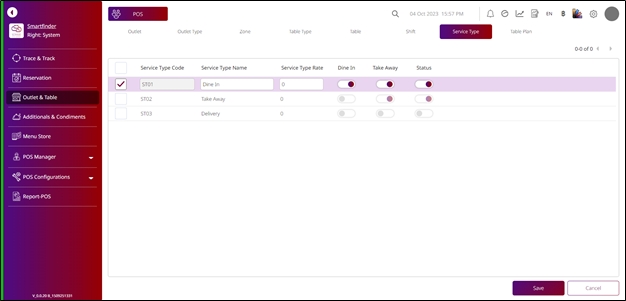
Note: Properly defined service types help staff differentiate between order methods and ensure the correct process is followed. Avoid changing the name of a service type that is actively in use unless necessary.
9. Table Plan
The Table Plan feature allows users to visually arrange tables within a defined area of an outlet and zone. It supports uploading background images, customizing table size and shape, and placing tables via drag-and- drop for an intuitive layout.
To perform the task
- Click the “Table Plan” button
- Select the desired outlet
- Select the corresponding zone
- Click the “Upload” button to upload a layout image
- Select and upload a picture file
- Enter the area width and area height for the layout
- Click “Table” to begin placing tables on the layout
- Enter table width, height, and border radius
- Click “Apply To All” to apply settings to all tables
- Drag and drop each table to the desired position
- Click “Save” to confirm the table plan layout
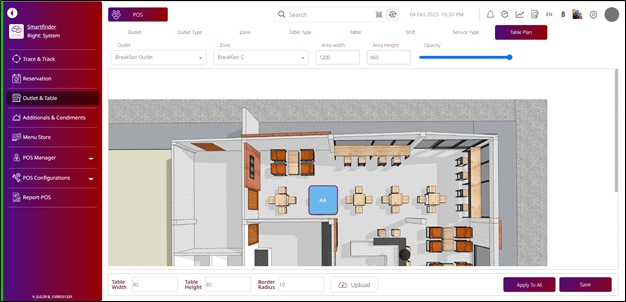
Note: Make sure that the background image matches the real outlet layout for accurate table positioning. Avoid overlapping tables or placing them outside the defined area. Saved plans will directly affect front-end table management views.